
 Home
HomeI have made a demo DVD of my trip in Japan, but do not have the source video, because the person who has filmed and edited the video has settled down in another country. So I only have the DVD format right now, but want to upload some of the DVD content to YouTube. It’s really a headache. I’ve been looking around the web to figure out the problem for a whole weekend, and tried out lots of DVD Rippers, but I was always disappointed with the result. The main problem seemed to be video and audio synchronizing. Fortunately, I finally came across Pavtube DVD Ripper on one of the Forums devoted to Burning. Because of its good output quality, I decided purchasing it. To be honest, I am very pleased with the application, it exceeds my expectations and I am very happy with it. It enables me to select specific scenes to convert to YouTube acceptable format without any audio and video out of sync issues. And I also like being able to alter the color and brightness and to deinterlace. Share the detailed steps in the following, and hope it is helpful. You can download Pavtube DVD Ripper for trial.
Before that, I would like to say some more about uploading videos to YouTube.
YouTube supported video formats:
.FLV, .MKV, .MOV, .WMV, .AVI, MPEG, .MP4, DivX, 3GP and .OGG
Optimized video settings recommended by YouTube while converting:
Video codec: MPEG-4, H.264, or MPEG-2
Audio codec: MP3 or AAC, 128k Mono or 320k Stereo
Resolution: Recommended:1280 x 720 (16:9 HD) and 640 x 480 (4:3 SD)
Frame rate: 30 frames per second
File size and length: Up to 2GB file size and 10 minutes duration
Here we go.
Step 1: Click "DVD Rom", "DVD Folder" or "IFO/ISO" to load DVD files
Step 2: Click the drop-down menu of "Format" to select a proper format for YouTube
According to the recommended optimal settings, I select "FLV H.264 (*.flv)" as output format. .FLV should be a much better choice than other formats, as long as you limit the bit rate in not more than 320 kbps. In that case, the generated .FLV files will not be converted for the second time by YouTube’s encoders while uploading, so that you can remain the original quality of .FLV video files as much as possible.
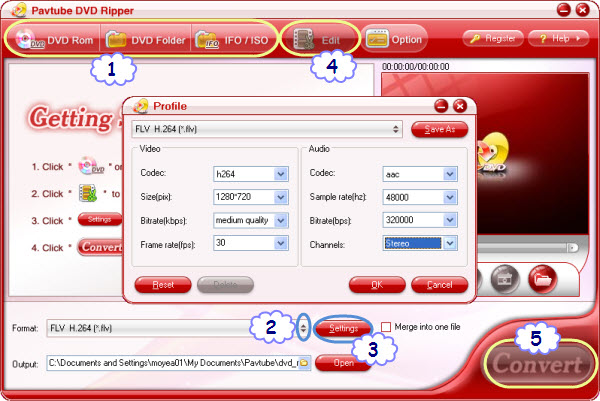
Step 3: Click "Settings" button to do optimized settings
I set it to the recommended optimized settings:
Video codec: h.264
Size: 1280*720
Bitrate: medium quality
Frame rate: 30fps
Audio codec: aac
Bitrate: 320kbps
Channel: Stereo
If you can't set the optimized settings accurately, try and match them as close as possible.
Step 4: Select specific duration and adjust contrast and brightness
Click on "Edit" button, and then you will enter the editor window, go to "trim" to specify your needed video clips. You can drag the slider bar under the preview window or insert the start and end time to the textboxes to specify a specific duration time of the video to do conversion.
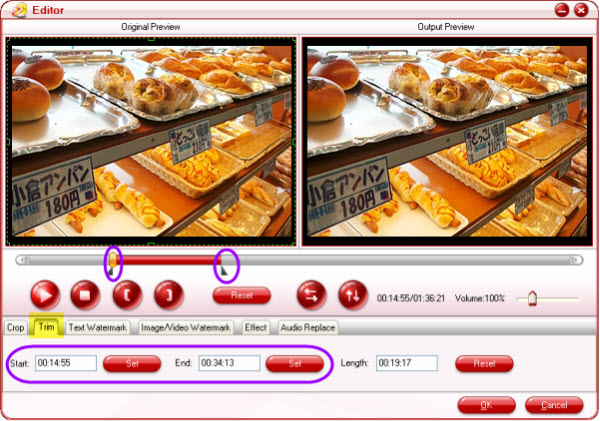
Click "Effect" icon, and you will be allowed to adjust brightness, contrast, and saturation by dragging the slider bars. Also, you can tick off the checkbox before "Deinterlacing" to remove interlacing lines.

Step 5: Click "Convert" button to start DVD ripping
The ripping window will show you clearly about the conversion info, especially, you can get an estimated output file size, so that you can see if the output file size is surpassing YouTube’s 2GB limitation. If it is, you can go back to re-trim the duration time, or reset the video and audio parameters to smaller figures, but the latter will sacrifice some quality of the file.
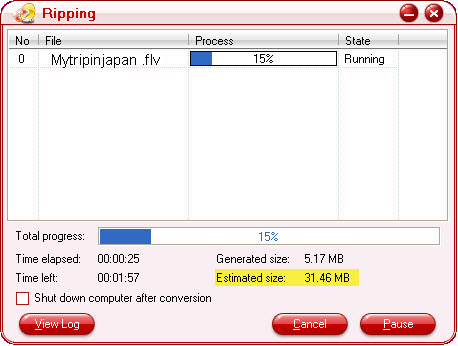
Once finished, you can get the output files via clicking on "Open" button, and now the file is ready to be uploaded to YouTube.
You can download trial version of Pavtube DVD Ripper from here. To get more information of this program, please visit Pavtube DVD Ripper.
 Free Trial DVD Ripper


