
 Home
HomeCanon always gives us surprises with its great and creative camera or camcorder products. Among all the products of Canon, the EOS C300 seems to be the most attractive one. The EOS C300 is a digital cinema camera announced on November 3, 2011. The camera is offered with the option of Canon EF or Arri PL mounts, and has been available in January 2012. It has been widely used in professional video shooting with its powerful 8.3mp 3840x2160 Super-35 CMOS sensor.
It is necessary for those camera operators to edit their video works in video editing tools like FCP X (Final Cut Pro X) on Mac computer before getting the satisfying videos they want. But sometimes you would meet some troubles during the editing process: you are not able to import the video files into FCP X. What is the mater? This passage will give you the correct explain to the problem and offer the best solution to come over it with ease.
Why video recordings from Canon EOS C300 can not be imported to FCP X? As we know that the EOS C300 shot videos in MXF video format which is a HD video format widely applied in many professional camcorders. The FCP X is announced to support many video formats including AVCHD (MTS/M2TS), MOV, MP4, etc. However, the MXF video format is not included, as a result of which, we can not directly load Canon C300 MXF recordings to FCP X for editing.


How to solve the problem and make FCP X support Canon C300 MXF videos for editing?
As the MXF videos are not compatible with FCP X, you need to convert Canon C300 MXF to FCP X compatible format if you want edit Canon C300 MXF video on FCP X. Here we strongly recommend Pavtube Video Converter for Mac to help you as the best MXF to FCP X converter on Mac.
With this useful Canon C300 MXF Mac video converter, you can easily convert MXF to ProRes video for FCP X on Mac and get the ProRes MOV videos for FCP X editing with just simple steps. Below are detail guide for you to encode MXF to ProRes for FCP X on Mac.
Step 1: Copy MXF recordings to Mac and import them to Pavtube Video Converter for Mac.
Connect your Canon C300 to Mac and copy the MXF video footages to Mac hard drive. Then launch the Pavtube MXF to FCP X converter on Mac and click the Add video button or Add from folder icon to import the MXF source files to the program.

Step 2: Choose output format.
Click the format bar and choose "Final Cut Pro">"Apple ProRes 422 (*.mov)" as the output format for FCP X editing.

Tips:
If you don't care about the output file size , just want to keep the high quality of your converted files, you can choose "Apple ProRes 422 HQ (*.mov)" as your output format. (Differences among Apple ProRes codec)
Step 3: Start to convert Canon C300 MXF to ProRes MOV for FCP X on Mac.
After choosing the output format, you just need click the convert button to start converting Canon C300 MXF to ProRes MOV for FCP X on Mac.
After the short time conversion, you can get the ProRes MOV videos and directly import them to FCP X for editing.
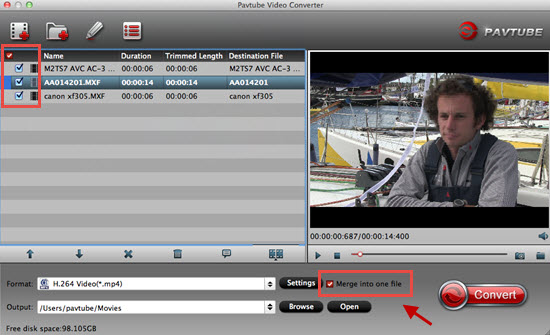
Combine files into one:
If you have a plenty of MXF videos and want to merge them into one , then you can select all the files you want. Click "Merge into one file" to start your conversion.
Tips:
To learn more conversion solutions for Canon MXF clips captured on XF Series Camcorders (XF100, XF105, XF300, and XF305) or a C300 Cinema camera, please refer to Pavtube's Canon Column page. And this Mac version can run on Yosemite without any problem.
How to transfer files into FCP X can be learned here.
 Free Trial Video Converter for Mac

Useful Tips
- Best Workflow of Canon 5D Mark IV 4K MOV with FCP X
- Canon MXF to Sony Vegas Converter-Edit MXF in Sony Vegas
- Convert Canon XF305 MXF Footage to VOB Format for Playing on TV
- How to import Canon MXF Video to Cyberlink PowerDirector for Editing?
- Convert Canon 60D MOV to 1080p AVI/WMV for Editing and Playback
- How to Convert Canon EOS 550D T2i Video to FCP Friendly Format?


