
 Home
HomeP2 camera-recorders like Panasonic AJ-HPX3700 record AV data as MXF (Material Exchanged File) files with metadata. It can record the metadata onto the clips scene by scene when it loaded from SD/ SDHC card containing the shooting information. This is very convenient for videographers and TV broadcasting makers to edit the MXF footage in professional editing software (e.g. Adobe Premiere CS5). The non-linear editing system supporting P2 can instantly start editing by mounting the P2 cards and can edit the clips in the P2 cards directly. However, the MXF files are not so well-suited when you feel like backing them up to PC or hard drive. As we all know, the P2 MXF format means high quality and huge file size. When recording in AVC-Intra 100 mode, a 64GB P2 card can be filled up in 64 minutes. It takes long time to copy the HD MXF files, and astonishing space to save them. This guide provides you solution for this issue: converting AJ-HPX3700 HD MXF to MPEG files and cut the file size down.
Software you'll need: Pavtube MXF Converter trial (Please note that the trial version generates videos with a watermark in the middle of screen)
Step 1. Import P2 MXF to the powerful MXF Converter.
Run the MXF Converter, click “Add video” or “Add from folder” button to load the MXF files you’d like to convert. When the MXF footages are loaded to the program, you can view the videos from the Preview window. Simply select an item and click the “Play” button. When the video is playing, you may take snapshot when it plays to your favorable frame. Simply click the “Snapshoot” button.
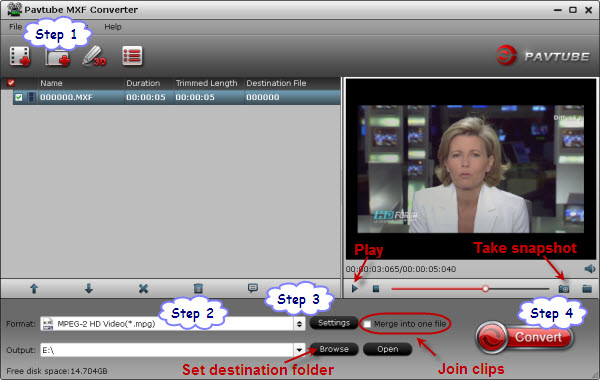
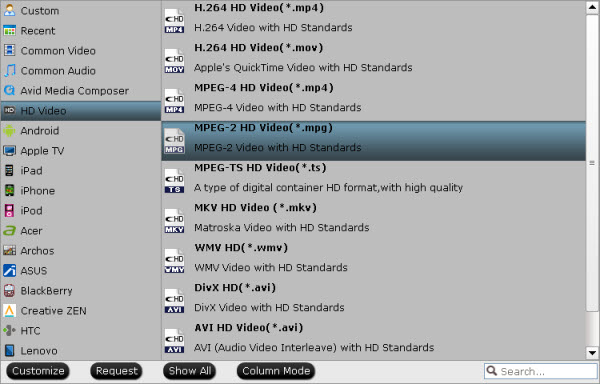
Step 2. Select output format
The MXF Converter is capable of converting MXF files to various HD and SD video formats. For converting MXF video to MPEG, you just need to click on the “Format” bar and select desired MPEG format from the profile list. In the tab of “Common Video”, MPEG-1 and MPEG-2 encoded SD formats are available. If you’d like to remain HD video quality, please find MPEG-2 and MPEG-4 encoded HD MPG, TS and MP4 format in “HD Video”.
Do not forget to specify a folder to save the converted MPEG files. Simply click the small folder icon next to “Output” field and specify an output folder to save converted files. And make sure there is enough space for saving the output files.
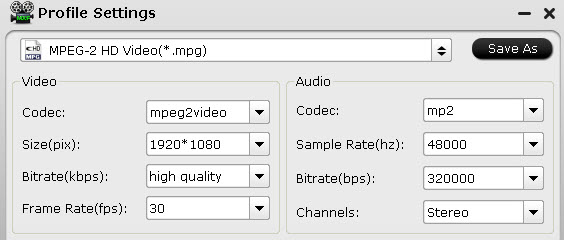
Step 3. Further customize the output format.
Simply click “Settings” button to and set the bit rate, frame rate, channels, sampling rate to desired values. It seems to be complicated, but it is not. What you are doing is down-scaling the MXF files, and the trick lies in video and audio bit rate. The video bit rate of P2 MXF can be up to 100mbps! That’s extremely high! Video bit rate of a commercial Blu-ray movie clip is around 30mbps. And standard DVD? 5-10mbps. The MXF clip I used for conversion is 148M, 21’ in length, and its video bit rate is 5, 760kbps. When I convert it to MPEG-2 HD Video (*.mpg), and set “high quality”(18,000kbps) as video bit rate, the file size is down to 47M. The video quality I get will be better than a commercial DVD but not good enough for burning Blu-ray disc. In one word, the lower bit rate you set the smaller file size you get.
Step 4. Start converting down MXF to MPEG.
When ready, click “Convert” to start converting MXF to MPEG formats (*.mpg, *.mp4, *.ts etc). The P2 MXF Converter supports batch conversion so you may load multiple MXF files and convert MXF files to MPEG at one time. You may also merge them to one file by checking the box “Merge into one file” before conversion starts. After conversion you may click “Open” button to find generated MPEG files and use them freely.
 Free Trial MXF Converter

Useful Tips
- How to Convert MXF to ProRes, AIC MOV for Loading into FCP and iMovie?
- Transfer Canon C300 MXF to FCP/Quicktime for editing on Mac
- Canon MXF file to iMovie importing issues on Mac
- How to Transcode MXF to AVI Easily and without Quality Drop ?
- Convert Panasonic P2 footage for importing to Davinci Resolve
- Fail to Import MXF Files into Premiere Pro CC 2015, Solved!


