
 Home
HomeIf you have shot hours of footage on a Sony HD recording camera or JVC Everio, things might be not so easy for you to get the MTS files imported into Mac non-linear editing software like FCP and iMovie, even though on paper it should. I believe most guys that shoot AVCHD footage would like to do sort of editing work and make the MTS footage into short film, just like me. So, is there any way to transfer the MTS footage into FCP compatible file? Here I would recommend you Pavtube MTS/ M2TS Converter for Mac, which will convert MTS to MOV and other QuickTime container formats that are accepted by Final Cut Pro. The app works well on Mac OS X and handles TS, TP, M2TS, M2T format as well. The following guide tells you how to convert MTS file to MOV format for edit in FCP step by step. You may download the trial version of the Mac MTS to MOV Converter. There is no restriction for trial version, only a Pavtube Logo will be put on converted videl. Just try it out.
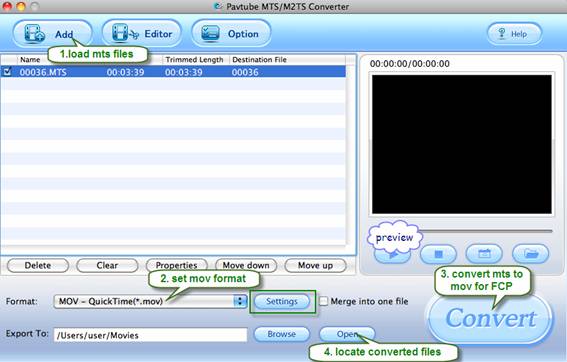
Step 1. Load MTS file.
Copy your MTS footages to Mac, install and run MTS/ M2TS Converter. Click on “Add” to import source files, browse to the drive and click “Choose”. You do not have to open the any of the folders. In preview window you could view the video and take snapshots. When the box of Merge into one is checked, all selected videos will be combined together as one output file after conversion.
You can click “Edit” button to perform edit functions such as crop, trim, flip, effect, watermark and audio replace. To eliminate interlacing effect, simply check Deinterlacing box under Effect tab.

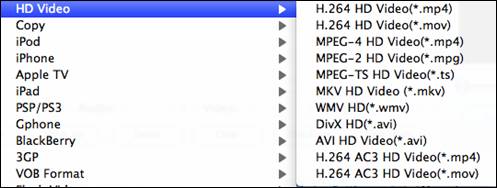
Step 2: Set MOV as output format.
Click on “Format” bar when you’d like to specify an output format. MOV formats can be found in common video, HD Video, and FCP/ Sony Vegas groups. Belows shows the H.264 HD MOV format under the tab of "HD Video".
Click “Settings” if you want to further customize video and audio parameters such as video codec, audio codec, frame rate, bit rate, video size, audio channels etc. Do not forget to click on “OK” to confirm your settings. In Export to box you could specify destination for the converted file.
Step 3: Start converting MTS to MOV for FCP.
Click on “Convert” button to start Conversion. The converter will generate MOV file with admirable video quality. The MTS files are HD video with huge file size, so the conversion of MTS to MOV may cost lots of time. You can set auto shutdown before conversion starts. Simply click on the “Option” menu and check the box of “Shut down computer after conversion”.
Step 4. Import converted video to FCP for editing.
After conversion you can click the “Open” button to locate converted files and load the MOV files to FCP. Now you are able to edit the MTS footage in FCP freely. You may also convert MTS to M4V, AVI, MPEG, etc for FCP editing too.
 Free Trial MTS/M2TS Converter for Mac

Useful Tips
- How to convert AVCHD MTS/M2TS to MKV?
- Convert AVCHD (MTS/M2TS) Videos for Playing on iPhone
- Convert AVCHD/AVCHD Lite Footage to Apple ProRes 422 Encoded Files for Final Cut Pro
- Sony M2TS to Windows Movie Maker Converter
- Canon Vixia MTS to Windows Movie Maker Converter
- Convert 1080p MTS Videos to Windows Movie Maker


