
 Home
HomeMany Youtube content creators think that captioning their videos is enough to attract a wider audience. But is it really true? The truth is that a lot of users are non-native English speakers, and captions might not be enough to help with the comprehension. But having subtitles in your YouTube videos actually helps you more than you may think. In fact, subtitles are traditionally used for viewers that are deaf, hard of hearing, or who speak other languages. One of the major benefits of YouTube subtitles is that they act as metadata, which increases your views significantly. Next, we introduce you two easy methods to put subtitles on YouTube videos.
Method 1: Add Subtitles to YouTube Video on YouTube Video Editing Interface
Here are the steps you need to follow to add subtitles on YouTube video editing interface:
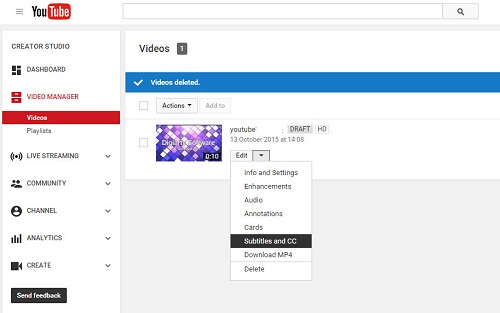
1. Go to the YouTube Video Manager
2. Find the video you want to add subtitles to, click the drop-down menu next to the Edit button
3. Click Subtitles and CC
4. Hit "Upload a file" and click "Browse" to choose your downloaded subtitle file (.srt, .ssa, .txt, etc). If you are uploading a transcript (with no time syncing), select Transcript, otherwise, select Subtitle file.
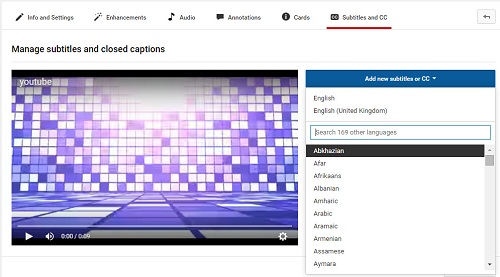
5. Choose the appropriate language. You may also enter a track name here. Last, click "Upload file".
Method 2: Add Subtitles to YouTube Video with the Aid of Subtitle Editor
In fact, many users have encountered YouTube subtitle adding problems. No matter for YouTube newbie or advanced users, you are not suggested to spend much time and energy on resolving such kind of complex issue. And honestly, you can turn to the functional video editing tool like Pavtube Video Converter. This best subtitle editor tool can help you easily add external SRT/ AAS/ASS subtitles to YouTube MP4, MOV, FLV, 3GP, AVI, MKV, SWF and more with high quality.
Besides adding subtitles to YouTube video, you can also use the program to remove subtitles from any video files, trim video length to remove unwanted parts or segments, split large video into small parts or segments, merge separate videos into one, crop video to remove black bars or unwanted area, replace/remove audio in video, adding video/image/transparent text watermark or apply special rendering effect to video files, etc.
For Mac users, please turn to download Pavtube Video Converter for Mac to insert external subtitles to YouTube video on macOS High Sierra, macOS Sierra, Mac OS X El Capitan, etc.


How to Add Subtitles to YouTube Videos with the Best-ever Subtitle Adding Software
Step 1: Import video file
Run the program, on the main interface, click "File" > "Add Video/Audio" to import the video file that you want to add subtitle to. Or simply drag and drop the file into the software.

Step 2: Choose output file format.
To avoid YouTube uploading problems, just choose YouTube best compatible uploading format from "Common Video" > "H.264 High Profile Video(*.mp4)".

Tip: Click "Settings" to open the "Profile Settings" window, here you can adjust the output video codec, resolution, bit rate, frame rate and audio codec, bit rate, sample rate and channels to let them fit them YouTube.
Step 3: Add external subtitles to YouTube video
Select an item on the main interface to activate the "Video Editor" function, in the opended video editor window, click the "Subtitle" tab, check the "Enable" box, then click the "Browser" icon to import and add online downloaded SRT/ASS/SSA subtitles to your source video.

Step 4: Start the subtitle adding process.
Go back to the main UI and click "Convert" to start inserting SRT/ASS/SSA subtitles to your source videos with no quality loss.
Read More: 5 Reasons to add Subtitles to your YouTube Videos
1. Search Engine Optimization (aka SEO)
Subtitles make your YouTube videos text searchable and thus search engine friendly. You benefit because your video is ranked higher by Google. End result, you get more views, hits and traffic to your website. Captioning your YouTube videos is a killer SEO secret that your competitors probably don’t know about. That’s what sets you apart.
2. Viewer Flexibility
Your viewers maybe in an environment where access to audio is limited or impossible, captioning or subtitling your YouTube videos allows them to enjoy it whether they are in a noisy bus, library or in a concert.
3. Improved Accessibility
Subtitles improve the accessibility of your YouTube video and help your message reach a larger audience. Deaf and hearing impaired individuals enjoy greater access to the information in your video.
4. Improved Comprehension
350 million people speak English as their first language worldwide. 1.4 billion people speak English as their second, third, and fourth language. Do the math. Captioning your YouTube videos improves comprehension and retention of your message for all of your viewers.
5. Google Factor
This is an often overlooked factor; but think about it for a minute. If you’ve not uploaded captions for your YouTube videos, Google uses the automatic-machine subtitles to index your video. We all know that those subtitless should not be used for anything else other than amusement. When Google uses them to index your video, there is going to be a mismatch between the content of your video and what search engines see as the content of your video. To avoid this, you need accurate captions of your video and you’ll be able to connect to your target audience.
 Free Trial Video Converter


