
 Home
HomeWhen it comes to editing video, you must be aware of the video resolution. Resolution or display resolution refers to the quantity of pixels each dimension can display. It is usually expressed as width × height, with the value given in pixels. In fact, it never means higher resolution gives people better experience. The factor that matters our decision for display resolution not only includes the device screen size but also the aspect ratio. For example, when you try to put a video with a resolution of 1280x720 into your iPhone 6 Plus featuring a 1920 x 1080 display, you'll find the video has black bars on its left and right side. Thus, we need a video resolution converter to change video resolution for better playback.
Common Types of Video Resolution
Before introducing the step-by-step guide to freely change video resolution for your video, let's go a step further and learn more about the common types of video resolution.
Video Resolution is mainly of those types:
1. 720p = 1280 x 720 - is usually known as HD or 'HD Ready' resolution
2. 1080p = 1920 x 1080 - is usually known as FHD or 'Full HD' resolution
3. 1440p = 2560 x 1440 - commonly known as QHD or Quad HD resolution, and typically seen on gaming monitors and on high-end smartphones. 1440p is four times the resolution of 720p HD or 'HD ready'.
4. 2160p = 3840 x 2160 - commonly known as 4K, UHD or Ultra HD resolution. It’s a very large display resolution and it’s found on high-end TVs and monitors. 2160p is called 4K because it offers four times the resolution of 1080p FHD or 'Full HD'.
5. 4320p = 7680 x 4320 - is known as 8K and it offers 16 times more pixels than the regular 1080p FHD or 'Full HD' resolution. Although you’re not going to see TVs or computer monitors with this resolution too soon, you can test whether your computer can render such a large amount of data.
How to Change Video Resolution without Sacrificing Quality?
Since there are many circumstances when you will need to increase or decrease the video resolution, a video resolution converter is essential. There are number of video resolution converters you can download online. Choose one trusted and download it. Then, install this software. There are some points that you should keep in mind while selecting any converter. First point is compatibility; make sure that the converter is compatible with the OS of your system. Secondly, check if the converter can support the latest technologies of video processing. If it does, then the video resolution conversion will not only be efficient and but will also be quick.
Here you can rely on a video resolution converter such as Pavtube Video Converter (Get Mac Version). It supports the most popular video/audio formats and offers ready-made presets for even the newest mobile devices. As a video resolution converter, this software allows you to adjust the video resolution from 3840x2160 to 1920x1080, 1280x720 to 640x480, 1280x720 to 720×480, 1920x1080 to 640x480, etc. Moreover, it also can be used as a frame rate converter, aspect ratio converter, video trimmer, etc.
Now click the appropriate button below to get the version of the program for Windows or Mac and check out this brief step-by-step guide to learn how to change resolution for video files.


Steps to Change Video Resolution with Pavtube Video Converter
Step 1: Add video to the video resolution converter
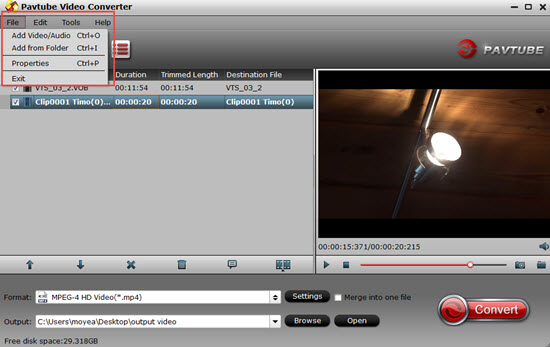
Run Pavtube Video Converter and click "File">" Add Video/Audio" or "Add from folder" in the upper left corner of the program interface. Batch converting is supported.
Step 2: Pick up the desired format for you video
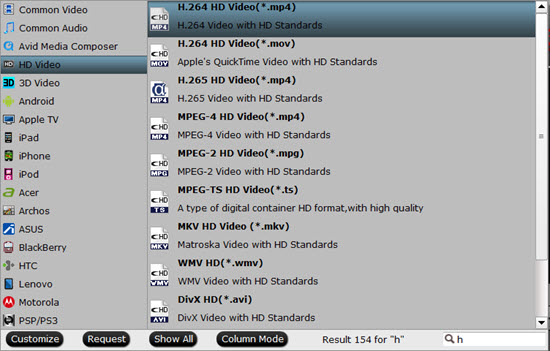
Click the format bar on the main interface to choose an output video format you want. A wide range of formats are available for you. Feel free to convert your source video to AVI, MKV, MP4, WMV, etc. You can also directly choose the specific device profile and never mind the video resolution as the profile offers the best video resolution, codec, bit rate, etc that give you great viewing experience on that device.
Step 3: Specify Video Resolution
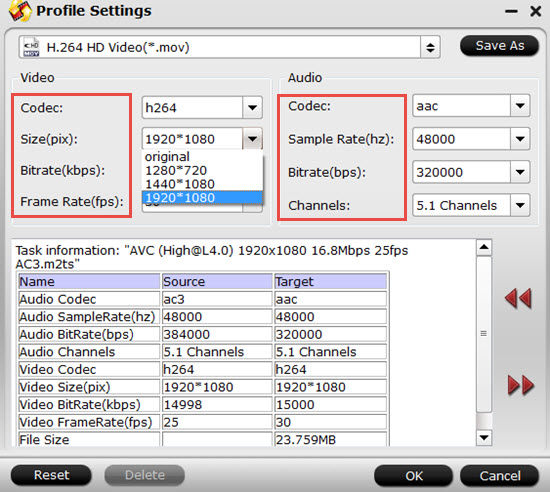
Click "Settings" button behind Format bar, to open "Profile Settings" window. Here, you are allowed to adjust various parameters like Resolution, Frame Rate, Bit Rate, etc.
Locate the "Size(pix)" drop-down list, simply choose the 1280x720 option. Certainly, you can also convert video resolution to 1920x1080p, 1440x1080p, etc based on your need.
Editor's Note: You can skip this step if you have already selected a device preset with a predefined resolution.
Step 4: Start changing video resolution
After all the settings are completed, just click "Convert" button and begin to change video resolution. It will take a few minutes to finish the task.
Editor's Note:
When you are doing the video resolution converting, you need to adjust the aspect ratio simultaneously, such as from 1280x720 to 640x480, the aspect ratio should be changed from 16:9 to 4:3. See how to Change Video Output Aspect Ratio.
 Free Trial Video Converter


