
 Home
HomeIf you have updated your PowerPoint to 2016, 2013 or 2010 version, you then have the opportunity to add a video file on your computer local hard drive to spruce up your PowerPoint Presentations. However, it may be a big challenge to insert video into Powerpoint if you are not familiar with the video embeding steps or not knowing what video formats can be added to PowerPoint. The following article will a offer a simple guide with the tips and solutions that you need to know about adding video to PowerPoint.
Add local video to PowerPoint
Tips: If your PowerPoint is not 2016, 2013 or 2010 version, you can make an Office updates through Windows Update server to install the latest PowerPoint. After the installation, following the steps below to embed video on local hard drive to PowerPoint.
1. Open the slide you want to add the video to.
You can embed the video on any slide in your presentation.
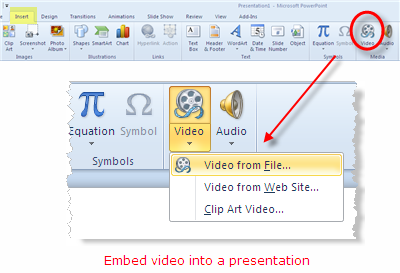
2. Click the "Insert" tab.
This will display the various Insert options.
3. Click the "Video" button in the "Media" section.
A small menu will appear.
4. Select "Video on My PC."
This will open the file browser. If you're using a Mac, select "Movie from File."
5. Find the video you want to add.
Use the file explorer to browse for the video file that you want to add. There are a few things to keep in mind when looking for your video file:
- Different versions of PowerPoint support different sets of video formats. 2016 supports the most types of files, including MP4 and MKV, while 2010 supports the least (just MPG, WMV, ASF, and AVI).
- Consider avoiding the AVI format, as these often require additional codecs that make playback difficult.
The following table lists the detailed video and audio formats supported in PowerPoint 2016, 2013, 2010.
Supported video file formats
|
File format |
Extension |
|
Windows Media file |
.asf |
|
Windows Video file (Some .avi files may require additional codecs) |
.avi |
|
MP4 Video file* |
.mp4, .m4v, .mov |
|
Movie file |
.mpg or .mpeg |
|
Adobe Flash Media** |
.swf |
|
Windows Media Video file |
.wmv |
*PowerPoint 2013 and later only.
**Adobe Flash isn't available in Office on a Windows RT PC.
Supported audio file formats
|
File format |
Extension |
|
AIFF Audio file |
.aiff |
|
AU Audio file |
.au |
|
MIDI file |
.mid or .midi |
|
MP3 Audio file |
.mp3 |
|
Advanced Audio Coding - MPEG-4 Audio file* |
.m4a, .mp4 |
|
Windows Audio file |
.wav |
|
Windows Media Audio file |
.wma |
Notes: Even though your audio or video file may have the same file extension as one listed above, it may not play correctly if the correct version of the codec is not installed, or if the file is not programmed in a format that is recognized by your version of Microsoft Windows. Mostly, successful media playback relies on PowerPoint having the correct file format splitter, video data decoder, and audio data decoder.
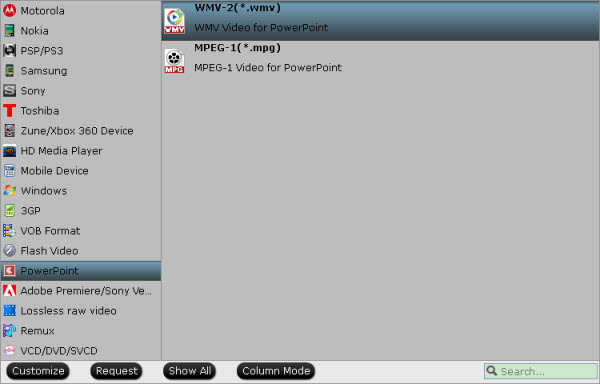
If you try to add an incompatible file format such as MP4, AVI, MXF, OGG, MOV, AVCHD, FLV, MXF, XAVC/XAVC S, VOB, etc to PowerPoint or fail to embed video into PowerPoint due to unapproiate video or audio codec, you can use Pavtube Video Converter (best video converter review ) to transcode any file format or codec to PowerPoint native optimized WMV-2 or MPEG-1 format. In addition, if your file size is too large, you can use the program's built-in video editor windows to reduce video file size without any quality loss by trimming or cutting unwanted parts or segments, crop video to remove unwanted area. Or personalize your video with video/mage/transparent text watermark, change video effect or apply special rendering effect.
For Mac users, please turn to Pavtube Video Converter for Mac to get PowerPoint best supported file formats on macOS Sierra.
Step by step to convert unsupported video for adding to PowerPoint
Step 1: Run the program, drag and drop unsupported video files into the program.
Step 2: Output PowerPoint preset "WMV-2" or "MPEG-1" format.
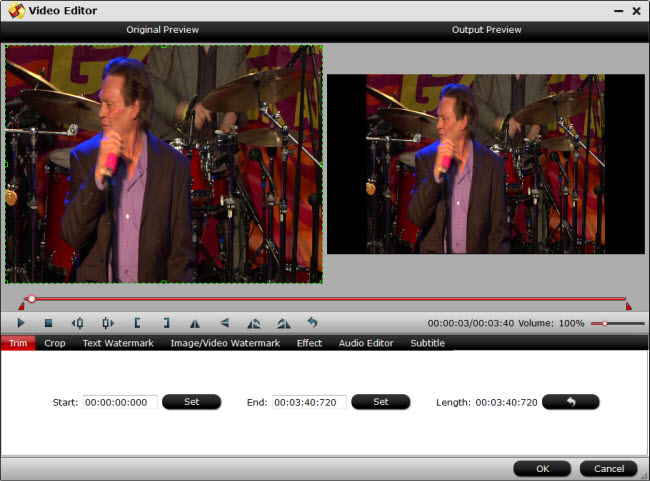
Step 3: Trim or crop video to reduce file size or length.
Open "Video Editor" window, click the "Trim" tab, drag the slider bar to set the start time and ending time. Go to the "Crop" tab, drag the dash line around the video frame to zoom in the video file size.
Step 4: Start video to PowerPoint best supported format conversion process.
6. Wait while the video is added to your presentation.
The time this takes will vary depending on the size of the video. The progress will be displayed at the bottom of the screen.
7. Click the "Playback" tab.
This will allow you to adjust playback settings for the video that you've added. If you don't see the tab, make sure the video has been selected.
8. Use the "Start" drop-down menu to select how the video will start playing.
By default, the video will need be clicked in order for the video to start playing. If you select "Automatically," the video will start as soon as the slide opens.
You can have the video loop or rewind automatically by checking the appropriate boxes.
9. Resize the video by dragging the corners.
You can make the video different sizes by dragging the corners. You can click and drag the video to reposition it on the slide.
10. Save your presentation with your embedded video.
Your video is embedded in the presentation, which includes the video inside of the PowerPoint file. You won't need to worry about sending the video along with the presentation, since it's packed into the presentation itself. This means that your presentation file size will increase to include the full video file.
- You don't need to do anything special to save the presentation with the embedded file. Just select "Save" from the File tab and save your presentation like you normally would.
 Free Trial Video Converter

Useful Tips
- How to Flip or Rotate Videos using Handbrake?
- Play Tivo Recordings with Windows Media Player
- How to Use VLC to Convert AVI to MP4 on PC/Mac?
- MOV Compressor: How to Compress MOV to a Smaller Size on Windows/Mac?
- Stream 4K Video to Chromecast Ultra via Plex
- Get Chromebook Pro/Plus to Play MKV Files without Any Problem


