
 Home
HomeThe future is Ultra HD, or 4K as it's known to its friends. Many multimedia devices and software have updated to support for 4K. The non-linear software, OpenShot, also released 2.2 version to support for 4K editing. OpenShot 2.2 opens with key enhancements to its performance, and the video editor now supports optimised editing of HD videos, including 4K. More importantly, editing HD video all the way up to 5K has been massively improved.
But when your OpenShot is a lower version or your computer is an old one that can't be able to handle 4K video, how can you edit your 4K footages in OpenShot? After all, many people with high end computers and OpenShot 2.2 still meet this kind of issues "OpenShot Crash with DJI Phantom drone 4k MP4s" and "DJI Phantom 4 Pro H.265 4K video crash with OpenShot". To edit 4K video with OpenShot smoothly without crash and choppy, we suggest you to compress 4K video to 1080p for OpenShot with a 4K compressor.
Best 4K Compressor for OpenShot
Pavtube Video Converter is a straight-forward and efficient software solution designed specifically as a means of shrinking movies in order to make them fit on removable media drives or prevent them from taking too much space on users' computers. It can compress video by downscaling video resolution, bitrate, frame rate, video codec and also can trim video, split video to reduce the movie size. It can compress H.265 4K video, H.264 4K video, VP8 4K video and VP9 4K video to 1080p MP4, MOV, AVI for OpenShot.
In order to compress a 4Kvideo for OpenShot, users will first need to load it into Video Compressor, which they can do in the classic way, by browsing for their file and selecting it to be processed or they can drag and drop the item onto the surface of the program's window. You can configure settings when it comes to video (frame rate, profile, codec, width and height) and audio (codec, bitrate, rate, sample frequency rate, channels, volume). With the built-in video editor, you also can trim or cut video to remove unwanted parts from DJI drone video, merge separate DJI video clips into one file, split large files into small parts by file size, count or length and more. If you are using a Mac, you should use the equivalent Pavtube Video Converter for mac.


Steps to Compress 4K Video to OpenShot
Step 1: Load4K files into the program.
Run the program on your computer click "File" > "Add Video/Audio" or "Add from folder" to add 4k footages such as DJI Phantom 4 PRO 4k files into the program. "Drag-and-Drop" and batch converison is supported here.

Step 2: Choose OpenShot supported Format
Click "Format" box and move mouse cursor to "Common Video" or "HD Video" category, simply select H.264 MP4 as the output format, which is supported by OpenShot.

Step 3: Compress 4K video to 1080p
Open "Profile Settings" window, click "Size(pix)" to select 1920*1080 as the final resolution for output video.
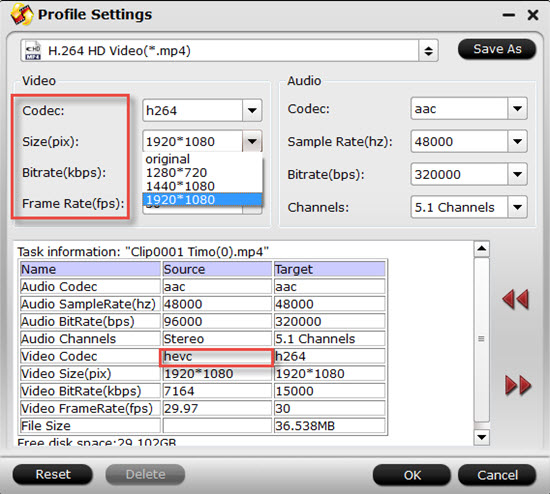
Tip: . Check an item to active the "Video Editor" function, then click the pencil like icon on the top tool bar to open the "Video Editor" window, you can trim video length, crop video black bars, add watermark, apply sepcial rendering effect, remove/replace audio in video, etc.
Step 3: Start 4k footages to OpenShot conversion
After all the settings, clicking the Convert button on main interface, you can go to Conversion window to start 4k footages to OpenShot conversion. Once the conversion is finished, you can click "Open Output Folder" button to get the output files effortlessly, and now you will have no problems to import and edit any videos files with OpenShot.
Import Converted 4K footages into OpenShot
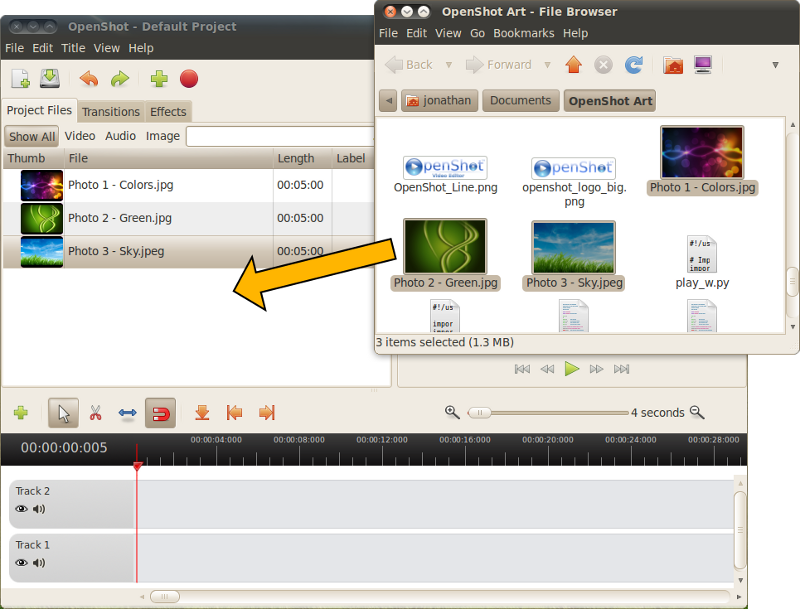
Before you can use a clip on the timeline, you must first import the clip into your project. There are a few different ways to import a clip. The most common way is to drag and drop files from your computer into the Project Files section of the screen.
There are 4 different methods to import a clip.
Method 1 - Drag & Drop
Run OpenShot
Drag and drop multiple files at once from your Desktop to the Project Files tree.
Method 2 - Drop Folder
Run OpenShot
Drag and drop a folder full of media files from your Desktop to the Project Files tree.
* All audio, video, and image files will be imported from this folder
Method 3 - Open With
While browsing files in Gnome, select 1 or more media files
Right click on the selected files, and choose Open With Other Application...
Choose OpenShot Video Editor (or the openshot command)
* Even after you start working in OpenShot with your files, you can still return to the file system, and right click on more files and choose OpenShot . It will add them to the currently running instance of OpenShot.
Method 4 - Import Button
Run OpenShot
Click the Import Files toolbar button
Select 1 or more files, and click Import
 Free Trial Video Converter


