
 Home
Home
While the nabi 2 Tablet provides the FoozKids Videos with access to an assortment of predefined and customizable kid-friendly YouTube videos; WiFi access is required. On a long road trip you can only count on Angry Birds to hold your child's attention for so long. Sure tethering the nabi Tablet to your smartphone may be an option, but unless you have an unlimited data plan, this could be expensive. So here is a guide to show you how you can enrich the Nabi movie library by converting your DVDs into mp4 format for the Nabi. I use this and my daughter loves it! I hope you find this guide useful.
Part 1. Rip DVD to nabi 2/nabi original supported MP4
1. Get a DVD ripper app that deals with purchased/protected DVDs. I tried several different rippers and find the Pavtube exports quality video with reasonable size. The app is available for Windows and Mac:
DVD Ripper for Windows | DVD Ripper for Mac
2. Insert a DVD to the computer optical drive (DVD-ROM).
3. Run the DVD Ripper, press the “disc” icon to import movie from DVD-ROM. If you have DVD digital backup saved as ISO or VIDEO_TS folder, you can also drag it to the app for conversion.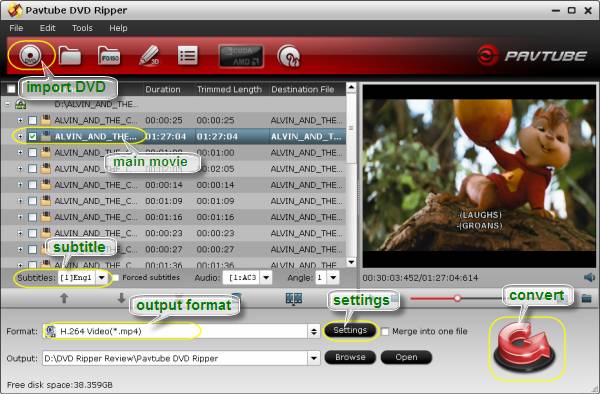
4. Pavtube DVD Ripper filters out trailers and extras, but sometimes special features are long enough to pass through. Make sure only the main movie (usually the longest one) is checked in the item list.
5. Select the main movie and set desired subtitles at the below of item list, if necessary.
6. Click on “Format” boarder, choose “Common Video >> H.264 Video (*.mp4)” as output format.
Tip: You can adjust output file size by setting video bitrate in Settings panel. Click “Settings” to enter the panel.
7. Press on the big Convert button and the DVD ripper will start converting DVD to MP4 H.264 format, which plays just fine on the Nabi 2 tablet.
8. When DVD to MP4 conversion completes, press “Open” to located generated MP4 movie.
Part 2. Transfer videos to nabi 2/nabi original tablet
How do I transfer videos between nabi and my Windows PC with a Micro USB cable? To transfer files between nabi and your Windows® PC, using a Micro USB cable, please follow these steps:
1. Plug the Micro USB cable from your computer to nabi.
2. A dialog box should appear asking you what you want to do with the new hardware. Select Open Device to View Files. If the box does not show up, you can go to Start Menu > My Computer and double click Removable Disk "No Name.”
3. Next, look for a "Music," “Movies” or “Photos” folder, or create your own to organize the files you are saving on nabi. Select the files you would like to transfer from your computer by dragging and dropping them into the folder.
4. Once all files have been transferred, safely remove your device: Click Safely Remove Hardware on the bottom right side of your computer screen, then click USB Mass Storage > Stop.
5. Open the files by going to the Gallery app on your nabi.
 Free Trial DVD Ripper

Useful Tips
- Transfer DVD movies to Asus Transformer Book T100
- Enjoy/Watch DVD movies on Nokia Lumia 2520 with high quality on the go
- Best DVD to iPad Mini 2 Ripper – Convert/Rip/Copy DVD movies to iPad Mini 2
- Play DVD movies on Surface 2/Pro 2 without DVD Drive
- Rip DVD collection to MP4 format for Samsung Galaxy Tab 3 10.1/8.0
- DVD to Kindle Fire HDX- Tips ripping DVD movies to Kindle Fire HDX


