
 Home
HomeThe MXF file is essentially a container which carries the original media file in the original file's native compression (mpeg, avi, etc), plus any relevant metadata. MXF was designed to work across networks with servers, workstations and other digital media devices. However, MXF is not a friendly format for Premiere Elements (15, 14, 13, 12, 11, 10) so that you can't import your MXF files to Premiere Elements (15, 14, 13, 12, 11, 10) for editing.
The MXF format is in use by Sony for their XDCAM cameras as well as Panasonic's DVCPRO P2 formats. Other manufacturers have recently adopted the format, including iKegami and Canon. So these HD camera users will often get MXF files when recording and they can't edit their MXF recordings in Premiere Elements (15, 14, 13, 12, 11, 10) unless they transcode MXF to Premiere Elements compatible format video with some video transcoding tools.
So, what media files does Premiere Elements support? In the official site, Premiere Elements (15, 14, 13, 12, 11, 10) support the following media formats.
Premiere Elements Supported Import Video file formats
| Format and filename extension | |
| MPEG-1 (.m1v, .mpeg, .mpe) | 3GPP (.3gp, .3g2) |
| MPEG-2 (.m2v, .mp2, .mpg) | Adobe Shockwave Flash (.swf) |
| MPEG-2 Transport Stream (.m2t) | Audio Video Interleave (.avi) |
| QuickTime (.mov) | AVCHD (.m2ts, .mts) |
| TOD (.tod) | DV stream (.dv) |
| Video Object (DVD video) (.vob) | H.264 (.mp4, .m4v) |
| Windows Media (.wmv) * | H.264-encoded QuickTime (.mov, .mp4, .m4v) |
| MOD (.mod) | |
After we learned the media format that Premiere Elements supports, we can convert the unsupported MXF to MPEG-2, MOV, WMV, etc for Premiere Elements (15, 14, 13, 12, 11, 10) editing.
Best Tool to Convert MXF to Premiere Elements
Pavtube Video Converter for Windows (Mac) is an efficient and easy to use multimedia conversion tool designed specifically for MXF, enabling you to convert MXF produced by professional recording devices such as Sony FS5, Sony PXW-FS7, etc to a MP4, MOV, 3GP, H.264, WMV, MPEG-2 in order to edit your MXF footages in Premiere Elements (15, 14, 13, 12, 11, 10). With this MXF video converter, you can effortlessly transcode MXF to edit in not in Premiere Elements but also in Avid Media Composer, Premiere Pro, Final Cut Pro, iMovie and more NLEs without problems.
In addition, this MXF video converter tool offers a series of editing tools, that you can use to enhance the appearance of your output movie. You can use the 'Trim' function to cut away parts of the original MXF video's beginning or end. The 'Crop' feature that lets you manually or automatically select a preferred region and remove the outside edges of your MXF video. You even can add subtitles and watermark to your MXF videos before convert to Premiere Elements.
Start to Transcode MXF to Premiere Elements
Step 1. Click "File" > "Add Video/Audio" to load MXF video into the program, you can also click the red cross icon to load the video or audio to it.

Step 2. Click "Format", at the drop-down list, click "Adobe Premiere" to choose Premiere Elements supported file format, such as: MPEG-2 (*.mpg), you can also choose other format that Premiere Elements supported, such as: WMV, MOV etc.
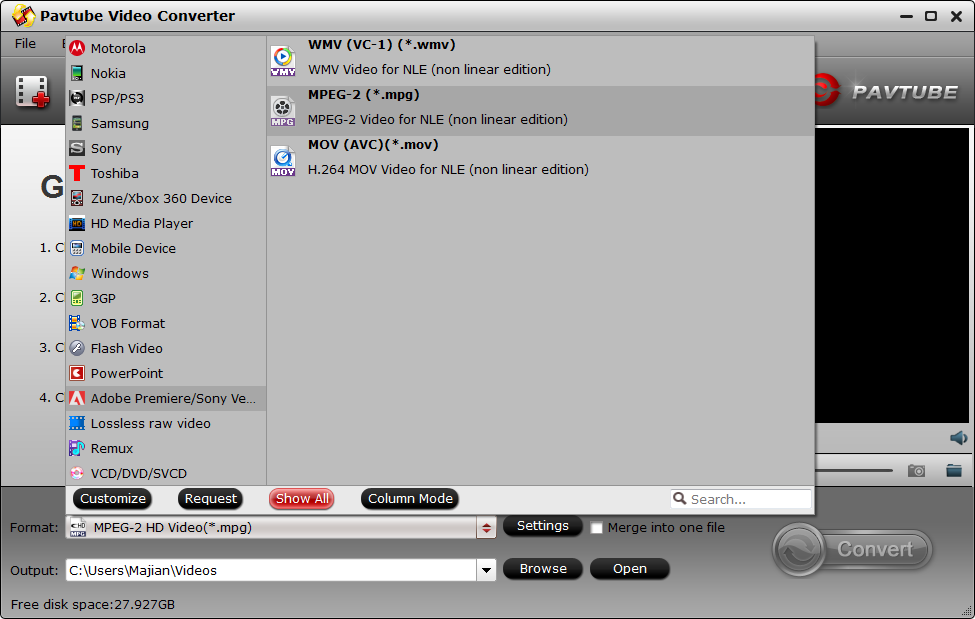
TIP: If you are a use of Mac, you install the Premiere Elements on your computer, when you want to edit the MXF video on Premiere Elements, you can convert the MXF to the QuickTime MOV by Mac version converter, the operation is similar to Windows.
Step 3. Click the "Browse"to set the output save location. You can save it to any devices, butthe best location is your hard drive, you can import MXF video to Premiere Elements easily.
Step 4. Click the "Convert" button to start converting. After conversion, you can click the "Open output folder" to find the output files quickly.
After the conversion is done, next step is to import the acceptable MXF video to Premiere Elements.
How to import MXF video to Premiere Elements?
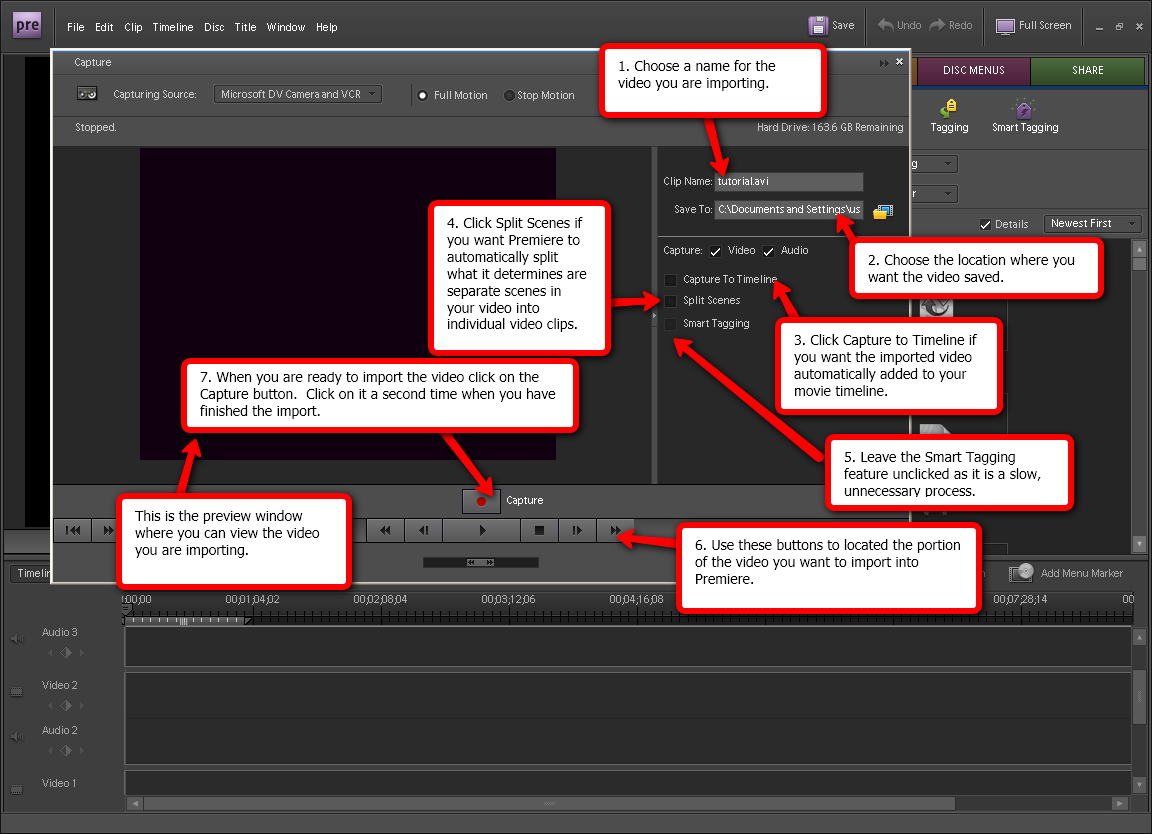
Step 1. Start Adobe Premiere Elements, you may need to wait for a while.
Step 2. On the right window, click "Clip name" to choose MXF video name from your PC hard drive.
Step 3. Click "Save to" to choose a location to save your video.
Step 4. Click "Capture" and check the video and audio, you can import your video to Premiere Elements quickly.
TIP: If you video is from a camera, a card reader, a scanner, online website, Adobe Revel, or other place, you can refer to here to know their ways for importing video to Elements.
Before you meet the best Premiere Elements MXF video converter, you maybe confusea by these issues that edit MXF video on Premiere Elements. This software will be your close video assistant, like your close friends, you can ask it for help anytime when you meet the video trouble.
Export Video From Premiere Elements for computer playback
Using AVCHD export, you can export a video as a high definition file to your computer in the MP4 or M2T format. You can, if necessary later, import the MP4 and M2T files into Premiere Elements.
1. Choose Share > Computer.
2. In Computer:Choose Location and Settings, select AVCHD.
3. Based on your requirements, select an option from the Presets menu.
4. Enter a name for the AVCHD File that is created.
5. Specify a location in the Save In option. Click Advanced to specify more export settings as required, and click OK.
6. Select Share WorkAreaBar Only if you want to export only the portion of the movie selected in the timeline.
If you use Windows Media Player to play Premiere Elements (15, 14, 13, 12, 11, 10) export, you may meet video playback issue due to the incompatible video format and codec. You can use Pavtube Video Converter to convert Premiere Elements export to WMV format for WMP.
 Free Trial Video Converter

Useful Tips
- How to Flip or Rotate Videos using Handbrake?
- Play Tivo Recordings with Windows Media Player
- How to Use VLC to Convert AVI to MP4 on PC/Mac?
- MOV Compressor: How to Compress MOV to a Smaller Size on Windows/Mac?
- Stream 4K Video to Chromecast Ultra via Plex
- Get Chromebook Pro/Plus to Play MKV Files without Any Problem


