
 Home
HomeAfter Effects is one of the mainstream post-editing software in the world, especially for rendering the files after Premiere Pro will be very convenient. You can send your Pr work to After Effects without any extra works. This cross-application workflow can be done among Adobe applications, but if you have some single files from others, how you deal with that? If you have some H.264/MP4 files, how to load H.264/MP4 files into After Effects CC/CS6/CS6 without any problem?
For users who are some amateurs but want to do some special effects on their videos, they may consider that After Effects is a good choice. But they can't load files easily into After Effects for some format thing. You can check the "Supported video and animation file formats" here in the After Effects help Page.
After checking this page, you can see there is no native support format as MP4 encoded by H.264. So how to import MP4/H.264 into After Effects smoothly will be a big problem for newbie. No need to worry about that, here suggest you this Pavtube HD Video Converter for Mac to tackle this problem once for all.
Hot search: Premiere Pro supported formats, MTS to After Effects, MXF to After Effects


Load MP4/H.264 in After Effects CC/CS6/CS5 smoothly
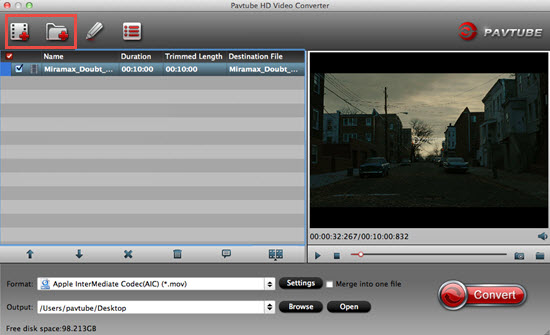
Step 1. Launch this app on your Mac
Free download this Pavtube HD Video Converter on your Mac, even on Yosemite, it can run smoothly as it should. After the simple installation, click "File">"Add Video/Audio" to load your H.264/MP4 files into it.
The only difference between the trail version and retail version is that the watermark "Pavtube" in the middle of the generated files of trail version.
Tips:
Some users may encounter this "unidentified developer" problem during the installation.
Don't worry about it, you can just follow these steps and everything will be OK:
1. Launch System Preferences from the Apple menu
2. Choose "Security & Privacy" and then click the "General" tab, followed by clicking the lock icon in the corner to unlock the settings
3. Look for "Allow applications downloaded from" and choose "Mac App Store and identified developers"
4. Accept the security warning and allow
5. You can now launch any app from any location or developer
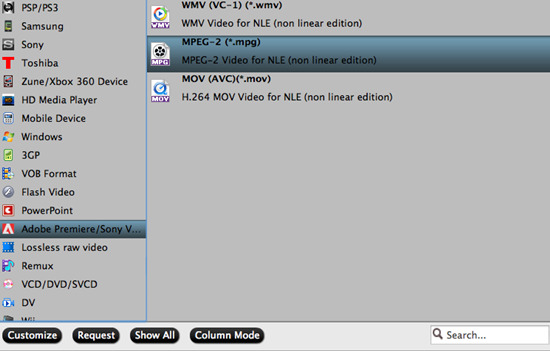
Step 2. Choose "MPEG-2" as your output format for importing MP4/H.264 in After Effects
For new users who just start to user this After Effects, they may wonder which format will be the best one to choose. No worry, consider about this, there is one preset for Adobe Premiere Pro for you. Go to the format bar and then choose "Adobe Premiere Pro/Sony Veg…">"MPEG-2 (*.mpeg)" as the output format.
Step 3. Adjust Parameters if you need
If you just want your raw H.264/MP4 into After Effects directly and do the post-editing in it, then you can skip this. But for uploading your videos online or downscale file size, improve quality, you can click "Settings" to adjust Bit rate, Frame rate and Size (pix).

Step 4. Start to convet MP4/H.264 for After Effects editing
After setting the file location, back to the main UI the click this "Convert" button to start your conversion. If you forget to set the file location, here you can click this "Open output folder" in the conversion UI to locate your files.
Now you have got the most compatible raw files for After Effects editing. You can find how to import files or project files into After Effects here.
Useful Tips:
1. Merge into one file
If you have multiple files and want to combine them into one before loading After Effects, how to do that? Just check all the files you want to join, and click "Merge into one file" in the main UI.
2. Split video
Or your files are much too long and you want to split them into several parts, click this "Split" button and you can split your file by count, size, time as you want
3. No audio showed up
If you loadyour files and fond there is no audio showed up, don't worry, you can try to adjust Audio Stream ID to make it appear, click this "Properties" to make it happen.
Further Reading:
How to Transcode Panasonic Lumix TZ70 AVCHD to Final Cut Pro X as ProRes for Editing?
Play 60p MTS, M2TS, TS Files on Adobe After Effects CC on Mac (Yosemite Included)
 Free Trial HD Video Converter for Mac

Useful Tips
- Review of 5 Best HD Video Converter for Mac (macOS Sierra Included)
- Import DJI Mavic Pro 4K video to iMovie for Editing
- Import DivX to iMovie (iMovie 11 Included)
- How to Convert ASF to iMovie (iMovie 11 Included) on Mac?
- Superior iMovie Alternatives for Mac (MacOS Sierra)
- 2017 Top 5 Best HD Video Converters for Mac OS X El Capitan/Yosemite/Mavericks


