
 Home
HomeWhy MKV to FLV?
MKV format is one of the most popular video formats and can be widely supported by media players. You may received some absorbing videos clips from your friends, which are in MKV container, or you have made a favorite movie from DVD into MKV with some free tools, now you’d like to share these videos with more people on YouTube. Here comes a problem, YouTube will not allow you to upload these MKV files, and you have to convert them to something more acceptable, like FLV, a universal format of online videos and shows. How to convert MKV to FLV? There are too many transcoding tools to choose from. For me, I would prefer an MKV converter that can cut off any parts that I do not like, divide a movie into several chapters (sometimes combine some short episodes together), add some ads or watermark to each of the chapter, and adjust the aspect ratio to 16:9. Thanks to Pavtube MKV Converter, I managed to make all of that. In the following guide I will show you how to convert a MKV file to FLV format for YouTube.
Available Software - Pavtube MKV Converter
You may learn more information about Pavtube MKV Converter, or download its free trail from here. Note that the trial version outputs video with watermark on the screen.
Convert MKV to FLV
1. Load MKV files
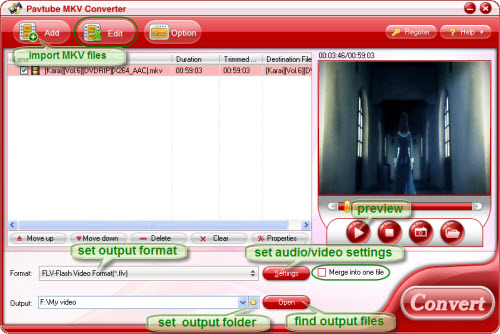
Run MKV Converter. Click ‘Add’ and browse to the MKV file(s) you would like to convert, select it and click open to load in as the picture shows below.
2. Set output format and location
Click on ‘Format’ bar and select Flash Video-> FLV (H.264 encoded). There are H.264 encoded F4V and SWF as well. If you want to combine multiple MKV files as one, simply select them in file list and tick the checkbox ‘Merge into one file’. You may click the folder icon at the opposite side of ‘Output’ to specify output location.
3. Set advanced video and audio settings
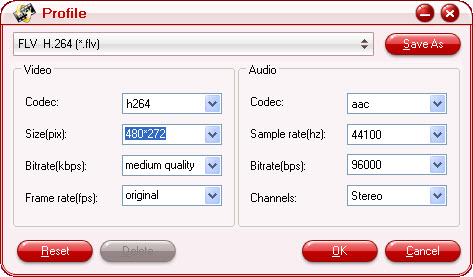
Click on ‘Settings’ button to adjust video and audio parameters including codec, aspect ratio, bit rate, frame rate, sample rate, etc. The default resolution is 320*240p (4:3), which is just all right for YouTube. If you want to apply 16:9 aspect ratio, please select 480*272p in the dropdown list of ‘Size’. For HD video file, a recommended config is 1280*720p, 1500kbps, 24fps, 44.8khz, in case that you would not give in to quality degradation.
Note: Transcoding (conversion) is a process of lossy and can not upgrade the video quality. Please set no higher resolution than the source video. You can select a file and click ‘Properties’ button under the file list to check the original resolution.
4. Arrange chapters and sections.
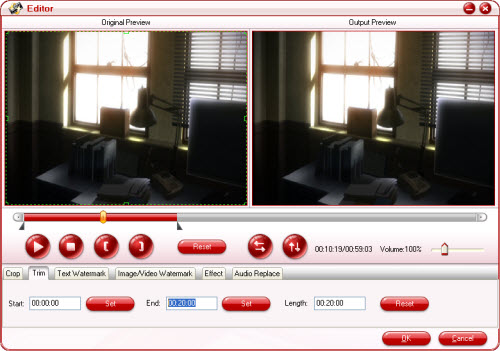
When a file is too big to upload, you have to divide it to multiple chapters. To select a specific section of the selected video for conversion, you could click ‘Edit’ menu, switch to ‘Trim’ tab, and input specific time point in Start and End box, and click Set button.
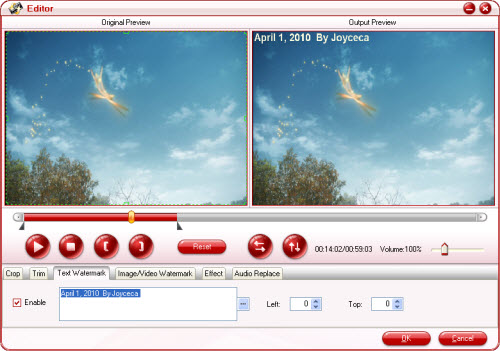
5. Add watermark to the video and set effect.
Switch to ‘Text Watermark’ tab, check the ‘Enable’ box, and input desired text as watermark. You may click the dots button to set font, color, and size of the text, and set the position of watermark in ‘Left’ and ‘Top’ box. To add Image or Video as watermark, you can switch to Image/ Video Watermark tab. To set contrast, brightness and saturation, please click ‘Effect’ tab. After setting, click ‘OK’ button to save settings and exit editor.
6. Convert MKV to FLV
When back to main interface, click ‘Convert’ button to start conversion. Once click this button, the ViewLog will present you all the info such as conversion progress, conversion state, elapsed and estimated conversion time, and generated and estimated conversion file size. After conversion you can click the ‘Open’ button to find the FLV files for share.
 Free Trial MKV Converter


