
 Home
HomeAmong the Blu-ray ripping tools, Pavtube Blu-ray Ripper is favored by most movie lovers for its high success rate of ripping and free switchover of languages and subtitles. It handles Blu-ray discs so that the Blu-ray movies are attainable freely. Recently Dolby TrueHD codec had been added to the app, which enables users to access any of the audio tracks in Blu-ray discs. It is “able to open, copy, and watch every Blu-ray, irrespectively whether the Blu-Ray was bought in Europe, Japan or USA (i.e. all the three zones)”. (commented by Markus Nolff, a user of Blu-ray Ripper). This guide shows you how to select subtitles and tracks of different languages when ripping Blu-ray discs. A step-by-step guide is displayed below:
Step 1. Load Blu-ray disc.
Make sure you have had an external Blu-ray drive connected with your PC. Insert the desired Blu-ray disc and run Pavtube Blu-ray Ripper. (A free trail version of Blu-ray Ripper can be downloaded from here.) Now when you see the interface, click on “DVD ROM” and the app will import Blu-ray movie from the BD-ROM. Check the directory and click “OK”. Do not expand the folders and try to look for certain M2TS files, since the ripper will detect and put all the M2TS files in file list. You can load DVD in the same way, the ripper is able to cope with any DVD, either protected or not. If your source movie is in folders, click “DVD folder” to import the folders.
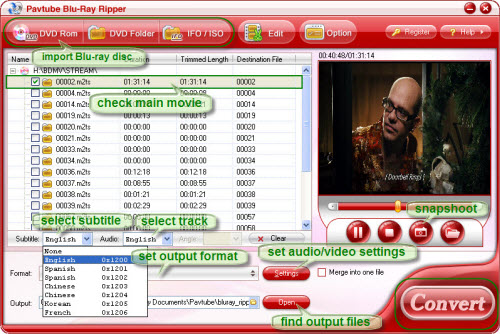
Step 2. Set subtitles and audio tracks.
One Blu-ray disc usually comes with multiple audio tracks and subtitles of different languages. Right under the file list you could find Subtitle and Audio option from where the subtitle and dubbings are set. The dropdown list shows you the detailed information, such as the subtitle language, audio language, codec, channels etc. Here you check the main movie (with longest duration), set the subtitle and audio track, and double-click the file to preview your settings.
![]()
Step 3. Set output format and destination.
Click on “Settings” and there are various output formats for you to choose from. Apart from common video, audio, HD video, Flash video, there are customized formats for portable devices such as iPod, iPhone, PSP, Blackberry, Nokia, Zune, Creative Zen, Archos and video game consoles like PS3 and Xbox360. Directly Copy is available for you to back up the disc as well. In output path box you can set output destination. To further customize output audio and video parameter, you may click “Settings” button. When completes setting, do not forget to confirm it by clicking OK.
Step 4. Start ripping.
Simply click Convert button to start ripping. You can view the progress information and and set auto shutdown. After conversion completed, the video clips are ready to be transferred to portable players or be played on PC with VLC player.
If you are interested in this program, please click here to download Pavtube Blu-Ray Ripper for free trail.
 Free Trial Blu-ray Ripper

Useful Tips
- How to keep original/ correct aspect ratio for 16:9 and 4:3 display?
- Blu-ray Ripping- improve Blu-ray converting speed with GPU acceleration
- Convert MKV to H.264 MP4 for streaming over DLNA
- How to Play Blu-ray Movies on Android Tablet?
- Blu-ray ripping- how to keep 5.1 and 7.1 audio?
- [How to] Turn your Blu-rays to iTunes playable 1080p MP4 movies


