
 Home
Home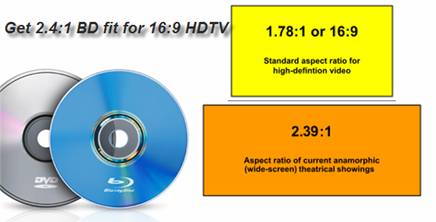
In order to play 2.4:1 Blu-ray movie at full frame on 16:9 HDTV without black bars, there are two ways to go: either stretch the image to fit for 16:9 screens or crop the anamorphic picture to 16:9. This guide aims to tell you how to rip Blu-ray movie of 2.4:1 (2.39:1) to fit for HDTV with Pavtube Blu-ray Ripper software.
Required Hardware: PC with Blu-ray Disc drive
Required Software: Pavtube Blu-ray Ripper (you may download a trial of the Blu-ray Disc Ripper and try it out)
Step-by-step guide of ripping anamorphic Blu-ray movie to 16:9 HDTV is here for your reference:
Step 1. Load Blu-ray Disc and set subtitle and audio language.
Hook the BD drive to your PC, Place the Blu-ray Disc you’d like to rip into BD drive. Run the trial of Pavtube Blu-ray Disc Ripper software, and click “Blu-ray Disc/DVD ROM” icon to load Blu-ray Disc from source drive. When your movie is now loaded as source, expand the folder and select the chapters to keep, and set subtitles as long as you like. If you would like to combine all selected Blu-ray Disc videos into one file, please check “Merge into one file”. Here I take BD movie Inception for example.
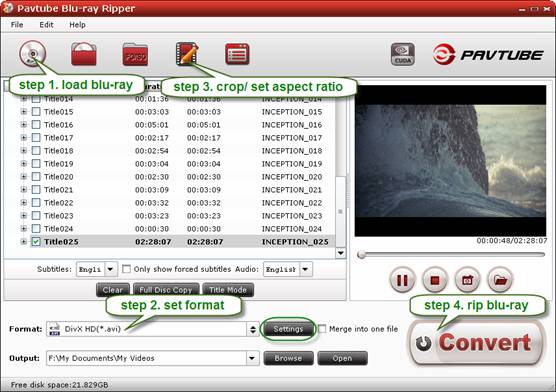
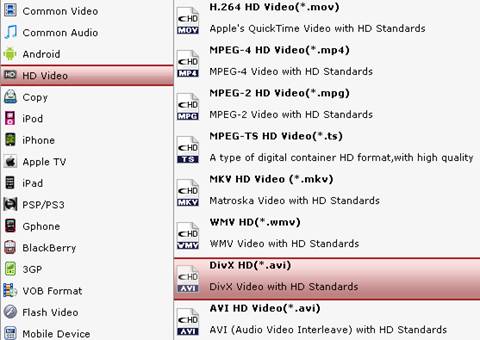
Step 2. Choose output format for watching Blu-ray movie on 16*9 display.
Click the Format bar, and choose a desired format in “Common Video” group. HD Video formats (1280*720, 1920*1080) are recommended for Blu-ray Disc. Here I select “HD Video>>DivX HD (*.avi) as output format. This format creates 1080p HD AVI video, which plays stunning on HDTV.
Step 3. Decide which method to follow for ripping anamorphic Blu-ray to HDTV.
A. Alter the 2.4:1 anamorphic Blu-ray movie to 1.78:1 ratio.
Click “Edit” button enter the Video Editor, switch to “Crop” tab, and drag the green frame in “Original Preview” window to crop out black bars. Uncheck the “Output keep original aspect ratio” box and click “OK” to back to main interface of the Blu-ray Disc Ripper.
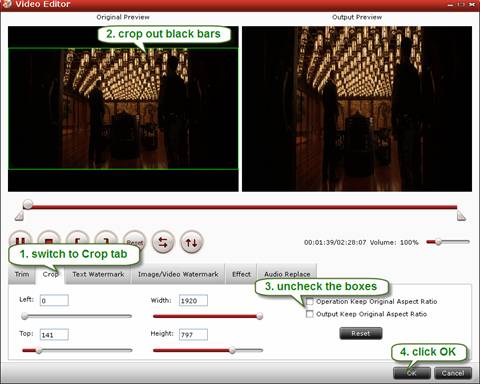
Pros: everything is preserved and the picture takes up the whole screen, without black boarders.
Cons: you lose the OAR (original aspect ratio) and the movie is stretched.

B. Crop the 2.4:1 anamorphic image to fit for 16:9 displays.
Click “Edit” button enter the Video Editor, switch to “Crop” tab, and drag the green frame in “Original Preview” window to crop out black bars. Check the “Operation keep original aspect ratio” and drag the green frame in the “Original Preview” window to select the portion that you’d like to keep. Then click “OK” to back to main interface.
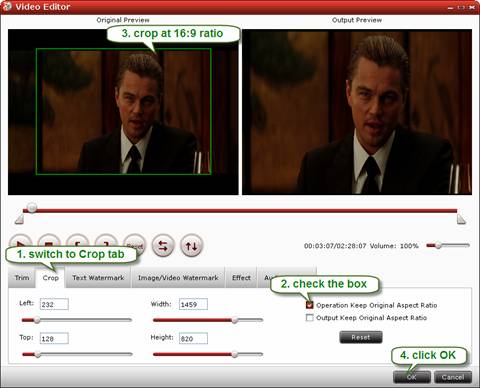
Pros: you get full-screen display of the movie and not lose aspect ratio.
Cons: this results in a loss of more than 25% of the original image.

C. Use the 2.4:1 OAR (original aspect ratio) of Blu-ray Disc.
Click “Edit” button enter the Video Editor, switch to “Crop” tab, check “Output keep original aspect ratio” box and click “OK” to confirm.
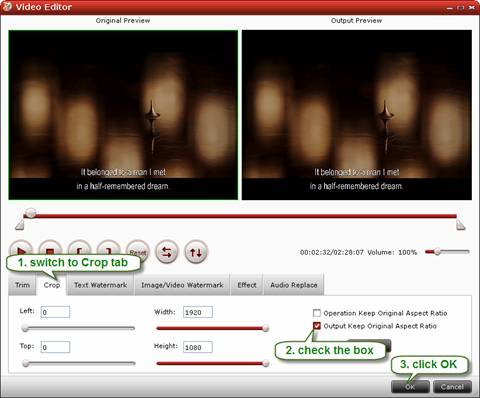
Pros: you get BD movie clips played in the way that they are meant to be seen, like playing Blu-ray Disc with PS3 or a regular BD player.
Cons: the movie is letterboxing and there are black boarders on top and bottom.

Step 4. Start copying cropped Blu-ray Disc to hard drive.
When back to the interface, click the “Convert” button to start cropping and converting Blu-ray Disc movie to hard drive. After conversion completes, click “Open” to find converted movie.
Also refer to Playing anamorphic Blu-ray on 16:9 HDTV for more details about Blu-ray and DVD aspect ratios.
 Free Trial Blu-ray Ripper

Useful Tips
- How to keep original/ correct aspect ratio for 16:9 and 4:3 display?
- Blu-ray Ripping- improve Blu-ray converting speed with GPU acceleration
- Convert MKV to H.264 MP4 for streaming over DLNA
- How to Play Blu-ray Movies on Android Tablet?
- Blu-ray ripping- how to keep 5.1 and 7.1 audio?
- [How to] Turn your Blu-rays to iTunes playable 1080p MP4 movies


