
 Home
HomeWe usually saw Sony AVCHD camera users encounter importing issues when attempting to edit their camera shootings in .MTS and .M2TS format with Final Cut Pro 7 or Final Cut Pro X. Let's see some frequently asked questions on this.
"I am shooting with a Sony Cyber-shot RX100 at 1920x1080, 60p, mts files, 16x9. I want to edit these MTS clips in FCP X, while it seems that FCP X does not accept them at all. I was told to convert the Sony AVCHD files to ProRes. I don't want to have quality loss and want to maintain the original image resolution at 16x9. What app and settings would you recommend?"
"I have several video clips from my friend's new Sony A77 DSLR Camera, which are in the MTS format. I am using FCP 7, and when I bring the MTS files into FCP 7 for edit, I get no success. I guess if I load directly from the camera itself, there would be no importing problems. But I have separate MTS clips only, what should I do? Any suggestions are greatly appreciated."
"I am new to FCP X and sorry for an obvious question. I am using a Sony NEX-VG20 camera that records in AVCHD high profile (MTS files). I am assuming I need to convert these Sony MTS videos to MOV files to edit in FCP. Which software can do this and how much do the files increase in size?"
Pavtube MTS/M2TS Converter for Mac is always ready to help you out of the above mentioned problems. This app does a good job when working as a Mountain Lion MTS to FCP Converter, which supports converting MTS files shot by different Sony cameras to Apple ProRes for using in FCP X and FCP 7, including Sony Cyber-shot RX100, Sony A77, Sony A57, Sony A65, Sony NEX-5n, NEX-VG20, NEX-FS3, HXR-NX30, and more.


How to Import Sony AVCHD MTS files to FCP 7/FCP X on Mountain Lion?
Step 1. Simply load MTS files into the Sony MTS to ProRes Converter app
After installation this MTS Converter on your Mac , you can click "File">"Add Video/Audio" to load your raw MTS files. This trail version will have watermark in the middle of the converted files. If you want to get rid of it, the full version will do you the favor.

Step 2. Choose an Apple ProRes format from the pull down menu beneath "Final Cut Pro" option
Go to the "Format" bar to choose the proper format, you may wander which will be the best format to choose for there are so many formats in the profile list. Don't worry about that , here is the preset for you to choose , just go for "Final Cut Pro">"Apple ProRes 422 (*.mov)" to select as your choice.

Tips:
If you don't care about the file size , then you can totally go for "Apple ProRes 422 HQ(*.MOV)" for it will give your more HD quality while larger file size. (Differences among Apple ProRes codec)
Step 3. Click "Convert" to start.
The Mountain Lion Sony MTS Converter will do the rest for you. What's more , with the latest Pavtube Mac products, the Yosemite system can be handled flawlessly.
Tips:
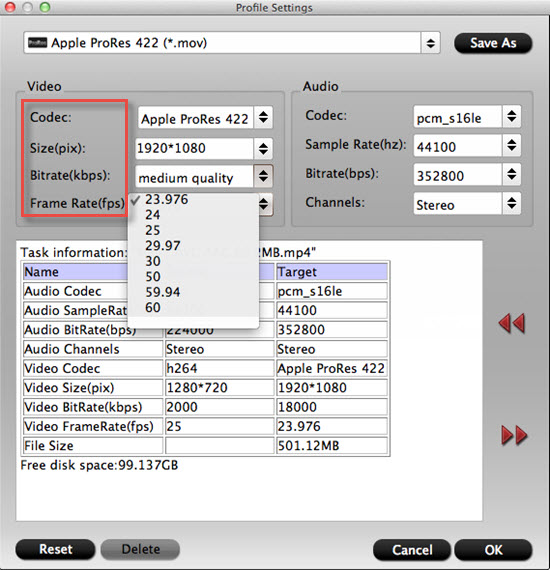
1. If you wanna customize video and audio quality for the exported Apple ProRes MOV files, you can click "Settings" button and enter the "Profile Settings" window to do so.
2. In particular, the Apple ProRes codecs have been designed to work especially well as high-quality, high-performance editing codecs for Final Cut Pro, taking full advantage of multicore processing and featuring fast, reduced-resolution decoding modes. The Pavtube Sony MTS to FCP Converter offers format presets for all members of the Apple ProRes codec family, including Apple ProRes 422 (Proxy), Apple ProRes 422 (LT), Apple ProRess 422, Apple ProRes 422 (HQ) and Apple ProRes 4444.
For new users who just enter into this Final Cut Pro world, how to make everything smoothly when loading media files into FCP may be their first priority to know.
 Free Trial MTS/M2TS Converter for Mac

Useful Tips
- Import footages/videos/projects into Final Cut Pro X without rendering
- Convert Panasonic MXF Footages to FCP as ProRes for Editing
- Workflow for Importing HX-WA20 MP4 to FCP (X) on Mac
- Edit MediaPortal TS Files in FCP X/Avid/iMovie and Burn to DVD on Mac
- Convert Panasonic TM900 MTS Videos to ProRes 422 for Editing on FCP
- MKV to FCP---Convert MKV to Apple ProRes 422 MOV for Final Cut Pro


