
 Home
HomeFor one of our clients has said that he wanted one app which can output high quality of the converted files and this features is the most important one he needed. He is a Film editor who produce films for German TV stations that they only allow 1080 50i to be broadcasted. The users use Blackmagic URSA to produce 4K ProRes films, now that , he used the DHxHD codecs on Avid MC to post-productions.
According to his needs and workflow , we can tell that what he needs most is the one app which can keep the sharp quality of the original files while accept this ProRes codec and output DNxHD codec. So is there any software which can transcode ProRes 422 to DNxHD mov while keeping HD quality at the same time?

Pavtube Video Converter for Mac will be the ultimate choice for those needs. It can accept this PorRes codec without any problem while the output quality is so high that you can even tell the differences between the original and the converted one. Bunch of output settings are for you to choose , including this DNxHD codec here.


How to Transcode Blackmagic URSA Prores 422 to DNxHD for Avid in TV stations Broadcast?
Step 1. Install and Run this PorRes Converter on your Mac
Free download this Video Converter for Mac and have a quick installation. You don't have to worry about the time using limitation. You can easily load your ProRes 422 files by clicking "File">"Add Video/Audio" to load your files or drag-and drop to load your files is also allowed.

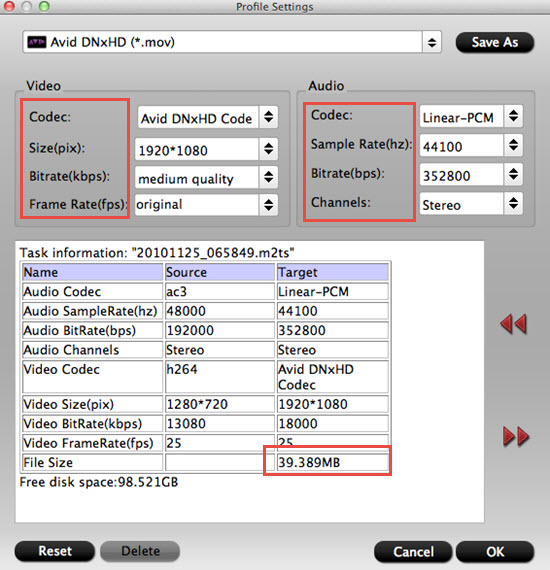
Step 2. Choose "Avid DNxHD (*.mov)" as your output format
After loading your files, click the "Format" to choose the proper format for your Avid MC. Here is a preset for you to chose , this may save you many times to adjust your parameters to achieve the best output quality.

Tips:
If you are a Win users, and have the similar problem with ProRes 422 for your Avid MC, then you can go to this guide for more.
Step 3. Go to adjust your parameters if you need
If you want to adjust your parameters to down-size your files for streaming, you can go to this "Settings" UI to have a try. Here you can adjust your Audio codec and Bit rate, Frame rate while you can see the whole file output size in the bottom of the table.
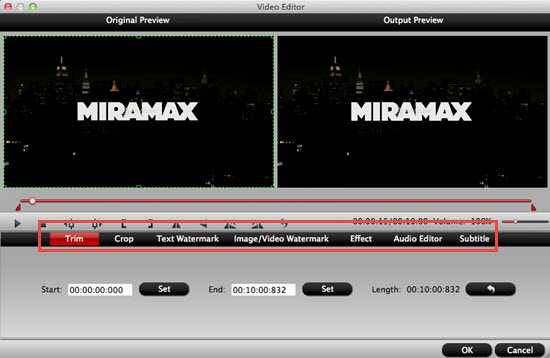
Step 4. Choose to do some simple edits to post-conversion
If you would like to do some simple eidts, like trim or crop the part you don't need or change the "Interlaced" mode to "Progress" mode, or adjust the "Aspect ratio", etc. You can simple do this by clicking "Edit" or "Pencil " icon on the top of the main UI.
Step 5. Start to convert ProRes 422 to DNxHD mov for Avid
After all have bee settled , back to the main UI and click this "Convert" to start your conversion. After the conversion, you can back to the main UI to click "Open " to find your converted files. If you forget to set the file location, still you can click "Open output folder" in the conversion UI to find them in the default location.
Useful Tips:
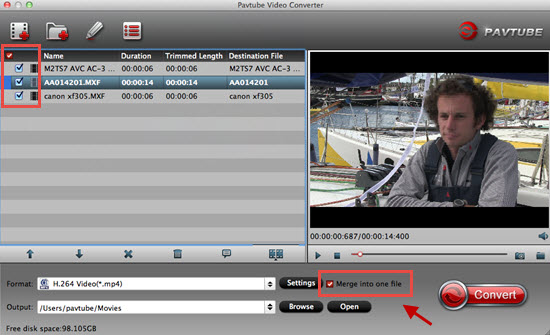
If you have bunch ProRes 422 files and want to merge them into one, then you can choose all the files in the main UI and then click this "Merge into one file" to do the combination.
After that , you can import your DNxHD mov files into Avid MC without any problem.
If you want to know how to how to make AVCHD, MXF to ProRes 422, then this app is still can be a best choice.
In case you want to know the differences among Apple ProRes codec, here is a detailed compare article for you.
 Free Trial Video Converter for Mac


