
 Home
HomeMXF(Material eXchange Format) is the mostly used format for recording footages with Sony, Panasonic and Canon cameras, its well organized file structure and ability of preserving HD videos with least compression are widely accepted by manufacturers and users. But MXF is not a well supported format by Mac natively, which makes playback and editing on Mac become very tough.
For mac users, Final Cut Pro is one of the NLEs that mostly used. But Final Cut Pro cannot play most MXF files although some of the camera models are supported. To accomplish this task, you are suggested to transcode MXF to FCP preferred format.
Moreover, it could be important for you to keep all the audio channels and subtitles and enable free switch during playback; and also some users would prefer to mix all the audio into one track. However, you may find it’s difficult to accomplish all of these using various popular converters on the market.
No worries, here we present you this professional iMixMXF (Mac) which is able to finish all the goals; please follow this step-by-step guide to quick learn how to edit MXF in Final Cut Pro.
![]()
Step 1. Import MXF to this iMixMXF.
Keep your camera on and connect it to Mac until it’s recognized as a hard disc on desktop. Launch this iMixMXF, click top left icon to import mxf files. You can also drag and drop directly.
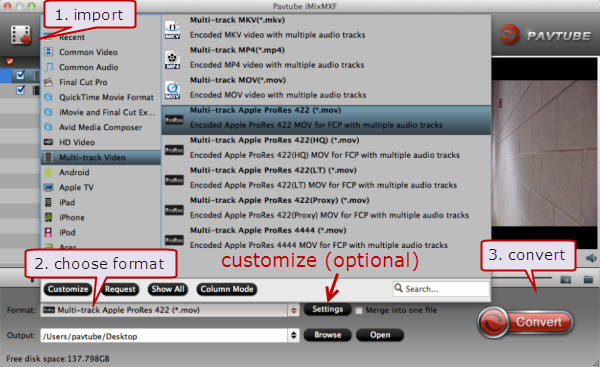
Step 2. Choose Apple ProRes as best video format for FCP.
Choose Multi-track Video>Multi-Track Apple ProRes 422 as the best video format for Final Cut Pro. Besides, it offers presets for multi-track ProRes 422 HQ, 422 LT, 422 Proxy and 4444, free select one as your needs.
Click the box right below Format to browse output file path.
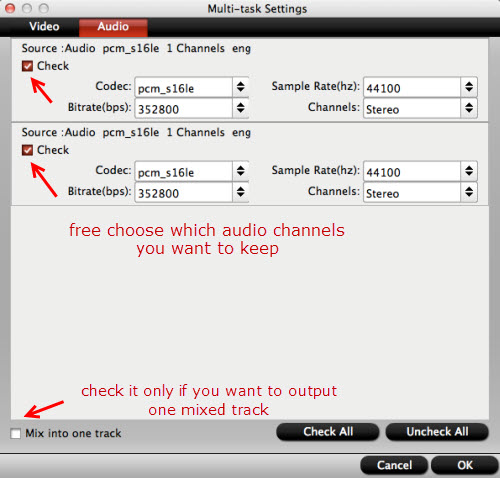
Step 3. Customize video size, bitrate, frame rate and audio channels. (Optional)
Click Settings, click Video to set up video size, bitrate and frame rate. Then switch to Audio and select the audio channel that you want to convert. Pls note that the option of “Mix into one track” will combine all the tracks into one; if you want to output audio channels separately as original, do not check it.
Step 4. Start converting multi-track MXF to multi-track ProRes.
Click the big red Convert to start the conversion. Pls note that videos encoded in ProRes will be 2~3 times larger than the source file so that it would take a while. After it’s done, click “open output folder” to locate the converted video and import them to Final Cut Pro.
FYI: For users who only records one audio track, the Pavtube MXF Converter for Mac is highly recommended and it costs less than the latter Pro version.
 Free Trial iMixMXF

Useful Tips
- How to Convert MXF to ProRes, AIC MOV for Loading into FCP and iMovie?
- Transfer Canon C300 MXF to FCP/Quicktime for editing on Mac
- Canon MXF file to iMovie importing issues on Mac
- How to Transcode MXF to AVI Easily and without Quality Drop ?
- Convert Panasonic P2 footage for importing to Davinci Resolve
- Fail to Import MXF Files into Premiere Pro CC 2015, Solved!


