
 Home
HomeHDTV DVD Combo features a built-in slot-loading DVD player, which provides an optimum way to save space. With the slim profile, it’s really an amazing experience to watch favorites TV shows and DVD movies on this device in your bedroom. But if your TV only has a standard DVD player but not the Blu-ray disc player, what is your solution to play Blu-ray movies on it? I’d like to know your ideas. I believe my way is somewhat helpful, just convert BD to a DVD format, and then burn it to a blank DVD for playback on the TV/DVD Combo, so share it here, and also be glad to hearing from you guys.
The software I used is as below:
- ReJig (freeware)
- ImgBurn (freeware)
Part 1: Rip and compress Blu-ray movie to VOB files
Firstly, use Pavtube Blu-Ray Ripper to remove copy protections of Blu-ray movies, and meanwhile convert it to the DVD vob format.
1. Run Pavtube Blu-Ray Ripper and click “DVD Rom”, “DVD Folder” or “IFO/ISO” to load Blu-ray movies. Generally speaking, the file with the longest duration time would be the main movie, if you just need back up the main movie, tick off this one only.
Each file will be checked by default after imported, right click on any one of the files, and then there will be a popup window to let you uncheck all, just do it, and afterwards to tick off the checkbox before the file you need converted.
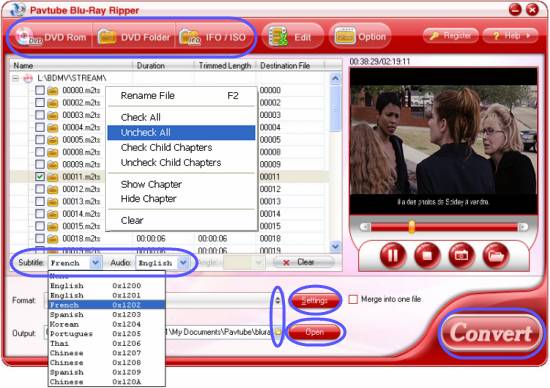
2. Click on the drop-down menus after “Subtitle” and “Audio” respectively to select your required languages and sound effect.
3. Select VOB as output format and specify destination folder
Click on the pull down list of “Format” to select VOB as output format and click on the folder icon at the opposite side of “Output” to specify destination folder.
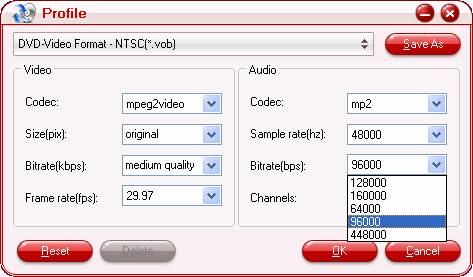
4. Customize output settings
The popup window will allow you to adjust audio and video parameters including codec, bit rate, aspect ratio, frame rate, sample rate, and audio channels to optimize the output file quality.
5. Click on “Convert” button to start BD ripping
Once finished, you can find out the output files via clicking on “Open” button with ease.
Part 2: Complete DVD authoring.
ReJig is used to do DVD authoring.

It's pretty simple with ReJig. Press “File Mode”; add your vob files and Demux.
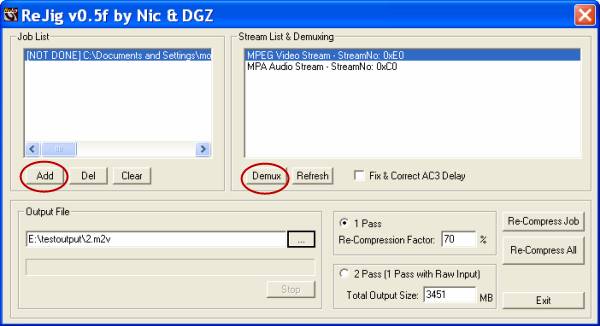
When it's finished, close that box and then select DVD Author. Add the video and audio files you've just created, and choose output destination folder, and click Create.
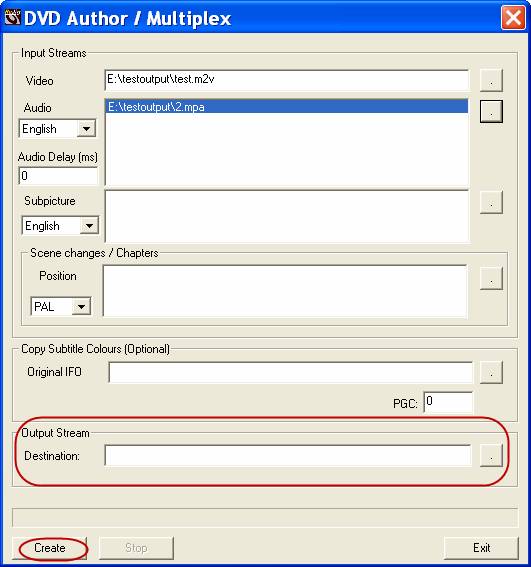
After DVD authoring is completed, you can open the destination folder to see that the output files are AUDIO-TS and VIDEO-TS folders, which are the correct structure for DVD burning.
Part 3: Use ImgBurn to burn DVD
We have got VIDEO-TS folder in part two, so the DVD burning process with ImgBurn is pretty simple. Here give you two links to check the detailed steps:
How to write DVD Video files directly to single layer media using ImgBurn (DVD±R/RW)
How to write a DVD Video double layer disc using ImgBurn (Verbatim DVD+R DL) – just check the contents that start from adding VIDEO-TS folder of this guide.
 Free Trial Blu-ray Ripper

Useful Tips
- How to keep original/ correct aspect ratio for 16:9 and 4:3 display?
- Blu-ray Ripping- improve Blu-ray converting speed with GPU acceleration
- Convert MKV to H.264 MP4 for streaming over DLNA
- How to Play Blu-ray Movies on Android Tablet?
- Blu-ray ripping- how to keep 5.1 and 7.1 audio?
- [How to] Turn your Blu-rays to iTunes playable 1080p MP4 movies


