
- Overview
- Installation
- Getting Started
- Import Video Files
- Preview and Snapshoot
- Edit Video▼
- Trim Video
- Crop Video
- Text Watermark
- Image/ Video Watermark
- Effect Settings
- Audio Replace
- Set Output Settings
- Start Conversion
- User Interface▼
- Main Interface
- Video Editor
- Profile Manager
- Configuration Option
- Technical Support▼
- FAQ/Purchase
- Register
- Update


What is Pavtube FLV/F4V Converter
Pavtube FLV/F4V Converter is more than a flash video converter. It converts FLV, F4V and even MP4 videos for various portable media players and video editing software. With the app you can converts FLV, F4V, MP4 videos to AVI, MP4, WMV, MOV, M4V, MPG, TS, MKV, VOB, MP3, AAC, AC3, etc., to make it easier for playing, editing, and sharing downloaded web videos. The Pavtube FLV/F4V Converter now converts videos with CUDA support, the GPU computing method by NVIDIA, and video conversion speed is improved 3X+ faster than ever.
The Pavtube FLV/F4V Converter is priced at $29. With extra $6 you can get Pavtube Video Converter, which converts almost any unprotected video formats; or Pavtube YouTube Converter, which downloads videos from YouTube, Hulu, Viemo, etc and converts the videos to various file formats.
Key Features
- Super high conversion speed with NVIDIA CUDA technology (NEW FEATURE)
- Support universal players and devices (iPad, iPod, iPhone, GPhone, Blackberry, 3G phone, Nokia, Sony Erickson,Motorola Droids, Google Nexus One, Apple TV, PS3, Xbox 360, WD TV Live, Zune, Creative Zen, Archos, PSP, Pocket PC, etc.)
- Powerful editing facilities (crop out unwanted black edges, trim the video at any length, put on Text/ Image/ Video watermark, set special effects, eliminate the interlacing lines, adjust the volume, and replace the original audio track with favorable music)
- Supportsvarious editing software and PowerPoint
- Extracts audio from FLV, F4V, MP4 videos and saves track as MP3, WMA, AAC, etc.
- Takes snapshots/thumbnail/still image from FLV, F4V, MP4 video clips
The Next

Installation
System Requirements
Recommended System Requirements:
- CPU: Intel processor, 1GHz or above
- Memory: 512MB or above
- OS: Windows 2000/ Windows 2003/ Windows XP/ Windows Vista/ Windows 7
- Display Resolution: 1024*768 or above
Install& Uninstall
To install Pavtube FLV/F4V Converter, please
- Download Pavtube FLV/F4V Converter setup file.
- Double click on the setup file to begin installation.
- Follow the instructions to install Pavtube FLV/F4V Converter on your PC.
To remove Pavtube FLV/F4V Converter from your computer, please
- Hit Windows Start and go through the following options: All Programs -> Pavtube -> FLV/F4V Converter -> uninstall Pavtube FLV/F4V Converter.
- From Windows Start menu, select to open “Windows Control Panel”. Double click “Add or Remove Program”, scroll to “Pavtube FLV/F4V Converter”, and click Remove.
More details are provided at How to install and register Pavtube software.
The Next
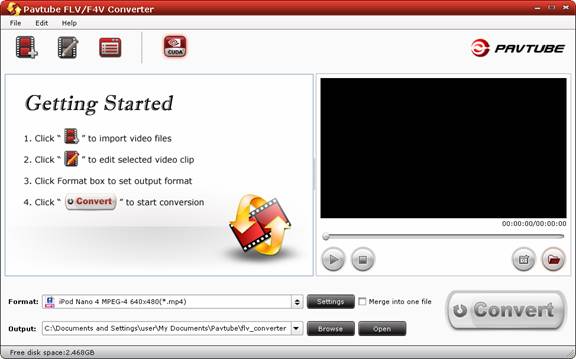
Getting Started
Pavtube FLV/F4V Converter is an easy-to-use program, which just needs several clicks to complete the conversion.
Basic steps for converting videos with Pavtube FLV/F4V Converter:
1. Import the files by clicking the “Add” button  or dragging and dropping files to the “Getting Started” area.
2. Click the “Edit” button  to adjust the videos for your requirement.
4. Select the format you need and specify the position in which you save your videos.
5. Click the "Convert" button![]() to start conversion.
to start conversion.
The Next
Import Video Files
When you start up Pavtube FLV/F4V Converter, the main interface pops up as below:
Load video files to the software using any of the three ways below:
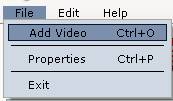
- Click “File” menu, and select “Add Video” to import source video files.
- Find “Add” icon

in the toolbar and click it to import the files to the file list.
- Open the folder that contains source files, and drag and drop video, audio and image files to “Getting Started” area.
Supported video format: *.flv, *.f4v, *.mp4
The Next
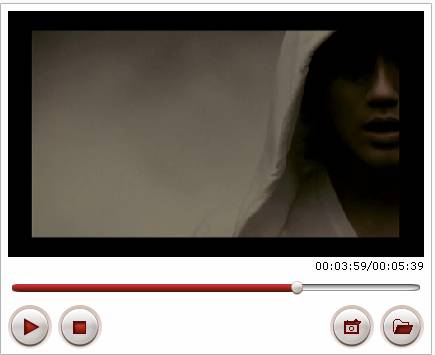
Preview and Snapshoot
Double-click on a chapter to preview it. You are allowed to take snapshots when previewing the movie. Simply click "Snapshoot" button![]() . See how to set format for thumbnails in Configuration Option part. To locate the thumbnails, please click "Open folder" button
. See how to set format for thumbnails in Configuration Option part. To locate the thumbnails, please click "Open folder" button![]() . In the preview window you can check the Subtitles and Audio track.
. In the preview window you can check the Subtitles and Audio track.
The Next
Edit Video
Edit Menu
Click the “Edit” icon on the tool bar of main interface to enter Video Editor. Here you find facilities such as Trim, Crop, Text Watermark, Image/Video Watermark, Effect, and Audio Replace.
Screenshots of the Edit facilities:
![]()
The Next
Trim Video
The “Trim” feature allows users to decide where to start and where to end when converting the selected clip, so that unwanted segments will be cut out after conversion.
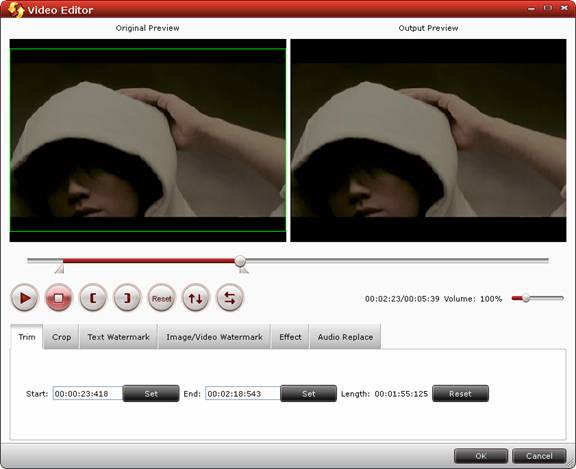
To trim a video, please switch to “Trim” tab in Video Editor Interface and follow any of the following methods:
- Drag the control strip (slider) to include the segment you want to remain.
- Or click the left square bracket “[“ to set start point, and click the right square bracket “]” to set end point when previewing the video.
- Or input specific value in Start and End box and click “Set” button.
The Next
Crop Video
The “Crop” facility helps to get rid of the black edges and unwanted area of the image.
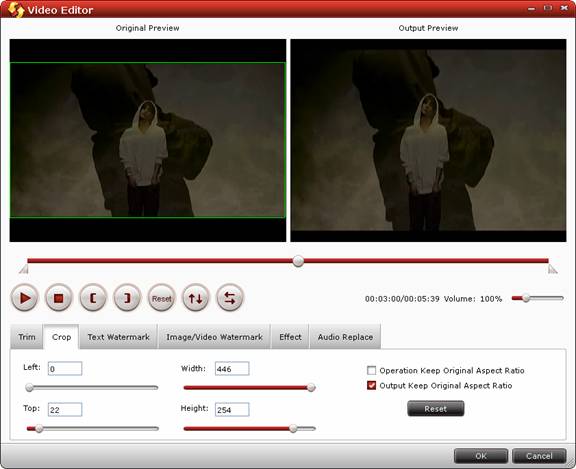
Switch to “Crop” tab, and follow either of the below methods to crop selected video:
a. Crop video by dragging and dropping the crop frame
Simply move your mouse cursor to drag and adjust the four corners of the green frame to desired position.
b. Crop video by setting values
Under Crop tab there are four value fields: Left, Top, Width and Height. You can either type in specific values in the fields or adjust slider to constrict the area you want to remain.
Keep Original Aspect Ratio
Once the box is checked, the output file will derive its aspect ratio from the parameter of cropped area. And this feature takes effect only when the aspect ratio of cropped part is inconsistent with the target profile settings. So, if you want to keep the cropped aspect ratio, make sure “Original” is not selected when you set the Video Size in “Settings”.
The Next
Text Watermark
Under the tab of “Text Watermark” you can add text as watermark to selected clip.
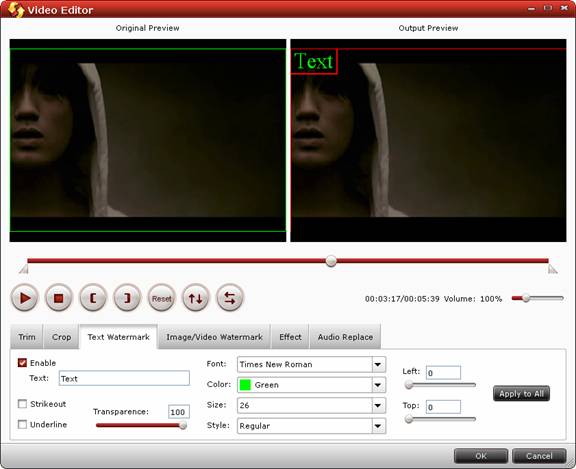
Find steps of adding text watermark to selected video below.
- Switch to “Image/Video Watermark” tab.
- Check option “Enable” box.
- Type the text you want to use as watermark in text watermark area..
- When the text is added, set its position by dragging the text in Output preview area or the Left and Top slider bar. You may strikeout, underline and transparent effect for the text. The font, color, size, and style of the text can be adjusted too.
- Click “Apply to All” to apply the settings to all the videos that are listed in file list.
The Next
Image/ Video Watermark
Under the tab of “Image/ Video Watermark” you can add image or video watermark to selected clip.
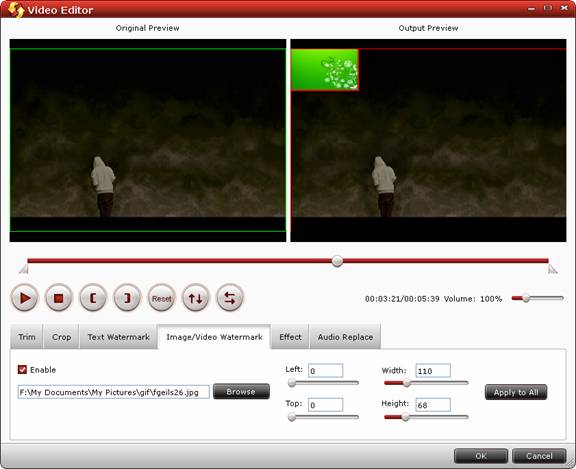
Find steps of adding image/ video Watermark to selected video below.
- Switch to “Image/Video Watermark” tab.
- Check option “Enable” box.
- Click “Browse” button to specify the image or video file you want to use.
- When the image/ video is added, set its position by dragging the slider bar of “X” and “Y”options and set its size by dragging the slider bar of “Width” and “Height” options. You may also input specific numerical values into the “X”, Y”, “Width” and “Height” fields or drag and drop inserted image/ video to set the position and size.
The Next
Effect Settings
The “Effect” facility helps you to customize the output effect. You can switch to “Effect” tab to adjust the following parameters:
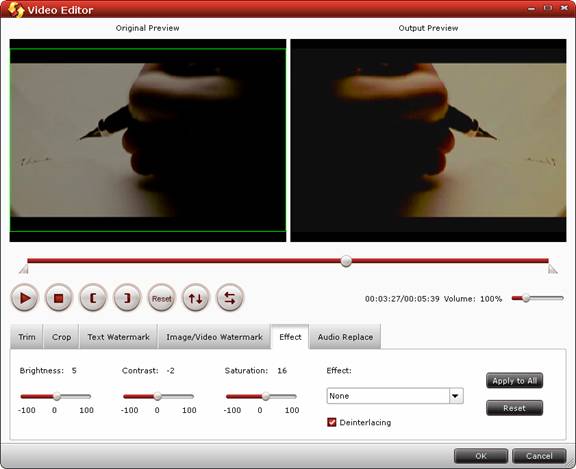
Brightness: Drag the Brightness slider to adjust the brightness of the video.
Contrast: Drag the Contrast slider to adjust the contrast of the video.
Saturation: Drag the Saturation slider to adjust the saturation.
Deinterlacing: Check this box to eliminate the interlacing lines (strips) to make a better image. It works well with HD footages.
Effect: Choose a special effect from the Effect drop-down list for the video. Available choices includes Simple gauss blur, Simple laplacian sharpen, Aged film, Flip color, Invert and None.
Apply to All: Click to apply the settings to all the videos that are listed in file list.
Reset: Click to reset to default values.
The Next
Audio Replace
The “Audio Replace” feature enables you to add audio to target video file so that you can replace the original audio track with favorite melody.
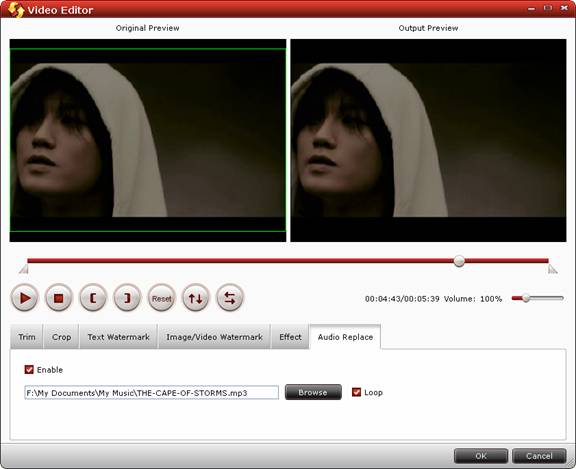
Find steps of replacing audio below:
- Switch to “Audio Replace” tab.
- Check the box of “Enable”.
- Click “Browse” button and select the audio or video file you’d like to add.
- You may check “Loop” to make the audio repeat in order to fit the full length of the video.
The Next
Set Output Settings
Set Output File Location
The software will specify a default folder to save converted videos. If you’d like to change the output location, please click “Browse” button![]() and navigate to the folder you want to save videos to.
and navigate to the folder you want to save videos to.

After conversion you can click the “Open” button ![]() to open output folder and check the generated video or audio files.
to open output folder and check the generated video or audio files.
Set Output Format
To select an output format, you can click on “Format” and find a desired video or audio format from the profile list that pops up. The profile list provides users with groups of flexible output solutions. There are output formats for various portable players, removable devices and editing software in the profile list. Select a desired format from the list, and then you can step into the conversion process.
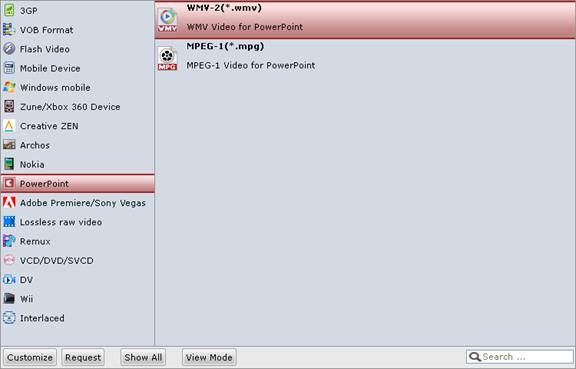
Tip 1: You are encouraged to use H.264 codec in order to take advantage of the GPU en-decoding acceleration of Nvidia CUDA enabled Graphics card.
Tip 2: In order to convert TOD to MPG format without losing quality, you’re suggested to choose “Remux”-> “MPEG-PS Video Remux (*.mpg)” format for conversion.
Tip 2: The Profile Manager helps you sort out the formats, hide rarely used ones, and submit your demands for new format to Pavtube in case that there is not a format that meets your needs. Find details in User Interface section.
Customize Profile Settings
To further customize the output format, please click “Settings” button ![]() and adjust advanced video/ audio parameters.
and adjust advanced video/ audio parameters.
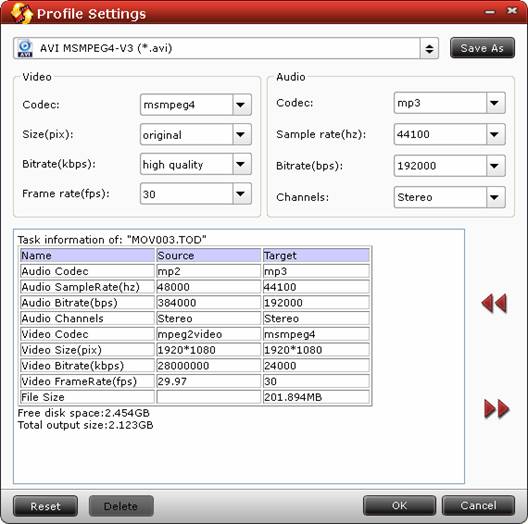
Video Section: You can set Codec, Bit Rate, Size, and Frame Rate to optimize the quality of the video.
Audio Section: You can set Codec, Bit Rate, Sample Rate and Channels to make the quality better.
Save As: Click to save your settings as a new format.
To create a new format, you can adjust the audio and video parameter as you like, click "Save as"' button and rename the format before clicking "OK" to save the new format. When you'd like to use the new created format at next run, just click the format bar and find it in "Custom" group.
Reset: Click to reload the default settings.
Tips and Tricks on customizing settings:
1. To get 16:9 aspect ratio: set the Video Size to 1280*720/960*540/ 854*480/720*405/ 640*360.
2. To improve video quality: set video bitrate up.
3. To cut down file size: set video bitrate down.
4. To save your settings: click “Save As” and save it as a custom format.
5. To get AAC 5.1/AC3 5.1: set 5.1 channels in Audio Channels (5.1 channels is only available in a few of formats templates. Try your fortune in HD Video formats instead of Common Video).
The Next
Start Conversion
After every thing necessary was selected, please click the Convert button![]() to start conversion. A window will pop up as below:
to start conversion. A window will pop up as below:
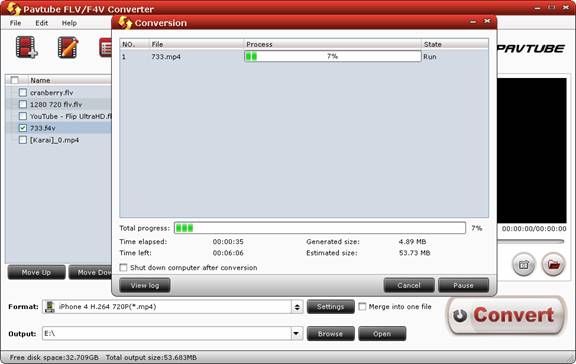
The Conversion window displays task list and progress information including Time elapsed, Time left, Generated size, and Estimated size. After conversion simply click "Completed" to back to main interface, and "Open" button![]() to find generated videos.
to find generated videos.
You can click “Pause” ![]() to suspend or “Cancel”
to suspend or “Cancel” ![]() to cancel the conversion at half way.
to cancel the conversion at half way.
In case of an error occurs during conversion, please click “View log” to check detailed error report.
The consuming time grows with generated file size. If conversion takes long time, you can set auto shut down by checking the box of “Shut down computer after conversion.
The Next
User Interface
The user interface of Pavtube FLV/F4V Converter is very friendly and intuitive. Generally, there are Main Interface, Video Editor, Profile Manager, and Option panel for you to edit and convert movies.
- To get a general idea of Pavtube FLV/F4V Converter, you may go to the Main Interface.
- To edit videos, you may go to Video Editor for details.
- To custom the output format list, please check Profile Manager.
- To configure options like thumbnails, update and TiVo Media Access Key, please check Configuration Option.
The Next
Main Interface
The main interface is composed of title bar, menu bar, toolbar, file list, media player, output settings area, and status bar.
1. Menu bar
There are three menus in menu bar, namely “File”, “Edit” and “Help”.
![]()
File: Contain operations like add file.
Edit: Edit selected task.
Help: Seek help and update information.
2. Toolbar
Three icons are displayed in the toolbar.

Add: Browse and load source files.
Edit: Edit selected file.
Option: Open Option panel.
CUDA: Turn on/ off CUDA. (En-decoding speed will be greatly accelerated when CUDA is turned on.
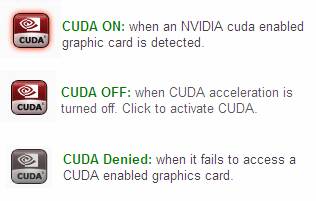
Note that CUDA is accessible only when there is an NVIDIA graphics card that supports GPU en-decoding acceleration. The CUDA button will be grayed out/ denied when the software fails to detect a satisfactory NVIDIA graphics card. And The CUDA works only when creating H.264 encoded video files. Click to learn more which graphics cards are supported)
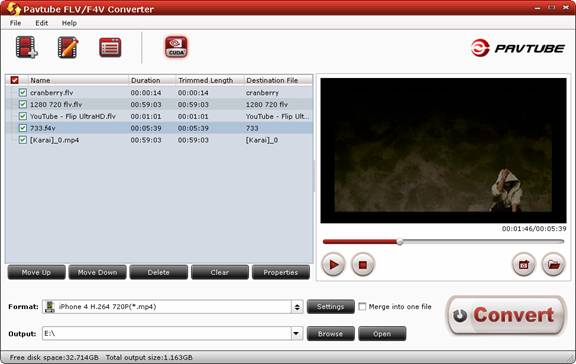
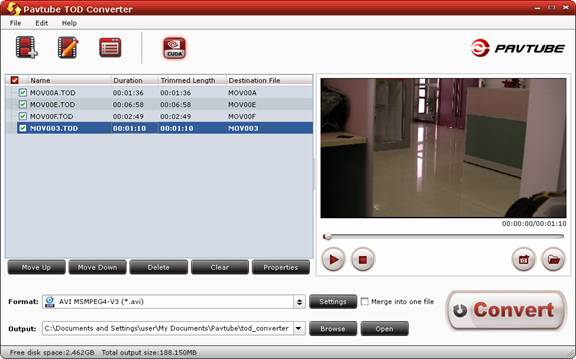
3. File list/ task list
In the file list/ task list you can find task information like file name, duration, trimmed length, and destination. Under the file list there are control buttons to organize the conversion tasks.
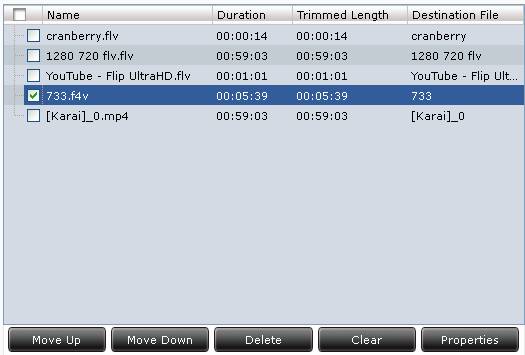
Move Down: Move the selected file one line down.
Move Up: Move the selected file one line up.
Delete: Remove selected file from the file list.
Clear: Remove all the files from the file list.
Properties: View properties of selected task.
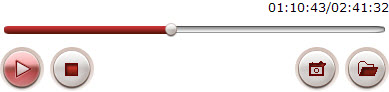
4. Media Player
The Media Player enables users to preview the video before conversion. Double-click on a file to preview it, or you can use the control buttons as well.
Play: Play or pause the video.
Stop: Quit previewing of the current playing file.
Snapshoot: Thumbnail present frame and save to specified place.
Open: Open the snapshots folder.
5. Output settings area
In output settings are you set output destination, format and its advanced parameters.
Format: Specify an output video/audio format.
Settings: Set advanced video and audio parameters.
Output: Show the output path.
Browse: Set output location.
Open: Open output folder that contains generated files.
Merge into one file: Combine and output all selected files as one file after conversion.
6. Status bar
The Status bar show you free space of your target disk and the storage occupation of current tasks.
The Next
Video Editor
You can click Editor![]() to customize the video before converting videos. Six facilities are available: Trim, Crop, Text Watermark, Image/Video Watermark, Effect, and Audio Replace.
to customize the video before converting videos. Six facilities are available: Trim, Crop, Text Watermark, Image/Video Watermark, Effect, and Audio Replace.
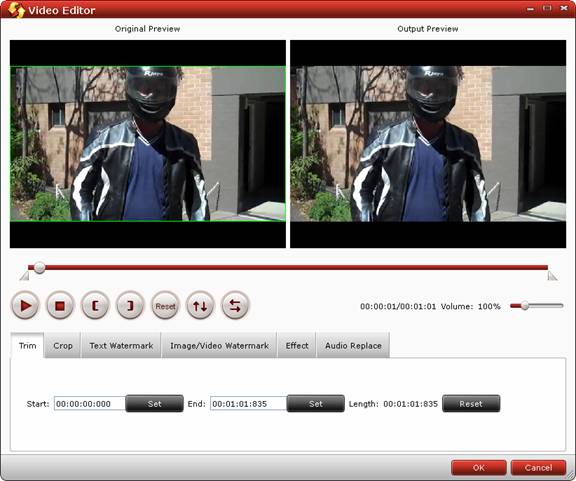
Trim: Cut selected video and remain desired duration only.
Crop: Cut off the black edges of the image and set the aspect ratio.
Text Watermark: Add text watermark to selected video clip.
Image/Video Watermark: Add image or video watermark to selected video clip.
Effect: Adjust the brightness, contrast of the video, and the volume of the audio.
Audio Replace: Replace the original audio track with favorable music.
Besides, there are some user-friendly control buttons for you to preview and edit selected video file conveniently. Please refer to the tool bar below.

Play/Pause: Click to start playing the current video or pause the playing.
Stop: Click to quit playing video.
Left square bracket: Click to set the starting time for trimming.
Right square bracket: Click to set the ending time for trimming.
Reset: Click to reset to default values.
Horizontal Flip: Click to flip the image horizontally.
Vertical Flip: Click to flip the image vertically.
Volume slider: Drag to adjust the volume ranges from 0% to 400% of the original volume.
The Next
Profile Manager
Profile Manager
The Profile Manager helps you customize your own profile list.
Enter Profile Manager
Click on the “Format” bar, and when the profile list pops up, click “Custom” button to enter Profile Manager.

The layout of Profile Manager
The Profile Manager can be divided into two parts. The left part is operation area and right display field.
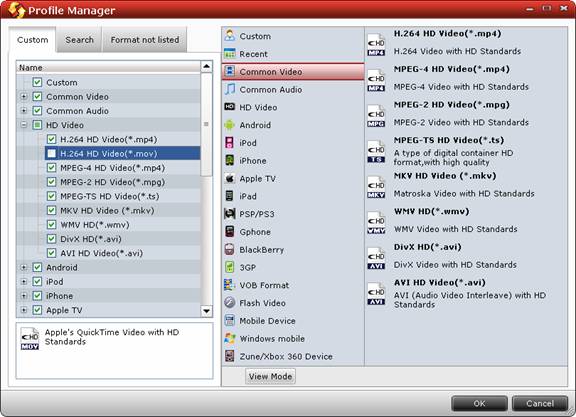
Custom
Under Custom tab you can find all the output format groups. Unfold each group to check individual output format. There is a checkbox before each format and group. To hide the format/ group, just uncheck the corresponding box. To view details of an output format, simply select it, and the Profile Manager will display its remarks at the left-bottom.
Search
When switch to search tab, you can search for desired output format. Input keyword(s) into the search box and click Enter to view search results. If there is no matched result, you may switch to “Format not listed” and ask for new format.
Format not listed
This tab is a deck for users to submit their requirements when there is no format that can satisfy their needs. Just add your demands to the textbox, leave your email address, and click “Submit” button.
Customize your own profile list
a. Hide rarely-used formats
All the formats are displayed by default. You can hide formats that are rarely used in Profile Manager or simply close them in file list to hide them. To open Profile Manager, you can hit the format bar and click the “Customize” button at the foot of profile list.
Uncheck the formats you want to hide or simply click the cross sign in file list to hide them. You can click the “View Mode” to switch to one-stage display mode or back to sub-list display mode.
b. Restore hidden formats
To restore the hidden formats, simply click Customize button, open Profile Manager and check the hidden formats.
c. Add new customized format in file list
The ripper allows users to create customized formats based on current formats for future use. Just choose an output format, click “Settings” ![]() and adjust the audio and video parameter as you like, and click “Save as”
and adjust the audio and video parameter as you like, and click “Save as” ![]() button to save it. Rename the format before you click “OK” to save it to format list.
button to save it. Rename the format before you click “OK” to save it to format list.
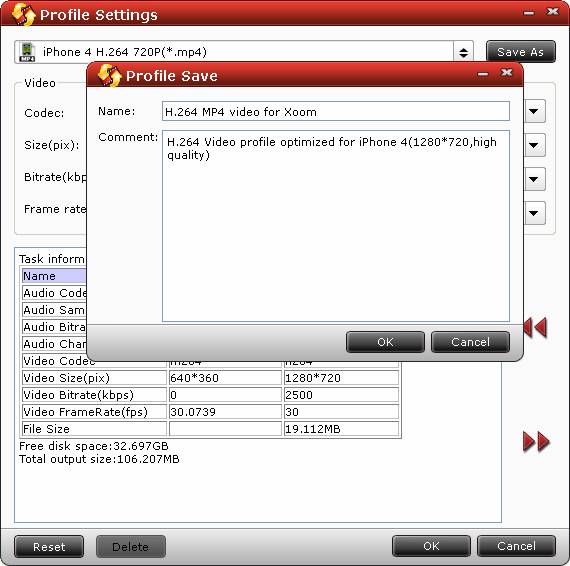
When you'd like to use the new created format as output format, please click the format bar and find it in “Custom” group.
The Next
Configuration Option
To configure options, you can click the “Options” icon to enter the interface below:
General
There are three tabs, General, Thumbnail and TiVo.
Under the “General” tab you can set preference for software update and file exist action.
When an output file has already existed in the output folder (usually because you have converted it once or more), there are three customized options.
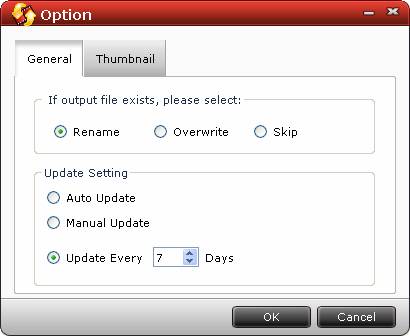
Auto Rename: Select to rename the present output file automatically to avoid overwriting existing file. The generated name is formed with the existing name and number.
Overwrite: Select to overwrite the existing file.
Skip: Select to skip the conversion of the file with identical name in the output folder.
For updating the software, you can set “Auto update”, “Manual Update” and “Update every * days”. You are suggested to set “Auto update”, so that the software will update itself whenever there is a new version released. The update is free of charge.
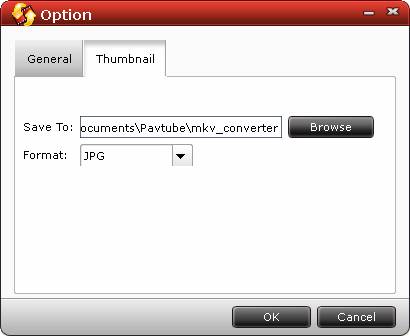
Thumbnail
Under the “Thumbnail” tab you can set folder and format for thumbnails.
Click “Browse” to specify location, and click the down-arrow to set format for saving screenshots if you like.
The Next
Technical Support
In case that you have any problems with Pavtube FLV/F4V Converter, please send email to support@pavtube.com for help. Our support team will help you out as soon as possible. In order to help us deal with the trouble more effectively, please include the following information in your email:
1) Product order number
2) The error message and log records
3) Product and its version number
4) The operation system information of your computer
5) Detailed description about your trouble
Before reporting the problems, please
- Be sure that you are using the latest version of our product.
- Read through the FAQs to search for the solution about the problem that you encountered.
For more information, you can visit our web site www.pavtube.com/support/
The Next
FAQ
1. I’m unable to download the program properly:
1) Please check whether virus has infected your computer.
2) Maybe your IE setting is not perfect, please click "Internet option..." under "Tools", and then select the "General" Page, just click "Delete file...", that will be OK!
2. How to combine multiple video clips into one file?
Select the items you want to combine together and check the box of “Merge into one file” before converting the videos.
3. My source videos (16x9) aren’t staying widescreen after conversion. I don’t want the video to be stretched and made taller. What can I do?
After selecting an output format, click “Settings” button and set the Video Size to 1920*1080/ 1280*720/ 854*480/ 720*405.
4. I’d like to eliminate black bars (edges) from the video, what should I do?
Click “Edit” button to enter into the edit panel and switch to the Crop tab, then just drag the dashed frame on the video screen of the original preview window to cut off the unwanted parts to get the right aspect ratio you need.
5. Can I set larger volume?
You can select the chapter or title and then click the “Edit” button. Under the “Effect” tab, there is an option of “Volume”. Drag the slider bar to a larger percentage. Click “OK” to save the settings. Then the output volume will be louder.
6. How can I get a technical support if I need help with my software?
You can visit our website www.pavtube.com and look through FAQs to search for the answers or email us directly for help.
Purchase
Pavtube FLV/F4V Converter is offered at $29 only, click to purchase the software.
The Next
Register
The differences between a trial version and a retail version
A trial version pops up dialogue box upon each run;
A trial version converts videos with watermark (the logo of Pavtube) on the screen;

Register your copy
After completing the purchase process, you will soon receive e-mail from Pavtube Studio. Download and install the retail version of the product according to the instructions. Copy and paste the registration code to the register field. Then, click the registration button to experience the full version. Find more details at
How to get or find back the download link and registration code of my purchased software?
The Next
Update
Follow “Help” -> “Update” to check for update. You are suggested to read through Tips for Updating Pavtube FLV/F4V Converter.

By default you'll be reminded to update the software to the latest version whenever a new version is released. The update is free of charge. To update Pavtube FLV/F4V Converter automatically, please check for details in Option Configuration. Pavtube support team is always ready to help you out. Any trouble you have when updating the software, please email us.
