
 Home
HomeThere are many open source tools out there for editing and converting media files into exactly what you need. Tools like FFmpeg is fantastic, which is an open-source command-line program for changing a file from one format into another quickly. However, FFmpeg is not easy to operate for newbie users. So, in this article, we will show you the detailed steps on FFmpeg video conversion and introduce the best FFmpeg Alternative to people who don't like using command.
A Quick Guide on using FFmpeg to Convert Media Files
FFmpeg is available on Windows, Linux and Mac operating systems and can be downloaded from the FFmpeg website or through most package managers. Below we will show you how to use FFmpeg on Windows. The steps on other platforms are basically the same.
1. Downloading FFmpeg for Windows
To download the tool, click here to go to the webpage. There are builds for different OS in 32-bit and 64-bit. Just download the version based on the operating system of your computer.
2. Extract FFmpeg Files
After you download FFmpeg, you'll have to extract the files from the .zip folder. First download a free zip extractor called 7-zip from here.
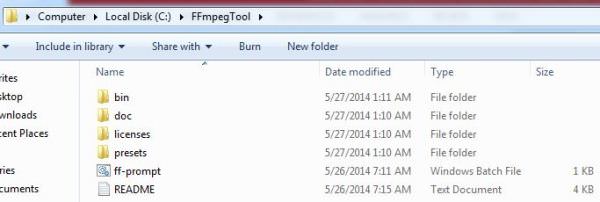
Use the extractor to extract the file, and create a new folder in C drive named FFmpegTool. Copy and paste the contents of the extracted folder into the created folder in C drive.
3. Start FFmpeg
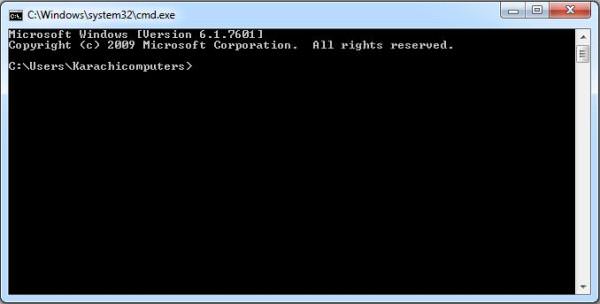
To open FFmpeg, click Run and type cmd and press the Enter button > Then enter cd\ and press Enter > enter cd FFmpeg and the tool will open > enter cd bin and press Enter > now enter ffmpeg.exe and press Enter. And this means that the tool is working fine and ready to use.
4. Start Free FFmpeg video Conversion: eg. AVI to MP4
Once you have tested that FFmpeg is working fine then type in the following command:
ffmpeg -i input.avi -cvodec libx264 -acodec libfaac output.mp4.

More important Commands:
a. Extracting Audio only From Video File: ffmpeg -i yourvideoname.mp4 -vn -ab 128 outputaudio.mp3

Here -vn is used to extract audio and -ab is used to save audio as 128Kbps MP3 file. You can change the bit rate to 256Kbps or something else. Just change the value after -ab. All of the output files will be stored automatically in the bin folder.
b. Resize the Video File: ffmpeg -i yourvideoname.mp4 -s 640x480 -c:a copy resizedvideo.mp4
Here -s is used to resize the video file.
c. Cut Video File into a Smaller Clip: ffmpeg -i yourvideoname.mp4 -ss 00:00:45 -codec copy -t 40 outputclip.mp4
Here -ss defines the starting time stamp (here starting time is the 45th second) and -t tells the total time duration for the clip. So, -t 40 means 40 second duration.
d. Split a Video File into Multiple Parts: ffmpeg -i yourvideoname.mp4 -t 00:00:59 -c copy part1.mp4 -ss 00:00:59 -codec copy part2.mp4
Here -t 00:00:59 represents a part that is created from the start of the video to the 59th second of video. -ss 00:00:59 shows the starting time stamp for the video. It means that the 2nd part will start from the 59th second and will continue up to the end of the original video file.
e. Join (merge) Video Files:
Create a .txt file including a list of all the input video files that are supposed to be merged. The keyword file is followed by name, path and the format of the video files. Add all of the files in the same way in the created .txt file and save this .txt file in the bin folder. eg: file 'C;\FFmpegTool\bin\part1.mp4' ; file 'C;\FFmpegTool\bin\part2.mp4'.
Now type the following command to join the video files:
ffmpeg -f concat -i file-list.txt -c copy outputfile.mp4
You can also explore the rest of the commands via the help option of FFmpeg. Just type in ffmpeg -h in command line. This will list all the available options and commands for these options.
Since FFmpeg works with command line to transcode videos, it seems a little complex for beginner, especially for people who doesn’t know anything about command. Actually, users can find an FFmpeg Alternative which has a friendly graphic user interface (GUI) and includes all common editing features you may need. What software is so perfect?
What's the Best FFmpeg Alternative?
Pavtube Video Converter for Windows/ Mac is the right FFmpeg replacement. This software is a lot easier to use: drag the original video file and select output format, the rest will be done. Pavtube Video Converter never lets you down. You can also take advantage of NVIDIA CUDA and AMD APP acceleration technology to speed the conversion. If you do video conversion and editing work, I strongly suggest you Pavtube Video Converter cause this all-in-one media solution can give you better movie entertainment. (Review)
Why Should You Choose Pavtube Video Converter over FFmpeg
> Friendly graphic user interface (GUI) that helps you to play the video at will and get rid of the boring command
> Wide Range of Output Formats and Codec: MP4, AVI, H.264, H.265, WMV, MOV, etc. And, it provides 150+ devices profiles. covering almost all popular Apple, Samsung, Sony, TV, game console, NLE, etc.
> Allows users to DIY their video by trimming video, merging video to single one file, rotating video, deinterlacing video and adding watermark, etc.
> 2D/3D to 3D movie creation
> Adjust video/audio parameters for better enjoyment
> Perfectly compatible with Windows XP/2003/Vista/Windows 7/Windows 8/Windows 8.1/Windows 10, macOS High Sierra, macOS Sierra, Mac OS X 10.11 El Capitan, Mac OS X 10.10 Yosemite, 10.9 Mavericks, 10.8 Mountain Lion, 10.7 Lion, 10.6 Snow Leopard
Simple User Guide of Pavtube Video Converter
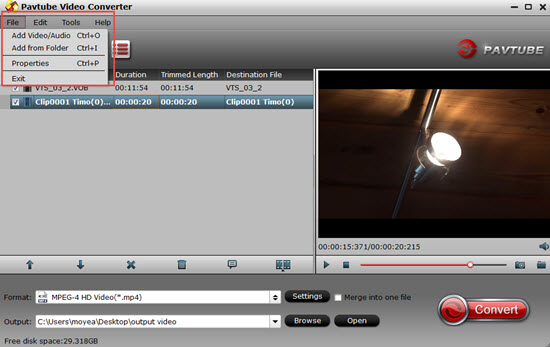
Step 1: Import video files
It is very fast to import source video files to this program through dragging them and dropping. You can also click "File"> "Load video/audio" or "Load from folder" to import your source files. Batch conversion is also supported.
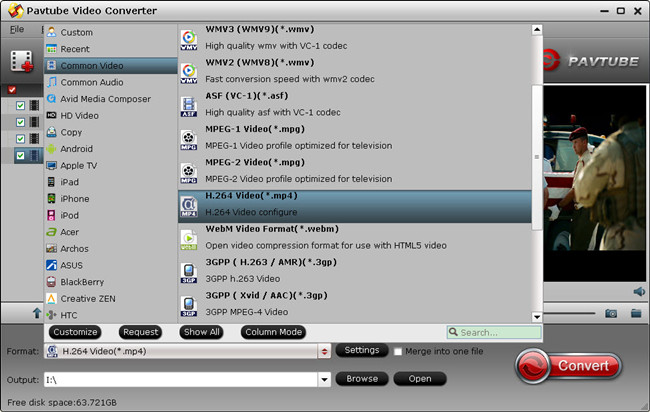
Step 2. Choose Output Format
Click on “Format”, at the drop-down list, you can select any your desired video, audio format as the output video files.
Step 3. Edit Video with the best FFmpeg Alternative
To edit the video file, click on the "Edit" button to open a new editing window from where you can apply the required effects. For example:
Trim and crop: Cut off unwanted parts from source video; crop the black bars and adjust the play fields.
Split and merge: Split a large video into several smaller file; combine more than one video footage into one large file with natural transition.
Insert subtitles: Attach SRT, ASS, or SSA subtitles into original video to create the personal movie for watching.
Add video effects: Adjust volume, brightness, saturation, resolution or apply artistic visual effects to movies.

Tip: To define a custom format, you can click on the "Settings" button on the main interface. Then the "Profile Settings" window will pop up for you to adjust Audio/Video parameters.
Step 4: Start video conversion
The last step is to hit on “Convert” to begin to converting your source video to the digital files you selected. The converting time relies on the size and your bandwidth.
In general, the best FFmpeg Alternative is worth trying. This video converter software can solve any video and audio issues for you.
 Free Trial Video Converter

Useful Tips
- FFmpeg vs Pavtube Video Converter, Which One is Right For You?
- How to Flip or Rotate Videos using Handbrake?
- Play Tivo Recordings with Windows Media Player
- How to Use VLC to Convert AVI to MP4 on PC/Mac?
- MOV Compressor: How to Compress MOV to a Smaller Size on Windows/Mac?
- Stream 4K Video to Chromecast Ultra via Plex


