
 Home
HomeYouTube is by far the most popular video sharing website. There are millions of new videos posted there every day. To make personal video more attractive, many people will edit their video in Sony Vegas Pro first. But after the editing, some don't know how to export the best video for YouTube from Sony Vegas Pro.
I googled the best render settings for YouTube in Sony Vegas Pro and found there are many video tutorials in YouTube but there was few useful posts there. With digging deeply around, I found a very detailed guide in linustechtips.com shared by NonaHexa. This tutorial explains the method for preparing high definition video for posting on YouTube with clean imagery and easy-to-understand wording.
Sony Vegas Pro: Best Render Settings for YouTube
Note: This does not apply solely to Sony Vegas Pro 12, nor Sony Vegas Pro itself. These are generalized video settings as illustrated through Sony Vegas Pro's menus.
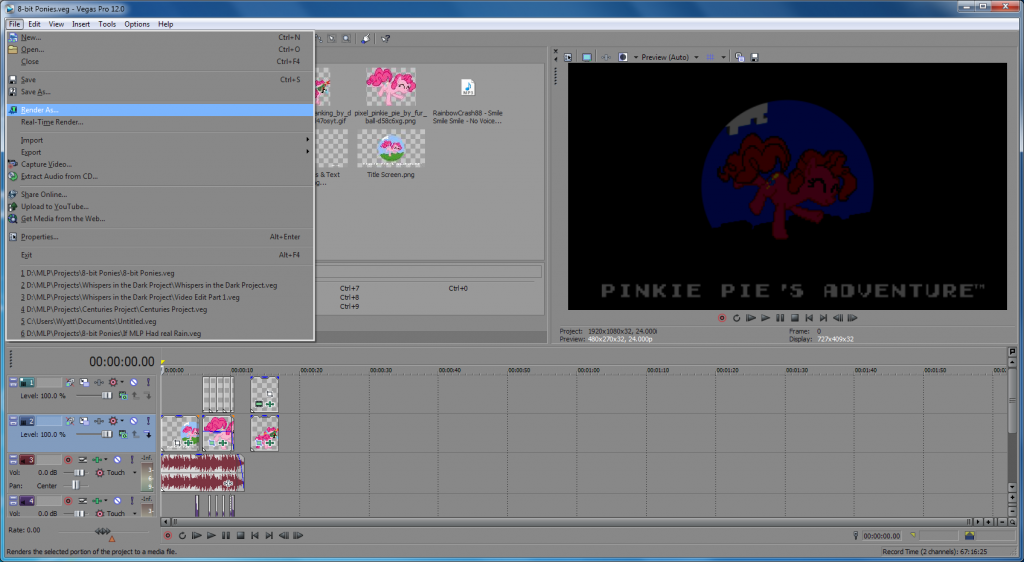
Step 1: Navigate up to the top of your Vegas Pro program, and go to File -> Render As
Step 2: While this may receive some flak, the H.264 codec is currently the best Render option available for Rendering videos in Sony Vegas Pro, and widely accepted as the current best overall. Navigate to the option highlighted in the menu below!
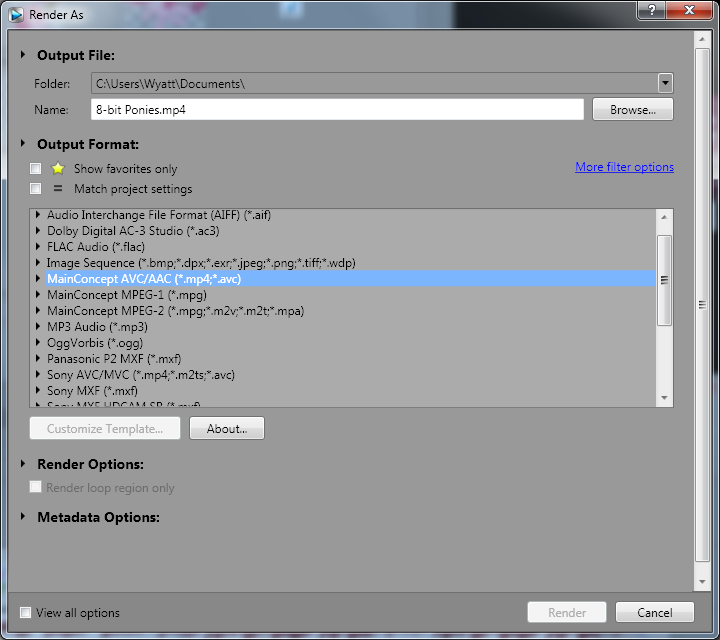
Step 3: Expand that menu, and you'll be presented with a list of presets. Don't just jump to the one that looks the most appealing though! Navigate through the list until you come across "Internet 1080p."
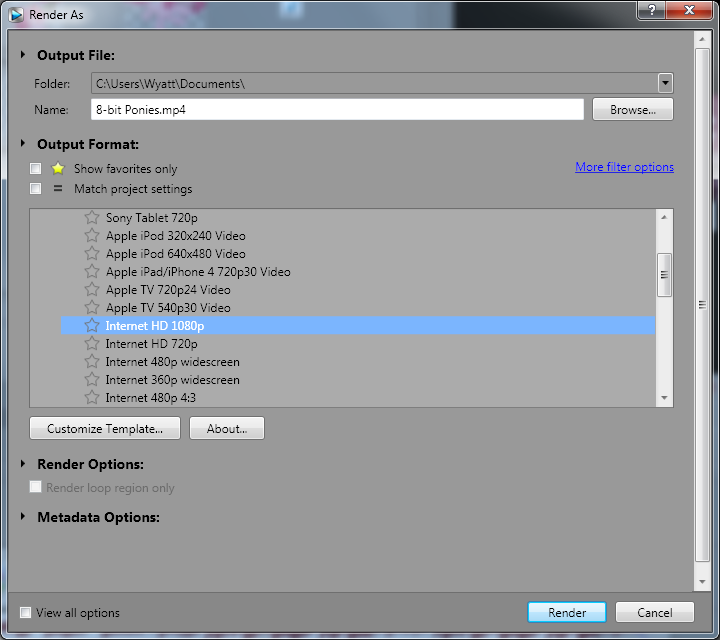
Step 4: Click the "Customize Template..." button, to bring forth a menu where we'll customize it to our liking!
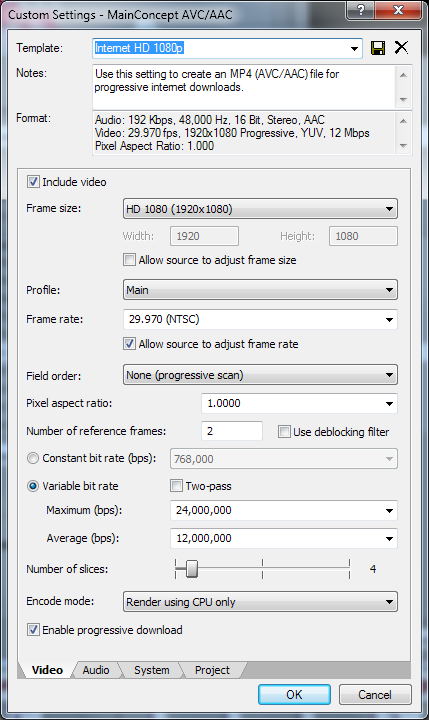
From this menu, we can see a few options we'll be changing. The resolution, the Profile, the Framerate, and the bit rate. Here's some things to note:
Your Resolution should always match, or be lower than your source footage's resolution. Never higher.
The same rule that applies to your resolution, also applies to your framerate.
For HD content, you DO NOT want Interlaced footage. Make sure that your Field Order is always Progressive Scan.
A higher bit rate equals a higher filesize. You'll be making a compromise between video quality, and filesize.
Your resolution should always be the same, or lower than your source footage. Never higher! YouTube has Native Support for 4K, so if your footage is in 4K, be sure to select it as its resolution!
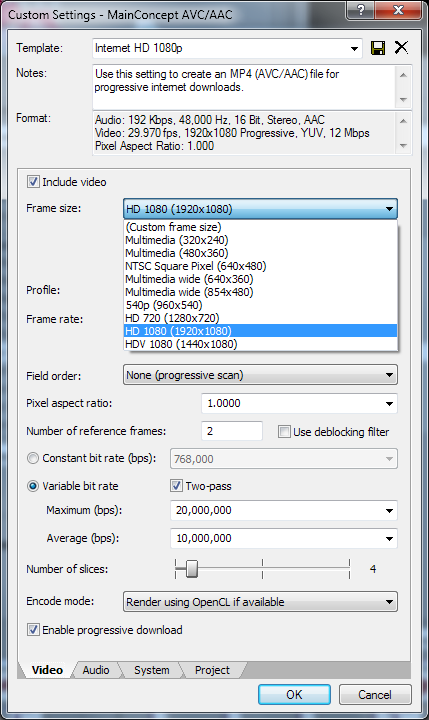
While this list does not display 4K resolution, (3840x2160) Vegas Pro does allow you to render it! Simply select "(Custom frame size)" and type in the values!
From this dropdown menu, you'll be selecting the resolution for your footage. Be sure to select an option that best matches your source!
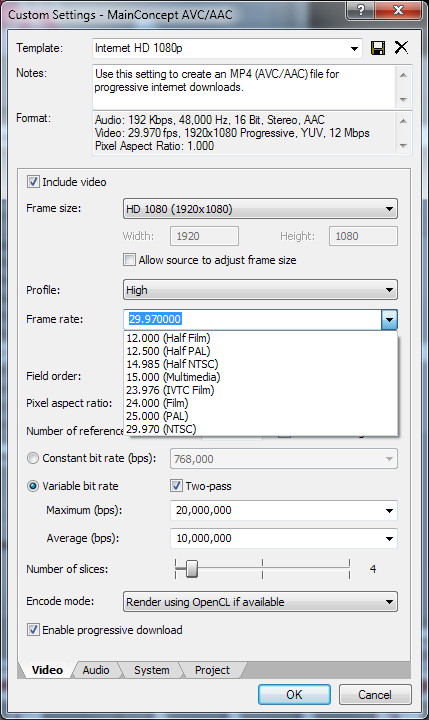
Framerate is just as important as resolution when it comes to matching your footage. Sony Vegas Pro does support 60fps renders, though it is not listed here! Unlike the custom value option for resolution, instead you'll be typing in the value in the box itself. Simply type the framerate at which your footage was recorded. "60" for FRAPS recordings at 60fps, for example.
Next is our bit rate. A bit rate is just that. A rate at which how many bits can be used per second of footage. Traditional bit rates for YouTube are 5-20mbps.
A variable bit rate versus a constant bit rate is less about which is better, and more about how much time you have and how efficient you want your render to be.
Selecting a constant bit rate of 20mbps is going to grant you a very sharp video, but with a larger filesize than would be had through a variable bit rate of 10 average and 20 maximum. A variable bit rate allows Vegas Pro to increase the bit rate for a certain bit of rendering, so as to allow for better compression when necessary, while maintaining a low filesize, due to it not being necessary to use such a high bit rate for larger blocks of similar data. (solid walls, still images and video, etc.)
More is always better with video editing, but the results are largely marginal after a point of about 50mbps. Especially for YouTube, as they do not support bit rates higher than so.
You can calculate your video's output filesize by taking your bit rate, dividing it by 8, and multiplying your number by the number of seconds. (10 / 8 = 1.25 x 180 = 225MB file for 3-minute video.)
The higher you can go, the better. Something like 20,000,000 average and 50,000,000 maximum. However, I find a good spot in the middle is something around 10,000,000 average, and 20,000,000 maximum. Around 250MB for a 3-minute video.
Step 5: So! You've got your Video Settings figured out! Audio is just as important though! Navigate over to your Audio Tab, and take a look inside there!
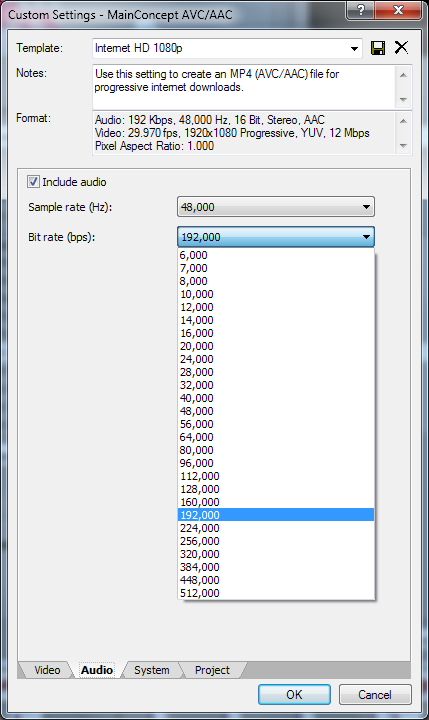
Here, you'll be able to select the Sample Rate, and Bit Rate of your audio. The best option here is to select a bit rate from the list which is closest to your source's audio. YouTube does not support audio bit rates over 320kbps however, so generally speaking this is the best option!
That's it! It really is that easy to get great, low filesize HD uploads for YouTube! These settings should transfer over between programs you use, though the interface and exact labeling might be different!
Rendering to an Interent Template does not limit you to just uploading it to a website. You can also use this format for playback on your computer.
Related Tip: How to Import YouTube Video Sony Vegas Pro?
When you download YouTube in Sony Vegas Pro supported format, you can simply load the video into SV for editing. For those Sony Vegas Pro unsupported YouTube video, you can convert downloaded YouTube video to Sony Vegas Pro supported format with third-party software.
With Pavtube Video Converter, you can convert YouTube FLV video to Sony Vegas friendly supported AVI, MOV, MP4, WMV, MPEG-1/2/4, H.264/AVC, H.265/HEVC,(Vegas Pro 14 supports HEVC) with simple 3 clicks. It also can compress YouTube 4K video to 1080p for Sony Vegas Pro if your computer is too low to handle 4K video. What's more, this video converter also can convert your Sony Vegas Pro export file to YouTube supported MP4, WebM, FLV, WMV, etc with excellent video quality if your Sony Vegas Pro exported file isn't supported by YouTube.
You also can configure video and audio parameters including frame rate, bitrate, codec and audio codec, bitrate, channel, sample rate to make the output video more compatible with Sony Vegas Pro 14/13/12/11. Furthermore, Pavtube Video Converter is also an excellent video editing tool with some simple video editing function. You can trim video, crop video, merge video, split video before export. You also can add subtitle/watermark to video files, rotate/flip video, edit audio. For Mac users, you can turn to Pavtube Video Converter for Mac to convert YouTube to Sony Vegas Pro media loading problems.
 Free Trial Video Converter

Useful Tips
- How to Flip or Rotate Videos using Handbrake?
- Play Tivo Recordings with Windows Media Player
- How to Use VLC to Convert AVI to MP4 on PC/Mac?
- MOV Compressor: How to Compress MOV to a Smaller Size on Windows/Mac?
- Stream 4K Video to Chromecast Ultra via Plex
- Get Chromebook Pro/Plus to Play MKV Files without Any Problem


