
 Home
HomeCan't import AVI files to Camtasia Studio for Mac
When I import the AVI file to clip bin, that file won't show there and Camtasia show me some windows like there is not supported file, or we are unable to find this codec, please help, I installed camtasia on PC and NTB ... on PC it didn't work too, but i restarted it and its working perfectly, on NTB its still not working, please help.

From Camtasia Studio supported file formats list, we can see that Camtasia Studio for Windows has native support for AVI file importing, however, AVI is unfornately excluded from Camtasia Studio for Mac supported format list. To import AVI files to Camtasia Studio for Mac, you will need to perform a format conversion process. Here, you can get the job easily completed with a remarkable program called Pavtube HD Video Converter for Mac (best Mac HD video converter review), which helps to easily transcode all AVI files encoded with different codec such as Divx, Xvid, DV, etc to Camtasia Studio for Mac supported editing video and audio formats listed below:
MOV (QuickTime movie), DV, MPEG-1
MP4
AIFF
MP3
WAV
AAC (m4a)
Tips: You are recommended to use QuickTime or MP4/H.264 (AVC) formats for importing
To get better output video/audio quality, you can also flexibly change the output profile settings such as video codec, resolution, bit rate, frame rate or audio codec, bit rate, sample rate, channels, etc in the program's profile settings window.
Besides AVI, you can also use the program to convert other unsupported file formats such as MP4, MOV, MKV, FLV, MPEG-2, 3GP, RMVB, AVCHD, MXF, H.265, etc into Camtasia Studio compatible editing formats.
Edit MP4 with built-in video editing function
Besides the basic conversion function, the program can also acts as a perfect MP4 video editor which enables you to trim or cut mp4 video length, crop mp4 video black bars, split large MP4 video into small clips by file size, count or length, merge separate MP4 video into one file, deinterlace interlaced mp4 video, add video/image/transparent text watermark to MP4 video, apply special rendering effect to mp4 video, remove/replace audio in mp4 video or add external subtitle to MP4 video, etc.


Step by Step to Convert and Import MP4 to Camtasia For Windows/Mac
Step 1: Add unsupported AVI files into the program.
Run the program on your computer and click "File" > "Add Video/Audio" or "Add from folder" to add unsupported AVI files into the program.

>
Step 2: Output Camtasia Studio for Windows supported editing formats.
From the pull down menu of "Format" , then you will be able to select Camtasia Studio for Mac best compatible editing formats "QuickTime "MOV - QuickTime(*.mov)" under "Common Video" main category, you can aslo choose to output "H.264 HD Video(*.mp4)" under "HD Video" main category according to your own needs.
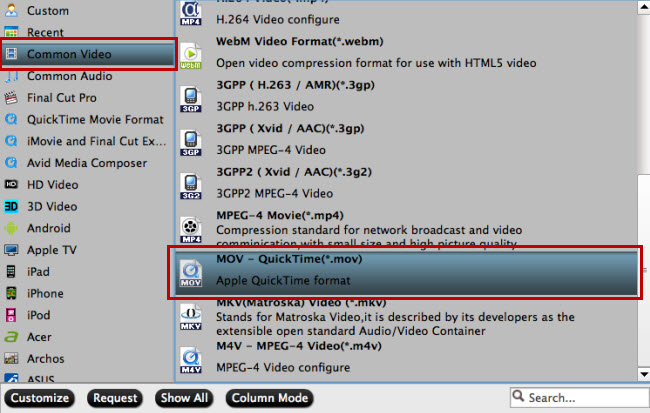
Tips: Click "Settings" to open "Profile Settings" window, here, you can change profile settings according to your own needs.
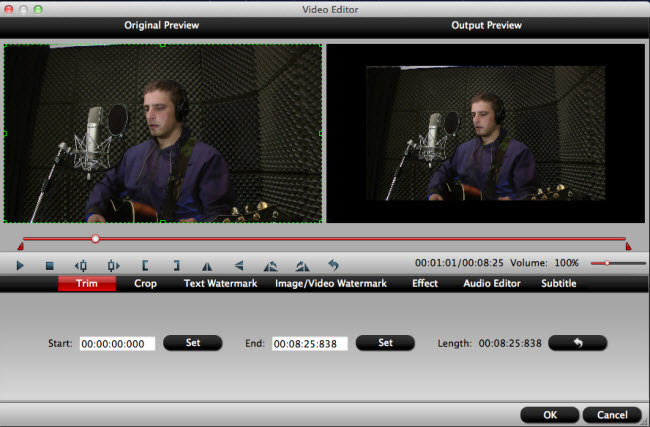
Step 3: Edit MP4 video(optional).
Check an item to active the "Video Editor" function, then click the pencil like icon on the top tool bar to open the "Video Editor" window, you can trim video length, crop video black bars, add watermark, apply sepcial rendering effect, remove/replace audio in video, etc.
Step 4: Start the final conversion process.
After all setting is completed, click right-bottom "Convert" button to begin the unsupported AVI video to Camtasia Studio best compatible editing format conversion process.
When the conversion is completed, you will have no problem to import any MP4 to Camtasia Studio for the best post editing workflow.
 Free Trial HD Video Converter for Mac

Useful Tips
- Review of 5 Best HD Video Converter for Mac (macOS Sierra Included)
- Import DJI Mavic Pro 4K video to iMovie for Editing
- Import DivX to iMovie (iMovie 11 Included)
- How to Convert ASF to iMovie (iMovie 11 Included) on Mac?
- Superior iMovie Alternatives for Mac (MacOS Sierra)
- 2017 Top 5 Best HD Video Converters for Mac OS X El Capitan/Yosemite/Mavericks


