
 Home
HomeCamtasia lets you record a video on your computer screen for making lessons, tutorials or product demos. The built-in video editing tools, animations and effects also help to turn your screen recordings into compelling videos.
Apart from the screen recordings, the Camtasia Studio editor also enables you to import a number of file formats into the timeline for editing. And the following tablet will list the file formats supported by Camtasia for Windows and Camtasia for Mac respectively.
Supported file formats by Camtasia Studio for Windows/Mac
|
Platform |
Video Formats |
Audio Formats |
|
Camtasia Editor for Windows |
.AVI |
.MP3 |
|
Camtasia Editor for Mac |
.MOV (QuickTime movie) |
.AIFF |
Import unsupported file formats to Camtasia for Windows/Mac
For unsupported file formats, you can record the playback in a desktop player or web browser window with Camtasia Recorder for Windows to create a .TREC file and import that into your project. You can also convert the video formats with the free and open-source video transcoder - Handbrake. For Mac users, you can also record the playback in a desktop player or web browser window with Camtasia Recorder for Mac to create a .CMREC file for importing that into Camtasia Editor for Mac. As for conversion files, you can do the conversion with MPEGStreamclip, VLC, Handbrake or QuickTime Pro to a format that Camtasia for Mac that will read,
Professional media conversion tool for Camtasia Studio for Windows/Mac
Fail to convert unsupported file formats with above listed free video conversion app or looking for a more powerful media conversion program that features fast conversion speed and perfect output file quality? Here, we highly recommend Pavtube Video Converter for Windows (review) /Mac to you, the program has comprehensively convert virtually any file formats (H.265/HEVC, XAVC/XAVC S, MXF, AVCHD MTS/M2TS included) with with resolution of 4K/2K/SD/HD to Camtasia Studio for Windows/Mac. As Camtasia Studio has specific requirements for the frame rates on the supported file formats, you can adjust the frame rate for the output video in its "Profile Settings" window.
Apart from that, the program can also work as a perfect video editor alternative for Camtasia Studio. You can take good advantage of its built-in video editing tool to flip video horizontally or vertically, rotate video clockwise or counterclockwise to get it displayed in the right angle, trim or cut video to remove unwanted parts or segments, crop video to cut off unwanted black borders or area, personalize video with video/image/transparent text watermark, split large video into small parts by file size, count or length, merge separate video clips into one, adjust picture effect like brightness, contrast, saturation or apply special rendering effects like Gray, Flip Color or Aged Flim, etc to your video or add external SRT/ASS/SSA subtitles to videos.


The following part will take Pavtube Video Converter as an example to show you how to convert and import unsupported video to Camtasia Studio step by step
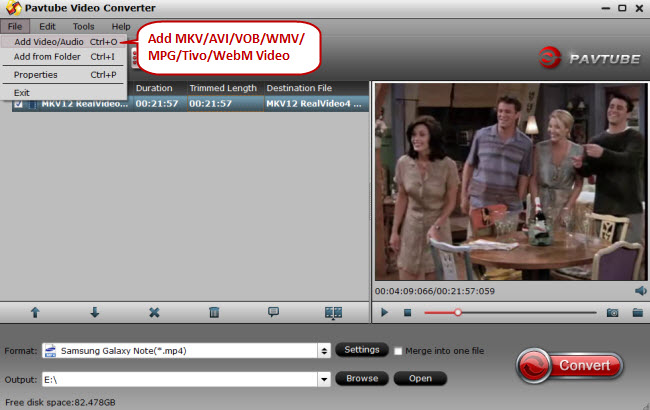
Step 1: Load unsupported files into the program.
You can directly drag and drop the video files with audio into the program or click "File" > "Add Video/Audio" or "Add from Folder" to load the source files into the program.
Step 2: Output Camtasia Studio supported file formats.
Click "Format" bar, from its drop-down options, select one of Camtasia Studio imported file formats such as QuickTime MOV files under "Common Video" main category.
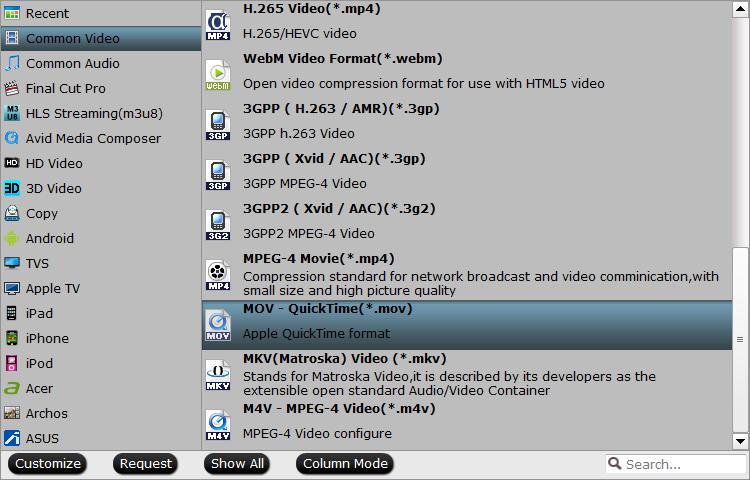
Tips: As Camtasia Studio supports QuickTime mov files no more than 30 frames per second, you can adjust the output frame rate in the program's "Profile Settings" window to let it fit with Camtasia Studio.
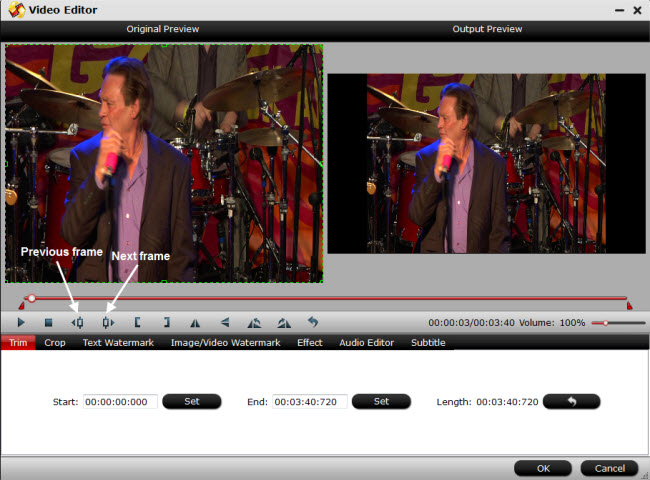
Step 3: Edit files with built-in editing tools.
On the top tool bar on the main interface, click the pencial like icon to open "Video Editor" window, you can trim Blu-ray movies to remove the unwanted parts by setting the start and end time, crop to remove the black borders or unwanted area by dragging the dash line around the video frame, flip video, add text/image/video watermark, change video picture effect, replace/remove audio in video, add external subtitles, etc.
Step 4: Carry out the video conversion process.
Go back to the main interface to begin the conversion from unsupported file formats to Camtasia Studio supported file formats.
When the conversion is completed, feel free to load the converted video into Camtasia Studio.
 Free Trial Video Converter

Useful Tips
- How to Flip or Rotate Videos using Handbrake?
- Play Tivo Recordings with Windows Media Player
- How to Use VLC to Convert AVI to MP4 on PC/Mac?
- MOV Compressor: How to Compress MOV to a Smaller Size on Windows/Mac?
- Stream 4K Video to Chromecast Ultra via Plex
- Get Chromebook Pro/Plus to Play MKV Files without Any Problem


