
 Home
HomeWant to play DVD movie on iPhone? This tutorial offers all the possible steps you would use to convert DVD movies to iPhone video with Pavtube DVD to iPhone Converter. You can get the iPhone MP4 video within a short waiting time with the high speed Pavtube DVD to iPhone Converter provides to rip DVD to MP4.
About DVD
DVD generally stands for Digital Video Disc or Digital Versatile Disc. There are VOB, IFO, BUP files in the folder named VIDEO_TS, under the DVD folder. The VOB files generally contain showing data like video, audio, subtitle, etc. The IFO files contain the navigation information of how the data show up. The BUP files are the backup of the IFO files.
About iPhone
Iphone, introduced by Apple Inc. in 2007, functions as a mobile phone with digital camera, portable media player (iPod), and web browsing gadget etc. The widescreen multi-touch display provides convenient virtual keyboard and buttons. iPhone supports MP4, MOV, and M4V video file formats and AAC, MP3, WAV audio formats.
About DVD movies to iphone software
Pavtube DVD to iphone converter enables you to convert DVD to MP4, H.264, MP3, AAC, WAV and M4A for your iphone easily.
1. Run Pavtube DVD to iPhone Converter, and add the DVD movies to the program.
Please download and install Pavtube DVD to iPhone Converter first. Click DVD Rom, DVD Folder, or IFO file to import DVD videos.
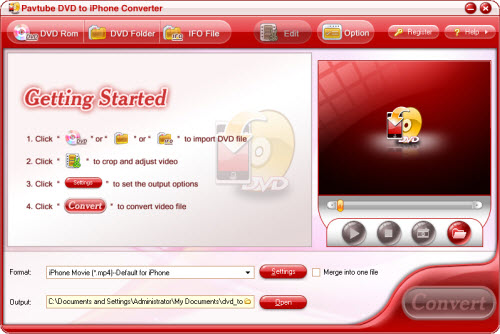
2. Choose the output format and specify the advanced settings
Click on the drop-down arrow for "Format" and select the profile you want with default parameter settings.

If you want to set the output video with the dimension and bit rate, etc. by yourself, you can also click the "Settings" button to personalize the output file. Just click on the item you want to specify, and you will find a drop down arrow for the item.

Listed below are the supported video format for iPhone, you can set the parameters accordingly.
H.264 video, up to 1.5 Mbps, 640 by 480 pixels, 30 frames per second, Low-Complexity version of the H.264 Baseline Profile with AAC-LC audio up to 160 Kbps, 48kHz, stereo audio in .m4v, .mp4, and .mov file formats;
H.264 video, up to 2.5 Mbps, 640 by 480 pixels, 30 frames per second, Baseline Profile up to Level 3.0 with AAC-LC audio up to 160 Kbps, 48kHz, stereo audio in .m4v, .mp4, and .mov file formats;
MPEG-4 video, up to 2.5 Mbps, 640 by 480 pixels, 30 frames per second, Simple Profile with AAC-LC audio up to 160 Kbps, 48kHz, stereo audio in .m4v, .mp4, and .mov file formats.
iPhone also supports AAC, Protected AAC, MP3, MP3 VBR, Audible (formats 1, 2, and 3), Apple Lossless, AIFF, and WAV audio file.
3. Set the output folder
To get the file under your control on your hard disk, you can set the output folder for yourself. Click the browse button to select or create a folder you want.

Click the "Open" button, if you want to open the output folder.
4. Specify subtitle, audio track and angle, or merge into one file.
![]()
Merge selected items to one file:
![]()
| Subtitle | Click on the drop-down arrow to choose the language subtitle you want to get. |
|---|---|
| Audio Track | Choose the audio track that is available from the source DVD. |
| View Angle | Choose a view angle for the output file. If the DVD includes multiple angles, you will get different effect after selecting different options. |
| Merge into One File | Checked the box to merge all the checked files into a single file as output. |
5. Change output file name.
If a file is checked for conversion, there shall be a name on the "Destination File" column. Click on the filename and type the new name, and then press the "Enter" key on the keyboard to save the change.

6. Customize settings: effect, duration, image region.
You can customize the DVD after selecting a chapter/title and clicking on the "Customize" button.
6.1 Change the visual effect under the "Effect" tab.

| Brightness | Drag the slider bar to brighten or darken the image. |
|---|---|
| Contrast | Drag the slider bar to strengthen or weaken the image contrast. |
| Flip | Check the box to correct the image vertically. |
| Volume | Set the default volume to your favorite for the output file. |
| Apply to All | Check the box for "Apply to All" to apply the effect settings to all the files loaded to the program. If the selected file is a title file, not a chapter, you can check the box for "Apply to Child Chapters" to apply the settings to the exact sub-chapters. |
If you wan to change the settings again without the previous change, click "Reset" to get all the settings to the default value. Then, you can quickly get the effect you want.
6.2 Change the duration under the "Trim" tab.

| Start Time and End Time | Type the time you want on the box, and click "Apply" to save the change. The value on the "Selected Length" shows the duration of the current selected segment. |
|---|---|
| Slider Bars | Drag slider bar under the right pane to change the value on "Start Time" or "End Time". |
Click the "Reset" button if you want to get the full length of the file.
6.3 Cut the unwanted borders under the "Crop" tab

| Letter Box | Click the drop-down arrow to select the effect of the letter box you want. |
|---|---|
| Drag Dashed Frame | Drag the dashed frame on the right pane to set the region on the image. |
| Exact Value | Click on the box for the four positions and then scroll to get the exact value, or click the arrow to set the exact value. |
| Apply to Child Chapters | Check to set the sub-chapters with the same crop settings if the selected file is a title file, not a chapter. |
Click the "Reset" button if you want to get the default full image.
7. Preview and take a snapshot of the DVD.

| Preview DVD | Double click on the file name on the list, or select the file and then click on the play button to play the DVD movie on the converter. |
|---|---|
| Take Snapshot | Click to capture the beautiful image of the DVD for thumbnail or wallpaper, and save in BMP, JPG, and THM still image format. Click the button on the right of the snapshot button, and you will face the default output folder for the captured image. |
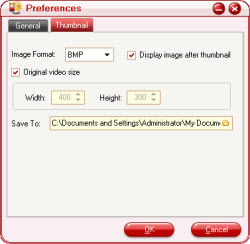
8. Custom preferences settings.
Click the "Options" menu on the main interface and select the "Preferences" sub-menu, and then you can change the general settings and thumbnail settings for the converter and make it meet your preferences.
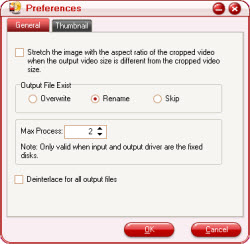
| Existing Filename | Select to overwrite the existing file, rename the output file or skip the conversion when the output filename is the same as that in the output folder. |
|---|---|
| Max Process | Click the arrow to change the number of files to be converted at the same time. If the source DVD is from a DVD disc, only one file will be converted at a time. It saves much time to convert more than one file at a time, while the DVD and the output folder are on your hard disk. |
| De-interlace Video | Check to correct the artifacts on the video and get perfect image on the output file. |
| Thumbnail Format | Click the drop-down arrow to select BMP, JPG, or THM as the default format for the captured image. |
| Thumbnail Size | Check the box to use the original video size, or uncheck to specify the exact size with width and height you want. |
| Thumbnail Folder | Specify the default output folder for the captured image. |
9. Start conversion.
Make sure that you have checked the files you want to convert, and then click the "Start" button.

| Auto-open Output Folder | Check to set the converter to open the output folder automatically. You can quickly find the output files after conversion. |
|---|---|
| Auto-shut down Computer | Check to shut down your computer, if you have no other task for your computer. |
Then, the output files are ready for you to sync to your iPhone via iTunes.
 Free Trial DVD Ripper

Useful Tips
- Convert AVCHD (MTS/M2TS) Videos for Playing on iPhone
- How to Record HD videos with the iPhone 5?
- View movies in format of WMV, MKV, AVI, TiVo and MTS on the new iPhone 5
- How to Sync Music, Photo, Video files from Mac to iPhone 5s?
- Watch Blu-ray ISO movies on Apple's new iPhone 5C
- Easy Way to Convert DVD ISO/IFO to iPhone 5S/5C on Mac


