
 Home
HomeAs video file formats always create large files than what Gmail, Hotmail or Yahoo can accept, therefore, you will need to compress that video for emailing as an attachment. For those people who are fond of sharing self-made videos on popular video sharing sites like YouTube, Facebook or Vimeo, you will still need to do some video compression work of your 4K/2K/HD/SD video to achieve a fast uploading speed and high quality uploading effect. The following article offer some beneficial tips about how to efficiently compress video for emailing sending and YouTube uploading.

Compress video for email
Most email services, if not all, have email attachment size limits. The maximum video size for emailing via Gmail is 25MB, OutLook 20MB, Yahoo 25 MB. The limitation on the video file size require you to email video with some good quality with reasonably small file size video format such as Divx, WMV, RealVideo, H.264, etc.
Compress video for YouTube uploading
Compress video for YouTube can be very tricky if you not clear what are the best uploading formats and settings for YouTube. The article below will show you how to properly compress video for YouTube uploading with the appropriate file format, size, duration, resolution, aspect ratio, frame rate, bit rate.
1. Video format
Although YouTube enables you to upload video in many different file formats, however, it is ideal to use the best youtube video uploading formats H.264 High Profile video codec and AAC-LC audio codec with Stereo or Stereo +5.1.
2. File size and duration
With an up-to-date version of your browser so you can upload files greater than 20GB. The maximum file size you can upload to YouTube is 128GB. As for the video length, you can upload a video that are up to 15 minutes longer with a verified account.
3. Resolution and aspect ratio
YouTube uses 16:9 aspect ratio players. If you're uploading a non-16:9 file, it will be processed and displayed correctly as well, with pillar boxes (black bars on the left and right) or letter boxes (black bars at the top and bottom) provided by the player.
4. Frame rate
Content should be encoded and uploaded in the same frame rate it was recorded. Usually videos have the best quality if there frame rate is between 25-30 fps.
5. Bit rate
Bitrate is highly dependent on video codec. YouTube published recommendations on bitrate value. See the table below. If you convert video for YouTube, please try to stick to it.
Recommended video bit rate for upload
| Type | Video Bitrate, Standard Frame Rate (24, 25, 30) |
Video Bitrate, High Frame Rate (48, 50, 60) |
| 2160p (4k) | 35-45 Mbps | 53-68 Mbps |
| 1440p (2k) | 16 Mbps | 24 Mbps |
| 1080p | 8 Mbps | 12 Mbps |
| 720p | 5 Mbps | 7.5 Mbps |
| 480p | 2.5 Mbps | 4 Mbps |
| 360p | 1 Mbps | 1.5 Mbps |
Recommended audio bit rate for upload
| Type | Audio Bitrate |
| Mono | 128 kbps |
| Stereo | 384 kbps |
| 5.1 | 512 kbps |
Best Video Compressor to Compress Video for Email and YouTube
To make video compatible with above listed formats and settings for email sending or YouTube uploading, you can download this professional and simple to use program called Pavtube Video Converter (review), it not only helps to encode various different video files to the best suitable Divx, WMV files for attaching to email or H.264 High Profile video codec and AAC audio codec for sharing on YouTube, but also offers various different ways to further compress your video: you can lower resolution to compress 4k to 1080p or 1080p to 720p, lower the bit rate 20-50% of the default or lower the frame rate of your video 15 or 10 fps to reduce the file size by as much as 1/2 or 2/3. If you don't want to loss any quality, just select to trim the video to cut off unwanted parts or split your large video into small parts by file size, count or length.
For Mac users, you can do the same video compression process on macOS Sierra with Pavtube Video Converter for Mac(review).


Step by step to Compress Video for Email Sending or YouTube Uploading
Step 1: Load video files into the program for compressing.
Launch best video compressor on your computer, on the main interface, click "File" > "Add Video/Audio" or "Add from folder" button to load source video files into the program.

Step 2: Choose output file format.
Click "Format" bar, from its drop-down list, select to ouptut good quality with smaller file size formats such as WMV, FLV, MP4 for email send. As for YouTube uploading, you can output the most suitable H.264 High Profile file format.

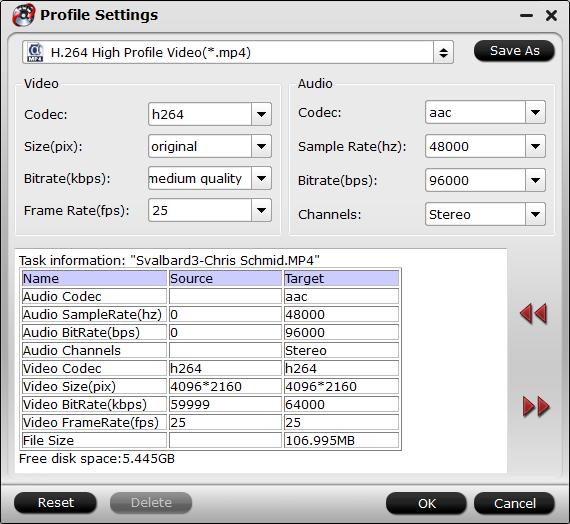
Step 3: Change output profile parameters.
You can further reduce the file size by tweaking the output video, audio settings like file resolution, frame rate, bit rate, codec, etc(lower resolution, frame rate and bit rate will also reduce the file size and lower the output quality, therefore, make sure the keep a balance between file size and quality.)
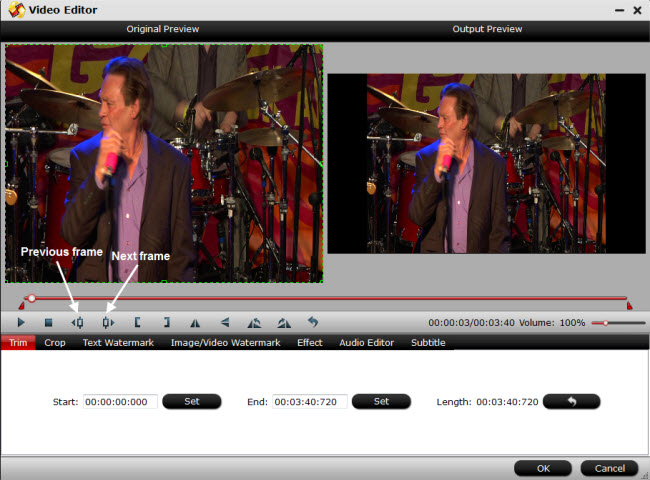
Step 4: Trim or split the video.
If you do not want to loss any quality when compressing video for YouTube uploading, you can trim video to cut off unwanted parts or split large video into small pieces.
Trim to shorten video length: Open "Video Editor" window and switch to the "Trim" tab, you can drag the slider bars to include the segment you want to remain, click the left square bracket to set start point, and click the right square bracket to set end point when previewing the video or directly input specific values to "Start" and "End" box.
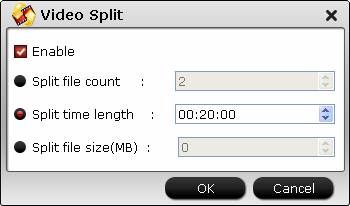
Split video into small parts: Click the "Split" button "http://www.multipelife.com/wp-content/uploads/2014/04/split.jpg" under file list to launch the "Video Split" window. Checking "Enable" to enable it, and then you can split the file by file count, time length, or file size.
Step 5: Start video to YouTube or email compression process.
After all the setting is completed, hit right-bottom "Convert" button to begin the video compression process for email sending and YouTube uploading.
 Free Trial Video Converter

Useful Tips
- How to Flip or Rotate Videos using Handbrake?
- Play Tivo Recordings with Windows Media Player
- How to Use VLC to Convert AVI to MP4 on PC/Mac?
- MOV Compressor: How to Compress MOV to a Smaller Size on Windows/Mac?
- Stream 4K Video to Chromecast Ultra via Plex
- Get Chromebook Pro/Plus to Play MKV Files without Any Problem


