
 Home
HomeThere're many cases you might need to compress the size of video file. For example, when you record a video using HD camera, you get the content in a video file of big size. It is challenging to send such large video file over social media, emails or other various sites. Hence, in this case, you need to reduce the size of your video files using a video compression software. Search for the best video compressor software for Mac? Now you can read this post to learn more detailed information about the best video compression software for Mac: Pavtube Video Converter for Mac.
Best Video Compression Software for Mac
There is a plethora of video compression software available in the market that supports compressing video files. Some video compression software even allows users to compress videos in a bulk. However, not all video compressors are suitable for you. For beginners, you need to choose simple-to-use video compressor. What's more, you need to judge a video compressor software by many factors, including supported OS, supported input source, output video/audio formats, available video audio parameter setting, help and support, usability and stability, video conversion & compression speed, etc. Taking all these factors into consideration, we have picked out the best video compressor for Mac – Pavtube Video Converter for Mac (Get Windows Version).


Why Pavtube Video Converter for Mac is the Best Video Compressor Mac?
1. Coming with 250+ video audio codecs, it supports virtually all video files as the input and output source. That is to say, it enables you to compress HD MKV, M2TS, TS, AVCHD, MP4, AVI, WMV, MOV and more videos at ease.
2. With optimized device presets, it is available to compress videos to iPhone X/8, iPad, Samsung, Android, Sony, Microsoft and more devices directly.
3. Nowadays, we love 4K videos, but we need to compress them some day for certain reason. With this compressor, it is easy fot you to compress 4K video to 1080p, or 1080p to 720p. Even upscaling 1080p to 4K is as easy as pie.
4. It offers all-around video & audio parameter settings for video compression, such as, bit rate, frame rate, resolution, sample rate, etc.
5. Takes full advantage of the NVIDIA CUDA technology and AMD ® Accelerated Parallel Processing (APP) to largely accelerate video encoding speed. (Windows version only)
6. Keep the best balance between file size and video audio quality while compressing video files.
7. Fully compatible with macOS High Sierra, macOS Sierra, Mac OS X 10.11 El Capitan, Mac OS X 10.10 Yosemite, etc.
Sum up, Pavtube Video Converter for Mac meets all the criteria for first-class Mac video compression software.
How to Compress Videos with this Best Video Compression Software?
Step 1: Load the video you want to compress
Here you are allowed to load your videos to be compressed with 2 different ways: click the "Add Files" button on top left of the main interface or directly drag and drop your videos to the program. This video compressor supports batch conversion. So you can add multiple video files to compress video by batch.

Step 2: Compress your videos
A video file size is determined by file format, video resolution, bit rate and more. To get a smaller result, you can make use of the compression options provided by this video compression software. You can do as follows to reduce the file size:
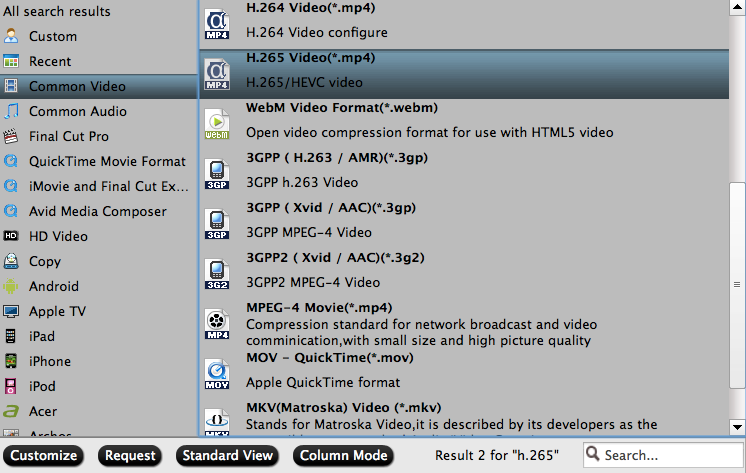
1. Define output file format
MP4 is commonly used thanks to its high compression rate, good video quality and wide compatibility. Pavtube Video Converter for Mac offers MP4 format with H.264 video codec and AAC audio codec, the most widely used video audio codecs supported by most devices and players. H.265/HEVC, the successor of H.264 codec, is also available to choose. It can help reduce file size without sacrificing video quality.
Editor's Note: To compress videos for uploading on YouTube or other sites, you can choose output like FLV from category "Common Video".
2. Set parameters to compress video
Click "Settings" button behind Format bar, to open "Profile Settings" window:
* Lower the bit rate 20-50% of the default. Bit rate is an important factor of video file size. You can lower the video audio bit rate to reach small files.
* Change video resolution. 640 x 480 is a good option, because it is fit for iPhone, iPad, Android mobile, Microsoft device, and video website like YouTube, Facebook, Vimeo and more.

3. Compress video by trimming
If you only need part of the video, just trim it and get a small video. Click the "Edit" icon on the UI to open "Video Editor" window. You can cut off the unwanted parts from a long video to short ones by setting the start time and ending time.

Step 3. Begin compressing video
After pressing "Convert' in the lower right corner of the interface, it will come to the process of video compression. After a few minutes, you will get your compressed video with small file size.
Related Article:
MOV Compressor: How to Compress MOV to a Smaller Size on Windows/Mac?
Reduce AVI File Size with Best AVI Compressor
Compress Video for Email Sending and YouTube Uploading
 Free Trial Video Converter for Mac

Useful Tips
- Best Video Compression Software for Mac
- Convert and Import VOB to iMovie on Mac OS X
- Import TS files into Premiere Pro for Editing
- Convert AVI/MKV/MP4/M4V/FLV to Apple ProRes codec for FCP editing
- Compress GoPro Hero 4K Video to 1080p HD on Mac/Windows
- Full Workaround to Import and Edit WebM Video with iMovie


