
 Home
HomeDo you have the predicament that one person in your office users Vegas Pro to edit and the rest uses Final Cut Pro X? Of course, it's not a huge problem that a person is using a different software, except, when the person can't save the project file in a format the rest uses. Normally, if you use Sony Vegas Pro 12, you can try to export FILE > Export > Final Cut Pro X (.fcpxml) to import your Sony Vegas Pro to FCP X.
However, in this way, a lot of things that probably won't translate simply because of the different capabilities of Vegas Pro and Final Cut Pro. Things like Deinterlace method, Motion blur type, Track Composite mode, Loop switch for events, Effects, etc. will all be ignored. So if you want to export FCPX XML file from Vegas for FCP X, the only way to work is that the person who using SV does a basic edit, and then someone else finishes it. Is there any better way to solve the issue?
Best Way to Import Sony Vegas Pro file to FCP X
If you have a Pavtube Video Converter for Mac, things will be getting simple. You can export any file from Sony Vegas Pro and edit the video as you want before render it. Then you can use Pavtube Video Converter for Mac to convert the video to FCP X most compatible video format with compatible A/V parameters. Apart from converting Sony Vegas Pro files into FCP X, this video converter also can convert Canon XF105 MXF video, P2 MXF, OBS video, Fraps recordins, Shadowplay video, etc to Final Cut Pro X/6/7.
Additionally, you can edit Sony Vegas Pros clips with built-in video editor to trim, crop, merge, split, rotate, flip, volume, add subtitle/watermakr and more. You also can adjust video and audio codec, frame rate, sample frequency rate, channel mode and others. For Windows users, you can turn to Pavtube Video Converter to convert Sony Vegas Pro file to FCP X supported files.


Steps to Convert Sony Vegas Pro file to FCP X
Step 1. Load Sony Vegas Pro files
Follow Export Sony Vegas to MP4 guide to get the MP4 file. Then you can directly drag & drop the Sony Vegas Pro MP4 files to the converter, or click “Add Video” or “Add from folder” button on the top menu to browse and choose Sony Vegas Pro MP4 files.

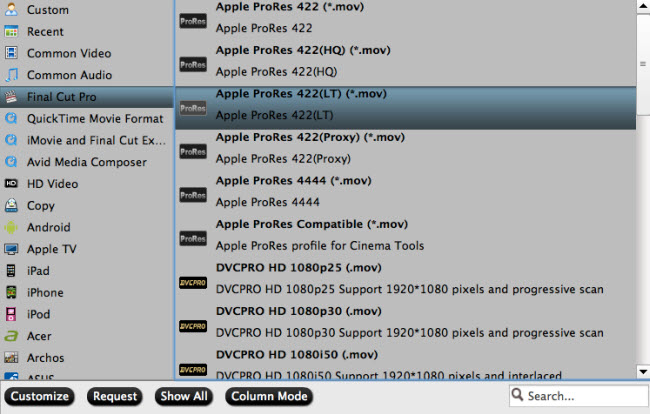
Step 2. Choose Apple ProRes for FCPX
Clicking "Format" bar and choose Apple ProRes 422 (*.mov) as output format from the "Final Cut Pro" category which can be the most compatible video format for FCP. Learn>>Types of Apple ProRes Codecs.
Tip: FCP 7 and above user can choose ProRes 422(LT)/ProRes 444/ProRes 422(Proxy) to meet your own demands.
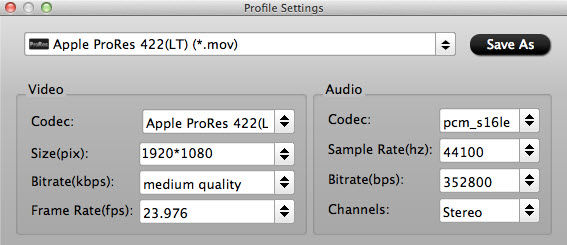
Step 3. Adjust video&audio settings (optional)
Click the “Settings” button to adjust video size, bitrate and frame rate if you are not satisfied with default settings.
Step 4. Start Sony Vegas Pro to ProRes 422 LT Conversion.
Click the big red “Convert” to start to convert Sony Vegas Pro file to FCP X suported video. The software will take care of the rest and the user will now have the file in a format that can be used with Final Cut Pro X.
How to import Video Files to Final Cut Pro for editing?
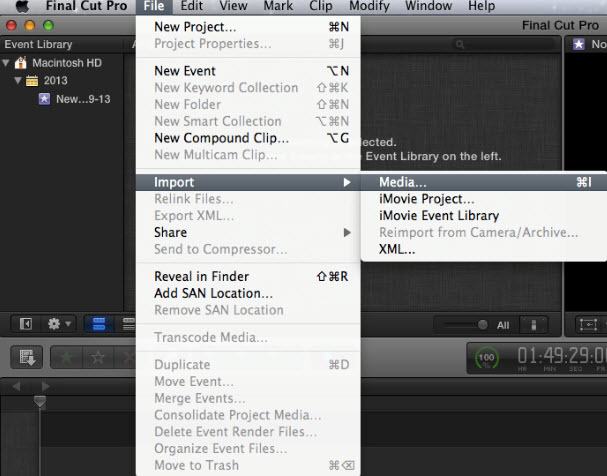
Launch Final Cut Pro on your Mac to enter the mani interface, on the top of which lies a menu.
Click “File” button to pop up a panel, on which you shall click “Import”, and then “Media” on another pop-up panel. Once “Media” is clicked, you can freely choose media file to import.
In this case, you should go to the output directory which you set in the third step of Part 2 and choose the movies for importing to Final Cut Pro.
After chosen, the video file now in Final Cut Pro compatible video formats will be imported into Final Cut Pro. Then you can drag the imported video on clips window to timeline for editing.
 Free Trial Video Converter for Mac

Useful Tips
- MOV to M4V: How to Convert MOV to M4V on Mac OS (macOS High Sierra Included)
- How to Play AVI Videos on MacBook(Air, Pro, iMac)?
- How to Import Android Videos to iMovie for Editing?
- How to Play a WMV File on Mac Computer
- Play H.265 Files with QuickTime Player on Mac
- Convert YouTube to MPG/MPEG with Easiest Way


