
 Home
HomeWhen you download videos from torrent sites, get video files from friends and shoot videos with a HD camera, you will have a greater chance to get MOV files. But, if you are interested in editing video by yourself with After Effects (CC, CS6, CS5), you maybe meet MOV importing and editing issues in After Effects (CC, CS6, CS5). Sometimes, when you import MOV files to the After Effects (CC, CS6, CS5) project, a message maybe pop up: "After Effects error: file 'file name.mov' cannot be imported - this 'MoV file is damaged or unsupported.'
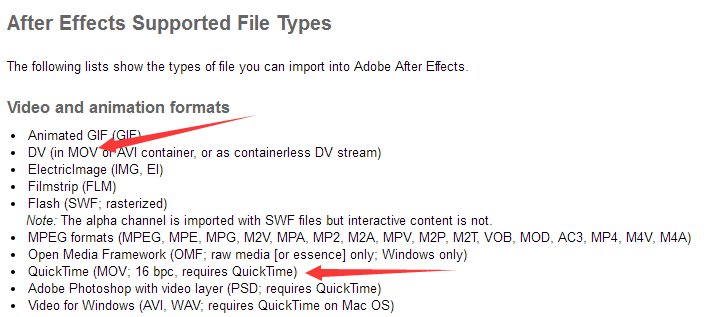
Isn't After Effects compatible with .mov files? Actually, on After Effect supported file video and audio page, MOV is on the supported list. But it also shows that After Effects (CC, CS6, CS5) can't accept all MOV files. AE only supports DV MOV and QuickTime MOV (requires QuickTime ).
How to Solve "MOV Can't Import into After Effect" Issues?
There are various factors that cause MOV failure importing into AE projector. So you can try the methods below one by one to check which method will work.
1. MOV Can't Import to AE issues might cause by the blocked communication between AE and QT. You can double check your QT version.
2. Do you have a firewall software installed that affected the communication? Exit it and try again.
3. Some third-party component in the QT Library also can cause the issue. You can remove all of those third-party components and try again. If After Effects works with QuickTime fine after that, then put the components back in one by one until you find the one (or more) that's causing the problem.
4. Try setting your default player for .mov files to QuickTime.
Right click on one of the mov files you are having a problem opening in AE.
Select the "Open with" and select "Choose default program..." at the bottom.
Select Quick Time. (Make sure the "Always use the selected program to open this kind of file" box is checked.)
Reboot your computer.
Open AE and see if it works.
5. MOV is a container which can contain some other video codec that After Effects can't support. In this case, you need to transcode AE unsupported MOV to AE supported QuickTime MOV files with a video converter.
How to Transcode AE Unsupported MOV to AE supported MOV?
If you shoot videos with DJI drone or a HD(UHD) camera, you will find that many cameras have output video files in HEVC MOV, some files also will be in 4K resolution. When your MOV files are these case source, you can't solve your MOV importing and editing issues in AE following the above methods. The only way is to convert these unsupported MOV to After Effect supported QuickTime MOV.
With Pavtube Video Converter for Mac, you can easily convert H.265 MOV and other AE unsupported MOV to QuickTime MOV and other AE compatible video such as DV AVI, H.264 MP4, MPEG-2, etc. It can compress 4K MOV to 1080P MOV for After Effects (CC, CS6, CS5). Of course, as an excellent video converter, it also can convert other video to AE like converting WMV, MKV, AVI, TS, VOB, FLV, etc to AE.
Furthermore, before convert your unsupported video to AE, you can merge all videos, remove audio from video, split videos by size, as well as modify audio and video settings when it comes to the sample frequency rate, bit rate, volume, resize mode, cropping, padding and others. Pavtube Video Converter for Mac is designed for Mac users. For Windows users, please use Pavtube Video Converter. Now download the right version below to start to convert AE unsupported MOV to After Effects (CC, CS6, CS5).


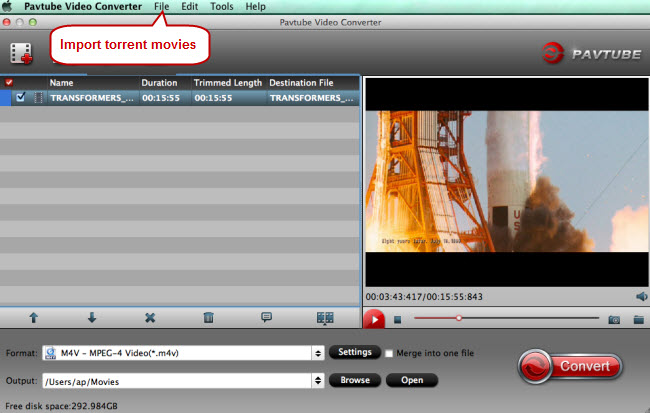
Step 1: Import MOV clips
Download MOV to AE Converter for Mac and load source mkv files to it. You can load multiple MOV files at a time cause this video converter supports batch conversion. If you like, check the “Merge into one” box to join MOV clips together.
Step 2: Choose After Effects preferred format
Navigate to “Format’ > “Common Video” > “MOV – QuickTime(*.mov)”. You can see that here are hundreds of video formats for you choosing. Click “Settings” button to go to “Profile Settings” screen where you can adjust audio and video parameters like size, bitrate, frame rate, sample rate, etc.

Step 3: Start MOV to After Effects conversion
Click “Convert” button to start converting MOV to QuickTime for Adobe After Effects on Mac OS X. When the MOV to Adobe After Effects conversion task is finished, click “Open” button to get the exported files for transferring to After Effects with easy playback or editing.
Tips. How to Export QuickTime MOV from After Effect?
Once You've imported and edited video in AE and ready to export the clip, then go to,
Menu --> Composition --> Add to Render Queue or (CTRL + M) on Windows/ (Command M ) on Mac . It will bring up the "Render Queue" panel.
To change the video settings as we need, Click on the "Lossless" text on the Render Queue.
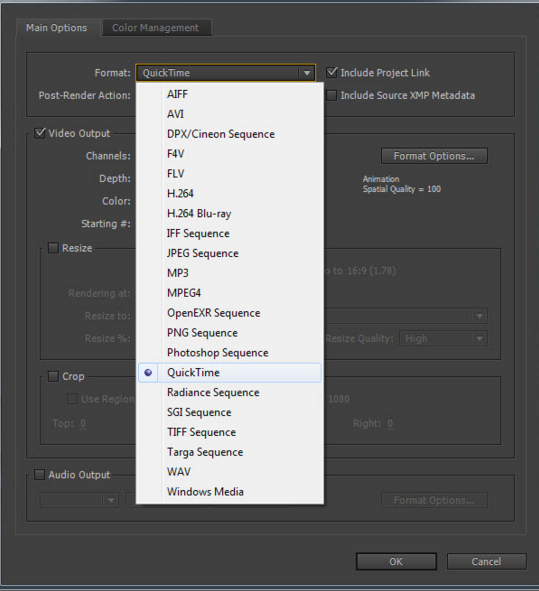
This will bring up "Output Module Setting" dialog box. This is the most important setting window where most people will struggle. Lets do this right.
From the Format drop down, Select QuickTime.
** If you can't see Quicktime as an option, then You might not have Quicktime installed on your system. You can download free installation from here. Install it and restart the After Effect and re-open the project.
then, Click on the "Format Options" button at Video Output section.
This is very important. You need to select correct Video Codec from here. Select Photo JPEG from the drop-down. This code will work for most of every footages. Standards says that you should use Photo JPEG, if your footage is Progressive Scan footage. (for computer animations too )
If you footage is Interlaced Scan footage, then you should select Motion JPEG as your video codec and once you've set the video codec, then you can adjust Quality of the video.
Then Press OK, and close the dialog box.
Then Click the yellow color text which says "Best Settings" on the Render Queue. It will bring up the Render Setting dialog box. Normally Quality should be set to "Best" automatically. If not change it to Quality as "Best".
Now you'll need to set the output saving location for the video file. You can do it by clicking yellow text front of "Output To: " at Render Queue. (Important : you should always set the output location , otherwise later you'll find it difficult to find the finished file. )
Then, You are good to go. Press "Render".
It will take few seconds to export depending on your system. After Effect will give sound alarm as well when the Render is done.
 Free Trial Video Converter for Mac

Useful Tips
- MOV to M4V: How to Convert MOV to M4V on Mac OS (macOS High Sierra Included)
- How to Play AVI Videos on MacBook(Air, Pro, iMac)?
- How to Import Android Videos to iMovie for Editing?
- How to Play a WMV File on Mac Computer
- Play H.265 Files with QuickTime Player on Mac
- Convert YouTube to MPG/MPEG with Easiest Way


