
 Home
Home“Hey guys, I’m really stumped on this. My Canon shoots 1080i, 60 fps videos, and I just want to know if there is a way to convert 1080i/60 to 1080p/60 for editing on Mac. Any recommendations for Mac software that can do this? Can anyone tell me a definitive answer to this?”
Before we answer the above mentioned question, let’s see: What are the differences between 1080p60 and 1080i60?
Some people are under the assumption that 1080i 60 and 1080p60 are the exact same thing, with one being interlaces and the other progressive. Actually, 1080i delivers a picture in two fields and together they make up a full frame. 1080p delivers a full frame in a single pass. In brief,
1080i60 = 1920 x 540 interlaced fields 60 times per second
1080p60 = 1920 x 1080 complete frames 60 times per second
A true 1080p signal carries twice as much information as a 1080i signal. Converting a 1080i signal to a 1080p signal does not in any way increase the amount of information in the image. Before investing money in converters, one needs to see the end results to make sure there is a real reason to make the conversion.
There are Mac converters (e.g. Pavtube HD Video Converter for Mac) that will convert between 1080i60 and 1080p60. The following tutorial will describe how to transcode 1080i60 to 1080p60 for FCP, iMovie, Avid, and PPro CS6 on Mac using this tool.
1. Download the free trial version of Pavtube HD Video Converter (Download PKG, Download DMG), install and open up it as a 1080i/60 to 1080p/60 Converter for Mac. After that, click the “Add video” or “Add from folder” icon to import 1080i60 files that you wanna convert to 1080p60 into the program.
Note: The free trial version will output files with Pavtube watermark in the middle of the video, if you wanna get rid of the watermark, you need to purchase the Retail Version.
2. Choose a proper format as output for your Mac NLE apps.
Pavtube 1080i/60 to 1080p/60 Converter for Mac software features optimal format presets for different Mac video editing programs, such as FCP, iMovie, FCE, Avid and Adobe Premiere Pro, so that you can make your selection directly and easily. In this example, we choose “Apple ProRes 422 (*.mov)” as target format from “Final Cut Pro” catalogue.

If you are using iMovie or FCE, you can select “Apple InterMediate Codec (AIC) (*.mov)” ![]() under “iMovie and Final Cut Express” option; if you are editing with Avid, you can choose “Avid DNxHD(*.mov)”
under “iMovie and Final Cut Express” option; if you are editing with Avid, you can choose “Avid DNxHD(*.mov)” ![]() from “Avid Media Composer” column; if you are working with Adobe Premiere Pro CS6, you can select “MOV(AVC)(*.mov)”
from “Avid Media Composer” column; if you are working with Adobe Premiere Pro CS6, you can select “MOV(AVC)(*.mov)” ![]() beneath “Adobe Premiere/Sony Vegas” profile.
beneath “Adobe Premiere/Sony Vegas” profile.
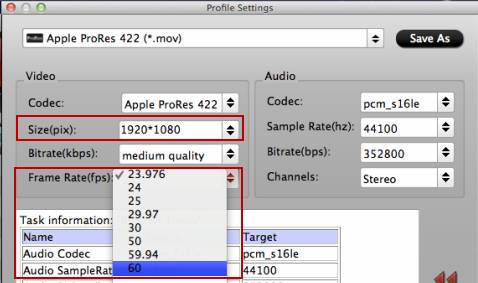
3. When finished step 2, click “Settings” button and go to “Profile Settings” panel to set the video size at 1920*1080, and set the video frame rate at 60 fps for your editing use on Mac OS X. Once completed, do remember clicking “OK” to confirm you selection.
4. Click “Convert” button to transcode 1080i/60 to 1080p/60 on Mac. As soon as the conversion is done, click “Open” button to find the generated 1080p60 videos and get them working beautifully with your Mac video editors, e.g. FCP 6/7/X(Learn to import videos to FCP X), iMovie, FCE, Avid MC, and Adobe Premiere Pro CS6.
Extended Contents
The currently released Pavtube DVD Creator for Mac is useful for either burning your source 1080i60 footage to DVD or creating DVDs from the generated 1080p60 files. There are two versions available for this Mac DVD authoring program. One is totally free and the other is with costs. The paid version comes with enhanced support for MXF files, AVCHD MTS/M2TS videos as well as still images, while the Free Version is unable to handle photos and camera recordings in MXF and AVCHD format. There is a piece of good news that the Pavtube DVD Creator Retail Version now has a 50% off Halloween Sale, so it’s a great time for you to save money.


 Free Trial HD Video Converter for Mac

Useful Tips
- Review of 5 Best HD Video Converter for Mac (macOS Sierra Included)
- Import DJI Mavic Pro 4K video to iMovie for Editing
- Import DivX to iMovie (iMovie 11 Included)
- How to Convert ASF to iMovie (iMovie 11 Included) on Mac?
- Superior iMovie Alternatives for Mac (MacOS Sierra)
- 2017 Top 5 Best HD Video Converters for Mac OS X El Capitan/Yosemite/Mavericks


