
 Home
HomeiTunes lets you play your music on whichever device you're using, plenty of your iDevices can transfer or stream music if they all in your iTunes. But after updating iTunes to 12 version, it seems impossible to add MP4/MPEG to iTuens. No matter what you try, direct drag files to add MP4 to iTunes or transfer MP4/MPEG videos to iTunes via "Add File to Library" from "File" menu. All your files like MP4 video, movie or TV shows just won't appear in iTunes. How did this happen?
Pavtube HD Video Converter for Mac can help to tackle this can't load MP4 to iTunes problem. It not just transcode your MP4/MPEG files into proper formats which iTunes can compatible with, also can edit your raw files before loading. Though iTunes have claimed that they can support MP4,MPEG-4, WAV,AAC and Apple Lossless. But unknown transfer problem will happen during the progress. (Learn more about the supported formats by iTunes).
Part I: Reasons about Why MP4 Files can't be Loaded into iTunes
1. Your MP4/MPEG files have already existed in iTunes, but you cannot find them
Starting from iTunes 11, all the movies aren't purchased from iTunes will be added to "Home Videos" under "Movie" Category. You can change the category that your MP4 files shows in iTunes so that they will appear correctly in it.
Highlight the files that you want to change category, right click(Win) or "Ctrl+ click"(Mac) on the files and select "Get Info". Open the "Options " tab from the dialog box. Under the "Media Kind" drop-down box, select the category you want.
2. Your MP4 files just can't be imported to iTunes at all
After adding MP4/MPEG to iTunes ,those files just don't appear in anywhere in iTunes. If this happens, which means that your MP4/MPEG won't import to iTunes. ITunes requires format like MPEG-4 video codec with AAC audio codec and H.264 video codec with AAC audio codec. MP4 is just a container, if you want to know the inner codec of your videos , use this MediaInfo to know if your videos is meet the importing demands. Bunch of codecs like DivX, Xvid, H.264, H.263, MPEG-4, AC3, WMA, AAC, etc can into this "MP4". So you have to figure it out before doing the next conversion step.


Part II:How to add MP4/MPEG Videos into iTunes without any Unknown Problems?
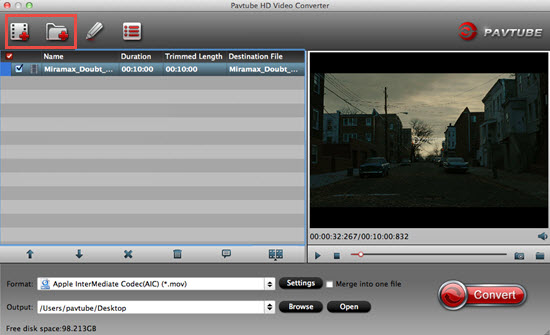
Step 1. Install and download this HD Video Converter on your Mac
No virus, no time limitation, no bundle apps. You can have a full clean installation on your Mac. Except for the watermark in your converted files. To load your files, you can click "File">"Add Video/Audio" or "Add from folder" which on the top of your screen. Or those two icons can also do that job.
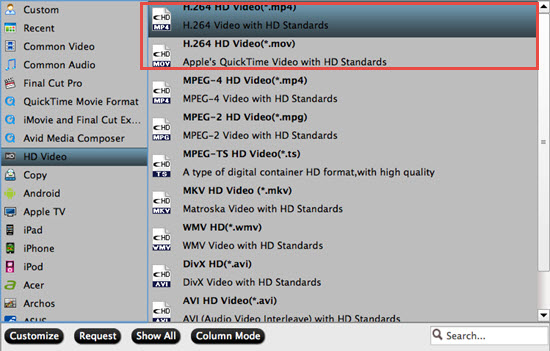
Step 2. Choose H.264 HD Video (*.mp4) as your output format
If your raw videos is HD videos like 720p,1080p or even 4K, then you can choose "HD Video">"H.264 HD Video (*.mp4)" from the format list bar.
Tips:
Bunch of presets can be found in the format list, if you happen to be a filmmaker, then you can choose the preset for the editing software, like FCP, iMovie, Adobe Premiere Pro, etc.
Step 3. Custom your MP4 videos to make them fit your player better
You can adjust your Bit rate and Frame rate in this "Settings" UI by clicking the "Settings" bottom beside the format bar.

Tips:
1.To keep the original video quality, you can choose the "original " in the following box, or type the parameters if there is no proper ones to choose.
2.To improve the quality, up the Bit rate may be a good way , but one thing need to be clarified is that high Bit rate=high video quality=big file size=long conversion time.
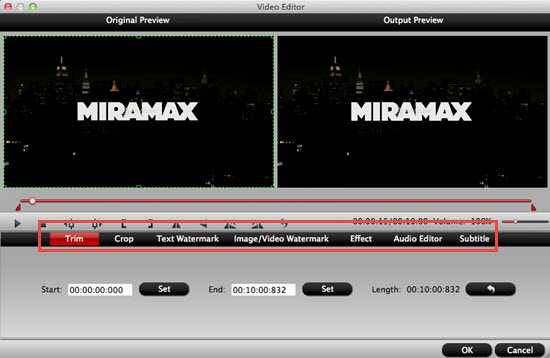
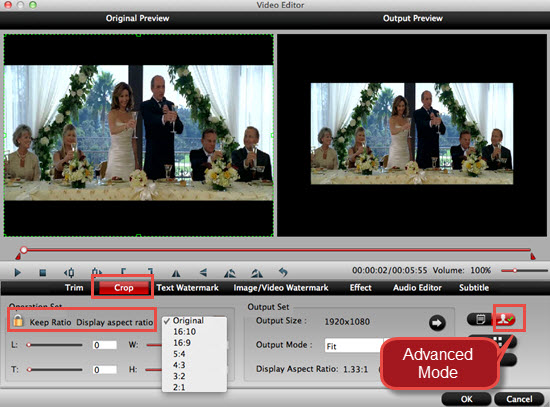
Step 4. Edit your MP4 videos before loading into iTunes (optional)
If you just want to enjoy the original videos, then this step can be skipped. Or you want to create some personal short clips , with the build-in editor, it can be easily realized.
Tips:
In the "Advanced Mode", you can adjust the Aspect Ratio to fit your media player better.
Step 5. Start to convert MP4/MPEG raw videos to load in iTunes
After settings the file location , then back to main UI and click "Convert". If you forget to set the file location, just click the "Open output folder" to find your converted files in the default location. And you can also click "Shut down computer after conversion" if the conversion time is very long.
Additional tips:
How to transfer contents into your iTunes may be very helpful for some newbie just walk into Mac world.
More options for windows users:
If you want to keep the sharp quality of your videos,those H.264 codec in the "HD Video" option will all be outputted as H.264 high profile, which will maintain the most quality of your raw HD videos.
Also if you have some H.265 player , you can choose to output as "H.265 HD Video (*.mp4)", it will bring your videos into a higher level of quality while only half size of original ones.
 Free Trial HD Video Converter for Mac

Useful Tips
- Review of 5 Best HD Video Converter for Mac (macOS Sierra Included)
- Import DJI Mavic Pro 4K video to iMovie for Editing
- Import DivX to iMovie (iMovie 11 Included)
- How to Convert ASF to iMovie (iMovie 11 Included) on Mac?
- Superior iMovie Alternatives for Mac (MacOS Sierra)
- 2017 Top 5 Best HD Video Converters for Mac OS X El Capitan/Yosemite/Mavericks


