
 Home
HomeHEVC (also called "H.265") is new with macOS High Sierra and Apple Final Cut Pro X 10.4. However, none of the export settings inside FCP X support HEVC. Instead, you will need to change preferences inside FCP X to allow to export a project using the HEVC codec.
Configure FCP X 10.4 settings to output H.265/HEVC
To start, go to Final Cut Pro > Preferences > Destinations. None of the default settings will output HEVC.
Instead, add the HEVC settings using the Compressor Settings menu.
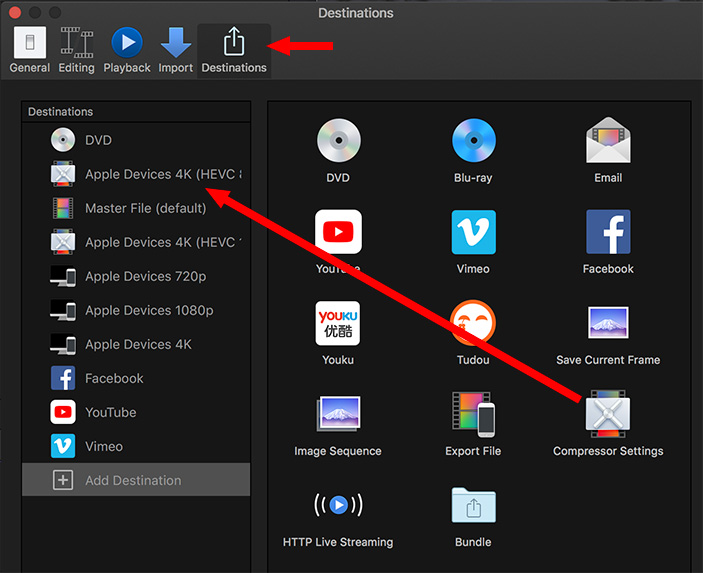
Add the HEVC settings using the Compressor Settings menu
Drag the Compressor Settings icon from the right side to the left.
Drag the compressor settings from the right side to the left
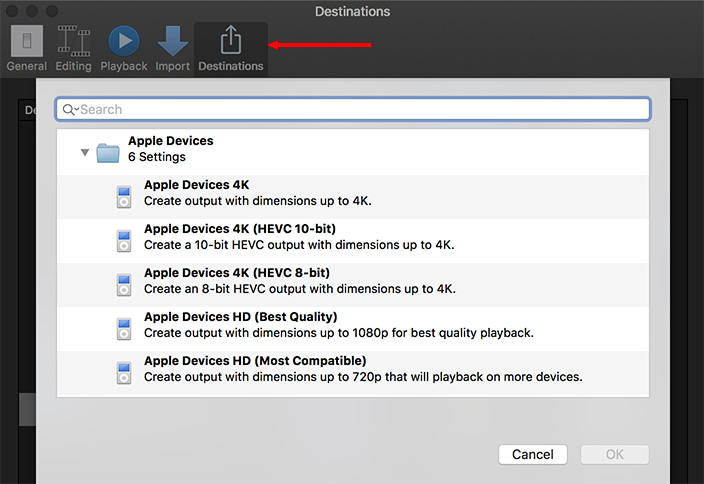
This opens a panel allowing us to choose which Compressor setting to import. There are only two HEVC settings - both in Apple Devices:
- HEVC 8-bit, which uses hardware acceleration to compress a file, but doesn't support HDR output.
- HEVC 10-bit, which is the version that supports HDR output, but only uses software to compress the file.
Select the setting you want to use, then click OK. For this example, I'll add both; which means I need to drag the Compressor Settings icon across twice.
Note: On older systems, such as my 2013 27″ iMac, which don't support 8-bit hardware acceleration, this 8-bit option is missing. Both options are there on my 2017 iMac.
Alternative solution to easily export H.265/HEVC from FCP X 10.4
For a lot of beginners, you can easily get confused and feel overwhelmed by the complicated configuration listed above. Looking for a simple alternative way to save FCP X project video to H.265/HEVC codec. The good news is that there are many H.265 encoder can assist you to complete this job in a pretty simple way.
One of the program that gets high reputation is called Pavtube Video Converter for Mac. The program can produce H.265/HEVC codec in both HD/4K resolution with the container file formats of MP4, MKV and also MOV. For advanced users, you can get better output video and audio quality by flexibly adjusting output profile parameters such as video codec, resolution, bit rate, frame rate, audio codec, bit rate, sample rate, channels, etc as you like in the program's "Profile Settings" window.
Edit H.265 with built-in editing options
After completing some professional editing workflow with FCP X 10.4, you can also do some simple video editing tasks with the exported FCP X 10.4 project with the our program before saving to the H.265/HEVC codec. You can trim or cut off of video unwanted parts from the beginning or end of the video, crop video to remove the black edges or unwanted size area, add transparent text watermark, flip or rotate video angel or insert external subtitle to video, etc.
Pavtube Video Converter for Mac has perfect compatibility with the new macOS High Sierra, macOS Sierra, Mac OS X El Capitan, Mac OS X Yosemite, Mac OS X Mavericks, etc.
Step by Step to Export Final Cut Pro 10.4 Project to H.265/HEVC
Step 1: Load Final Cut Project video into the application.
Download the free trial version of the program. Launch it on your computer. Click "File" menu and select "Add Video/Audio" or click the "Add Video" button on the top tool bar to import source Final Cut Project video files into the program.

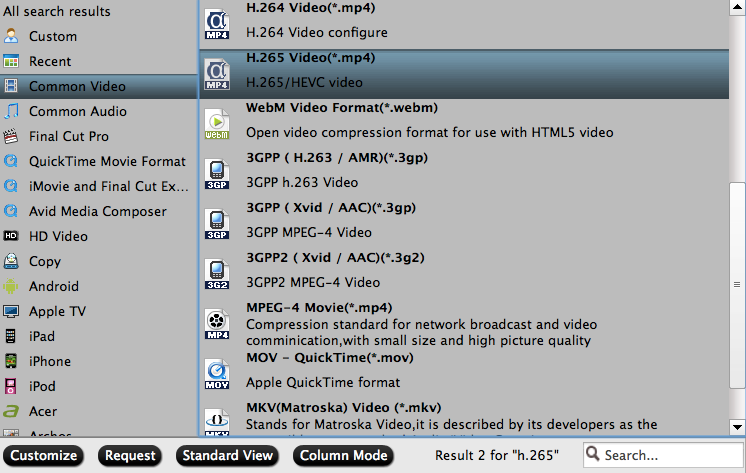
Step 2: Define the output format.
Clicking the Format bar, from its drop-down list, select your desired H.265 file format to output. Here, we choose the output 4K H.265 video by following "H.265 Video(*.mp4)" under "Common Video" main category. You can also choose to output H.265 HD MP4 video, H.265 HD MKV video, 4K H.265 MKV video according to your own needs.
Step 3: Edit Final Cut Project video.
By default the Edit icon is grayed out. To activate the Edit menu, you have to select an item first. When a video or movie is selected, click the pencil like Edit icon on the left top tool bar to open the video editor window, here, you can play and preview the original video and output effects. Also you can flip or rotate video, trim, crop, add watermark, apply special effect, edit audio or insert external subtitle.

Step 4: Begin the conversion process.
After all setting is completed, hit the "Convert" button at the right bottom of the main interface to begin Final Cut Project video to H.265/HEVC exporting process.
When the conversion is finished, click "Open Output Folder" icon on the main interface to open the folder with generated files.
 Free Trial iMedia Converter for Mac


