For Mac users who are going to upgrade your Mac OS to the new macOS High Sierra, one of the great news for you is that this new OS has include support for HEVC/H.265, a new compression standard which helps to compress 4K video up to 40% more than H.264. Then how about playing 4K content on macOS High Sierra.
Which Mac computer support 4K displays?
With OS X Mavericks 10.9.3, Apple implemented official support for 4K video for the first time. You can use 4K displays and Ultra HD TVs with these Mac computers:
- MacBook Pro (Retina, Late 2013) and later
- Mac Pro (Late 2013)
- iMac (27-inch, Late 2013) and later
- Mac mini (Late 2014)
- MacBook Air (Early 2015) and later
- MacBook (Retina, 12-inch, Early 2015) and later
If you are using other versions of Mac computer, the you will be out of luck to get 4K video played on macOS High Sierra.
Solution to fix 4K video not playing on macOS High Sierra
Solution 1: Play 4K video on macOS High Sierra with 4K video player
Your Mac computer are not powerful enough to handle 4K resolution video on Mac, never mind, there are many free Mac 4K Video players that can play 4K video smoothly on Mac including VLC Player, Divx Player, Cisdem Video Player, 5K Player, Elmedia Player, etc.
Solution 2: Compress 4K to 1080p for macOS High Sierra
Although you can now easily play 4K video on macOS High Sierra with above listed Mac 4K Video player, however, you may still be disappointed to find that you still fail to get the 4K video played on macOS High Sierra with web browser such as Safari (which still caps to max 1440p), Chrome (which shows 2160p but stutters hell lot), the default QuickTime player won't handle 4K resolution video, iTunes not allows you to sync 4K resolution video to iPhone, iPad or Apple TV, etc. What's more, some of the video editing software may still lacks the ability to handle 4K resolution video.
Therefore, to get full entertainment of 4K video on macOS High Sierra is still not possible at this moment. To fix above listed issue, the most effective solution is to downscale 4K to 1080p. Here, you can get the job easily done with our professional Mac 4K Video Compressor - Pavtube iMedia Converter for Mac. The program has full support for all 4K video encoded with various different compression codec such as H.265, H.264, Prores or container file format like AVI, WMV, MP4, MOV, MKV, FLV, TS, MXF, XAVC, XAVC S, etc. With the program, you can easily compress 4K video to 1080P or 720p video in various file format options including H.264 HD MP4, H.264 HD MOV, H.265 HD, MPEG-4 HD MP4, MPEG-2 HD, MPEG-TS HD, MKV HD, WMV HD, Divx HD, AVI HD, BDAV HD, etc. You can also choose to directly output hot devices or editing program preset profile formats with the optimal playback settings.
The program supports batch conversion mode, so that you can load multiple 4K video into the program for conversion at one time. What's more, it keeps constant update with perfect support for the new Mac OS, therefore, just feel free to download our program even if you have upgrade your Mac OS to the new macOS High Sierra.
Step by Step to Compress 4K Video to 1080p for macOS High Sierra Playing
Step 1: Load 4K video into the program.
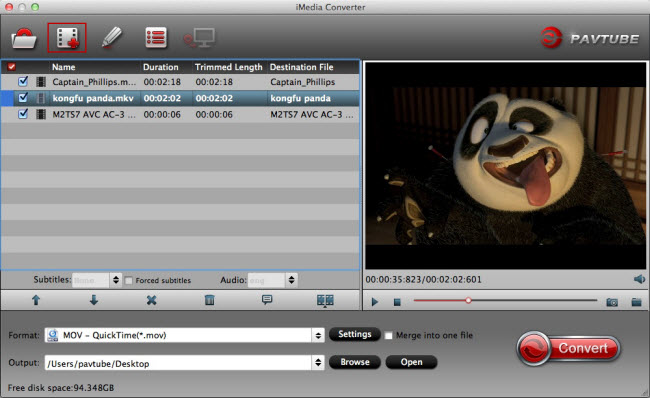
Download the free trial version of the program. Launch it on your computer. Click "File" menu and select "Add Video/Audio" or click the "Add Video" button on the top tool bar to import source 4K video files into the program.

Step 2: Define the output format.
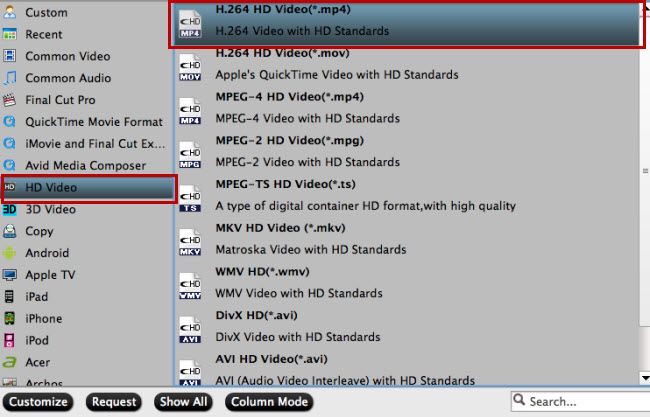
Clicking the Format bar, from its drop-down list, to compress 4K video to 1080p, just choose to output one of your desired HD file formats such as "H.264 HD Video(*.mp4)" under "HD Video" main category.

Step 3: Compress 4K to 1080p.
Click "Settings" on the main interface to open "Profile Settings" window, in video section, from "Size(pix)" drop-down list, choose "1980*1020" or "1080*720" to compress 4K to 1080p.
Step 4: Begin the conversion process.
After all setting is completed, hit the "Convert" button at the right bottom of the main interface to begin the conversion process from 4K video to 1080p or 720p video conversion or compression process.
When the conversion is finished, click "Open Output Folder" icon on the main interface to open the folder with generated files.


 Home
Home Free Trial iMedia Converter for Mac


