People love to record their happy time with their phone like iPhone 7. When you shot a 4K footage with iPhone 7, you may want to import the iPhone footage to Sony Vegas Pro for editing. Now, situations occur that you can't the MOV files from iPhone to Sony Vegas Pro or you import the MOV files into Sony Vegas, but fail to bring both audio and video into the time line.
Even though MOV is listed as compatible video with Sony Vegas Pro, it is laggy to edit MOV in Vegas Pro. In addition, issues that failling to import MOV into Sony Vegas often occurs due to the codec problems. Fortunately, it is easy to handle the issues. One of the solutions is simply to download and install the QuickTime for the latest .mov codecs. Undo the "various codecs" if you can. Anothe option is to get all of your MOV videos converted to MP4 simply because Sony Vegas Pro seems to work with this format much better.
The former way is simple. So let's just focus on the latter way. To convert MOV to Sony Vegas, you need to use a video converter. Below is the best MOV to Vegas Pro converter we picked out for you.
Best MOV to Sony Vegas Pro Video Converter
Pavtube Video Converter for Mac allows you to encode video clips from the MOV format to media files of various extensions, such as MP4, AVI, 3GP, RM, WMV and MP3. It can be easily handled by all user levels. It can simply convert H.264 MOV, H.265 MOV, MPEG-4 MOV, 4K MOV, 1080P MOV to Sony Vegas Pro supported AVI, MOV, MP4, WMV, MPEG-1/2/4, H.264/AVC, H.265/HEVC,(Vegas Pro 14 supports HEVC).
Furthermore, you can configure audio and video settings when it comes to the codec, frame rate, sample frequency rate, channel mode and others. Additionally, you can edit MOV clips with built-in video editor to trim, crop, merge, split, rotate, flip, volume, add subtitle/watermakr and more.
Apart from converting MOV to Sony Vegas Pro, this video converter also can transcode MOV to After Effects, Adobe Premiere elements, Premiere Pro, Final Cut Pro x/6/7, etc. For Windows users, you can turn to Pavtube Video Converter to convert Fraps to Sony Vegas Pro media loading problems.
Steps to Convert MOV to Sony Vegas Pro
Step 1. Add MOV videos
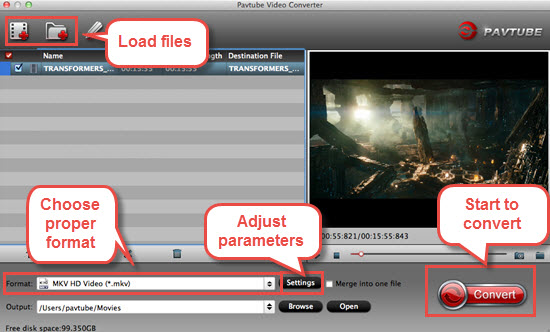
First of all, locate your local MOV files and then drag them directly onto this program's conversion pane. All uploaded files will then be displayed on the interface as shown in the screenshot below. The other method you can use to add files is to click "Add Video" button to import the MOV files.

Step 2: Choose Vegas Pro supported format
Click "Format" option to choose the output format. To make your Sony Vegas Pro 14/13/12 to readthe output files, just choose the most Sony Vegas accepted "WMV (VC-1) (*.wmv)" or MPEG-2 under "Adobe Premiere/Sony Vegas" option as output format. You also choose HD MP4 format to keep high video quality and get the compatibility.

Click “Settings” button if you’d like to customize advanced audio and video parameters like Video Codec, aspect ratio, bit rate, frame rate, Audio codec, sample rate, audio channels.
Step 3: Start to convert MOV to Vegas Pro
Back to the main interface. Hit the convert button, it will start converting MOV for importing to Sony Vegas Pro immediately. Soon after the conversion, just click “Open” button to get the generated files for natively editing in Sony Vegas Pro 10/11/12/13 perfectly.
Import and Edit Converted MOV Videos in Vegas Pro
1. Importing videos to your project:Go to "File -> Import -> Media." pick the media files you want.
2. Puting videos in the timeline, and trimming.
You can now trim the video in the timeline, where you want it to start and end. This is done by pulling in the middle of the sides. You can also split any clip in the timeline, this is easy press where you want to split make sure the clip is highlighted then press "s" or go to "edit -> split".
3. After edit video in Sony Vegas Pro, you can now render your newly made movie.Go to "File -> Render as." To make this as easy as possible pick "Windows media v9 or v11" and then pick "720p-30".
How long it take to render depends on quality, computer and lenght.
Useful Tips
- MOV to M4V: How to Convert MOV to M4V on Mac OS (macOS High Sierra Included)
- How to Play AVI Videos on MacBook(Air, Pro, iMac)?
- How to Import Android Videos to iMovie for Editing?
- How to Play a WMV File on Mac Computer
- Play H.265 Files with QuickTime Player on Mac
- Convert YouTube to MPG/MPEG with Easiest Way


 Home
Home

 Free Trial Video Converter for Mac


