
 Home
HomeFor NLE software, MOV seems to be a friendly format. Normally, you can import and edit MOV in Premiere Pro CC, iMovie, After Effects, etc. However, it doesn't mean that you can import all MOV files into Premiere Elements (15, 14, 13, 12, 11, 10). In the adobe forum, you can see many issues about MOV in Premiere Elements (15, 14, 13, 12, 11, 10).
"I've been having trouble importing .mov files to into premiere elements 14. Some of the videos have imported successfully and play fine, while for others an error message pops up saying a generic error has occurred."
"I am new to Premiere Elements 15, My mom had it installed on her new computer. I am trying to edit videos but I am running into some problems with .mov files."
Analysis: Why Can't Import or Edit MOV in Premiere Elements 15/14/13/12/11?
1. MOVs are just envelopes for a video files. What matters is the codec the file uses. Like many snapshot still cameras, when you can't i mport MOV to Premiere Elements, your camera might save its video in the MJPEG codec, a codec with Premiere Elements doesn't support.
2. In the MOV files that did not import into Premiere, was the lighting conditions different during recording? Premiere Elements has a problem with video that is recorded with a variable frame rate across the footage rather than a constant one. The lighting conditions during this type of recording may be involved in what the recording devices use. In this Premiere Elements variable frame issue the typical symptoms are audio out of sync or just cannot import the video at all.
Results: Try These Solutions to Fix MOV Can't Import to Premiere Elements Issues
1. Check if the MOV files is broken. What computer operating system is your Premiere Elements running on? If you have Windows, make sure you can import the problem file into Movie Maker. If you have Mac, check if you can import the problem file into iMovie.
2. Check if you have installed the latest version of QuickTime.
3. Are these .mov files from the same camera and have around the same recording date?
4. Use a video converter to change a possible variable frame rate to a constant one before import.
Ultimate Solution: Convert MOV to QuickTime MOV with constant Framerate for Premiere
MOV is a container. When you watch it as a MOV file, it may be MPEG4 MOV, H.264 MOV, H.265 MOV, DV MOV, QuickTime MOV, etc. Among these MOV files, only QuickTime MOV and H.264 MOV are supported by Premiere Elements 15/14/13/12/11. So when you can't import and edit MOV in Premiere Elements 15/14/13/12/11, you can simply convert MOV to Premiere Elements compatible QuickTime MOV or other supported DV AVI, H.264 MP4, MPEG-2, etc.
With Pavtube Video Converter for Mac, you can simply convert all MOV files to Premiere Elements supported video formats with right video and audio codec. You also can convert MOV video from variable frame rate to a constant one to avoid audio out of sync issues in Premiere Elements. You also can configure the video and audio encoder, sample frequency rate, bit rate, etc to make the output video better compatible with Premiere Elements. And before output, you also can do some simple editing like merge all videos, remove audio from video, split videos by size, adjust volume, resize mode, cropping to edit video, etc.
Now download the right version below to start to convert MOV to Premiere Elements (15, 14, 13, 12, 11, 10).


Getting Started to Convert MOV to Premiere Elements (15, 14, 13, 12, 11, 10)
Step 1. Add MOV files
Load MOV files to the program. Launch the program, and open the folder where you have saved the MOV files, and then directly drag the files to the program interface, the files will be loaded to the program immediately.This program supports batch conversion to automatically convert multiple .mkv files one by one. And it also supports joining several MOV videos into a single one.
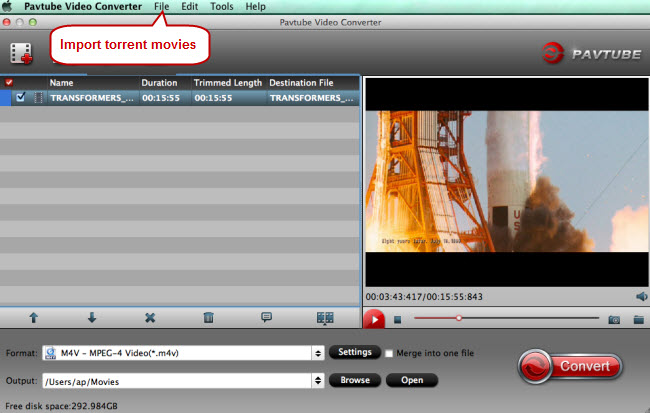
Step 2: Choose Premiere Elements preferred format
Navigate to “Format’ > “Common Video” > “MOV – QuickTime(*.mov)”. You can see that here are hundreds of video formats for you choosing. You also can choose H.264 MP4, DV AVI, MPEG-2 for Premiere Elements. Click “Settings” button to go to “Profile Settings” screen where you can adjust audio and video parameters like size, bitrate, frame rate, sample rate, etc.

Tip: The default setting works well. Of course, if you want to customize video and audio encoding settings, just click the "Settings" button to customize these settings. You can adjust the output video/audio resolution, frame rate, bit rate, etc. to customize the output files to get the best quality you want.
Step 3. Start MOV to Premiere Elements conversion
The file is now ready to be converted and that is done by clicking on the covert button on the menu. The software will take care of the rest and the user will now have the file in a format that can be used with Premiere Elements 10/11/12 /13/14/15.
How to Add MOV Files into Premiere Elements?
You can import your converted MOV files from your computer’s hard drive.
Do one of the following:
Click Add Media and choose Files And Folders.
Choose File > Add Media From > Files And Folders.
To import a media file, locate and select the file from the dialog box and click Open.
On Windows, select the folder from the dialog box and click Import Folder if you want to add an entire folder.
Note: Alternately, you can drag files from your operating system's file explorer to the Quick view or Expert view timeline.
How to Export MOV from Premiere Elements?
You can save your project to QuickTime MOV for viewing on the web, mobile phone, computer and more. The Export & Share option includes all the available export formats in a single panel. Individual tabs on the Export & Share panel represent the various media options that you can choose from.
View settings for multiple formats from a single panel.
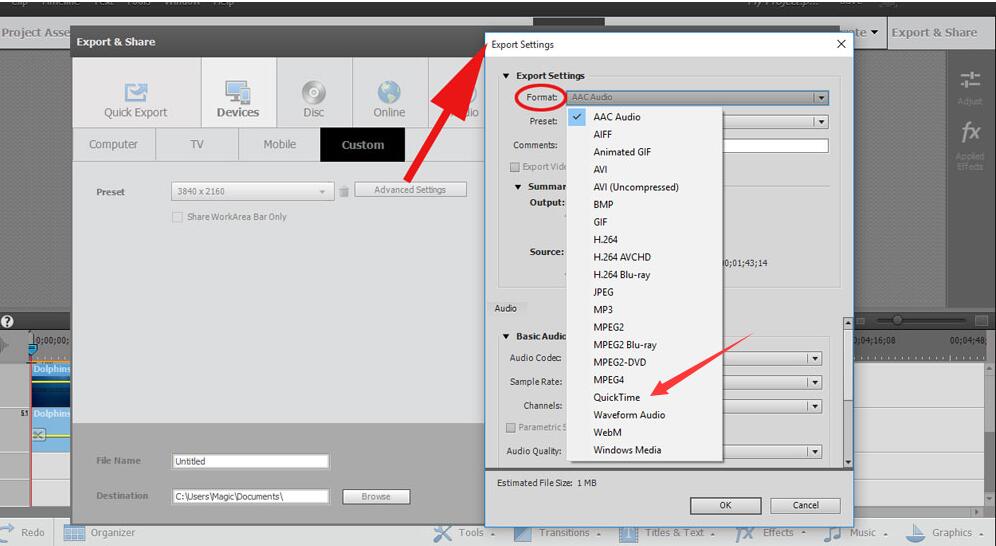
View recommended settings based on the format of your source clip and the desired output type.
Preview your video before exporting.
Scan through settings for each media type in an easy-to-view format.
 Free Trial Video Converter for Mac

Useful Tips
- MOV to M4V: How to Convert MOV to M4V on Mac OS (macOS High Sierra Included)
- How to Play AVI Videos on MacBook(Air, Pro, iMac)?
- How to Import Android Videos to iMovie for Editing?
- How to Play a WMV File on Mac Computer
- Play H.265 Files with QuickTime Player on Mac
- Convert YouTube to MPG/MPEG with Easiest Way


