
 Home
HomeWith free color grading software DaVinci Resolve, everyone can edit videos just like the professionals in Hollywood. It is easy to import the video source that you want to edit then do some special editing on your video. But sometimes, people will meet this kind of issue that there is no audio when importing a video to Davinci Resolve.
" Resolve 12.5 has lost sound. audio is visible in waveform but no sound comes out. this is true for any clip I have. Other programs are fine like cs6."
How to Solve Davinci Resolve No Audio Issues?
There are various reasons that cause the audio disappear from Davinci issue. Below are some tips and tricks that you can try.
1. Make sure you haven't accidentally turned on the global mute button:
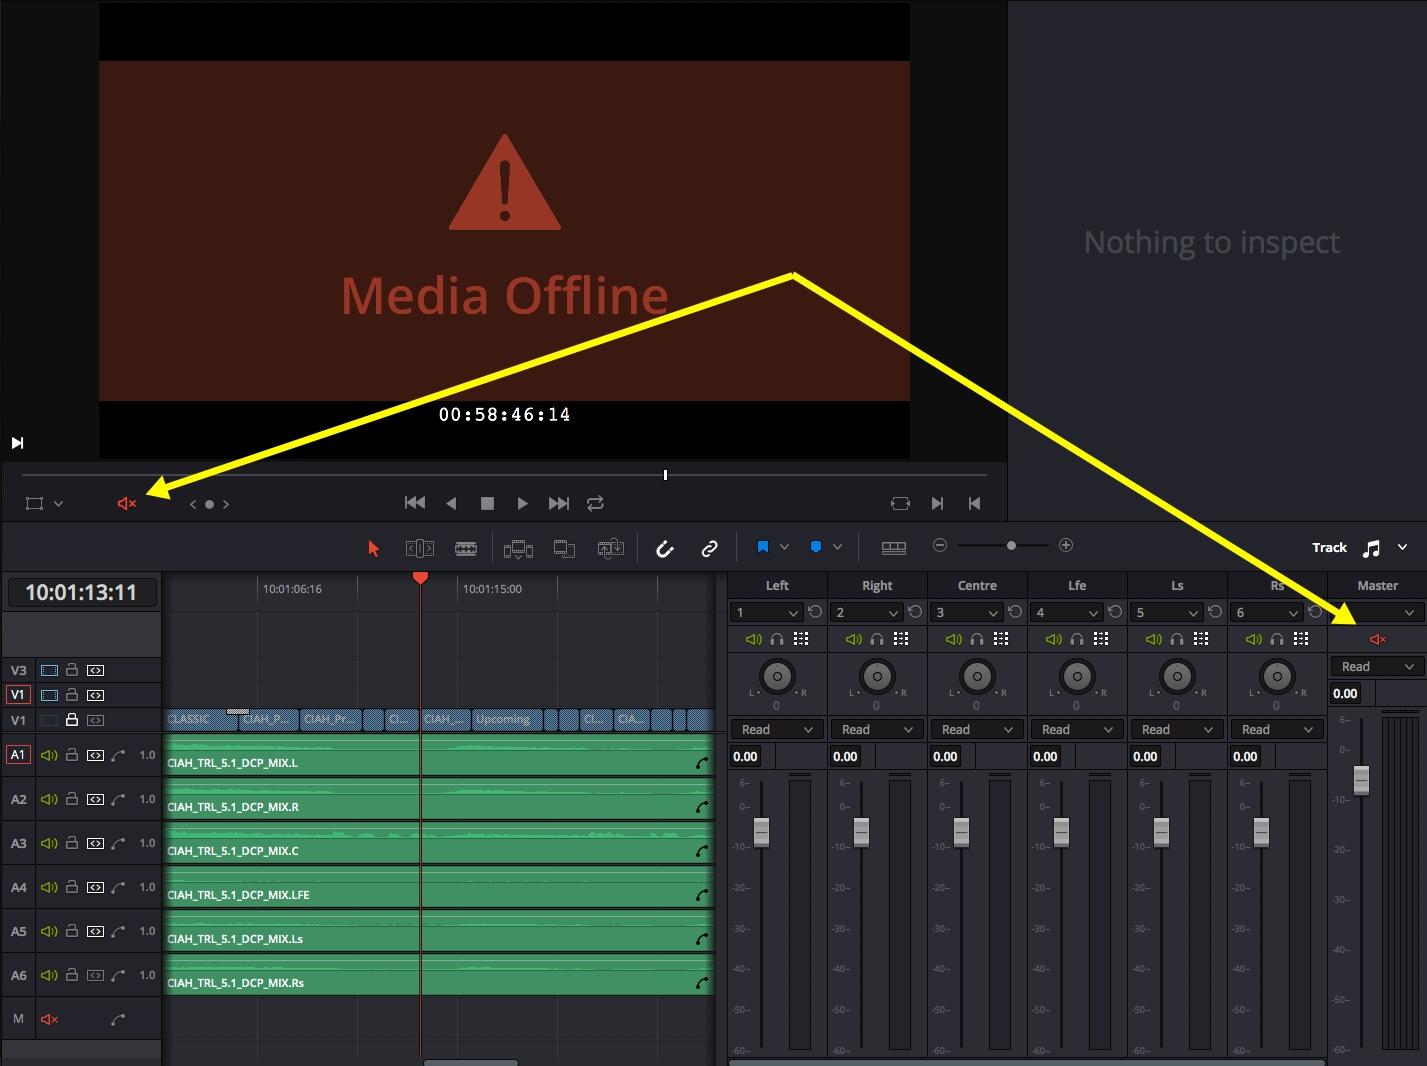
2. Try to deselect BM sound device and restored the system device. This maybe happend when installing the intensity pro.
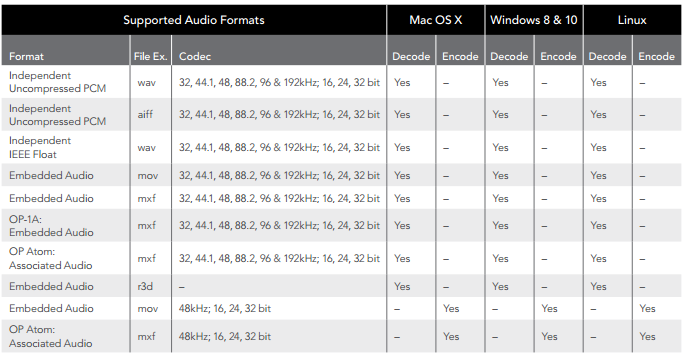
3. Check your video and audio codec by MediaInfo if they are suported by Davinci Resolve. You can learn Davinci Resolve supported video and audio codec below.
Davinci Resolve Supported Video Codec: QuickTime, Prores, DNxHD, MXF, DPX, CIN, EXR
Davinci Resolve Supported Audio Codec
How to Make Sure Unsupported Video/Audio Supported by Davinci Resovle?
If your "Davinci Resolve No Audio" issue is caused by the audio codec, you can use Pavtube Video Converter for Mac to re-encode the video file. This video converter is easy to use for each level users. Even though you haven't had any video conversion experience, you can easily know the every step to transcode the video to Davinci Resolve supported file with compatible video and audio codec. This video converter can convert any video to Davinci Resolve more compatible DNxHD and Apple ProRes 4444, Apple ProRes 422 (HQ), Apple ProRes 422, Apple ProRes 422 (LT), Apple ProRes 422 (Proxy) with supported video and audio codec.
You can use Pavtube Software to convert MXF, XDCAM, MPG, etc video to Davinci. Besides, you can adjust video codes, video frame rate, video bitrate, audio codes, audio bitrate, audio channel. It also enables users to edit video before output. For example, you can trim video length, crop video black bar, remove/replace audio, add external subtitle and more.
The "Drag-and-drop" and batch conversion features are also supported to make the video conversion easier. For Windows users, you can turn to Pavtube Video Converter to convert any video with unsupported codec to Davinci Resolve accepted video format.


Steps to Convert video with Davinci unsupported codec to Resolve Supported video
Step 1. Load video with Davinci unsupported codec files
Here you can directly drag & drop the video with Davinci unsupported codec files to the converter, or click “Add Video” or “Add from folder” button on the top menu to browse and choose video with Davinci unsupported codec files. Batch conversion is supported here.

Step 2: Specify output file format for Davinci Resolve
Click "Format" bar, from its drop-down list, select Davinci Resolve best supported editing codec such as "Avid DNxHD (*.mov)" from "Avid Media Composer" main category menu extended list. This preset has been equipped with Davinci supported video and audio parameters. Click “Settings” button if you’d like to customize advanced audio and video parameters like Video Codec, aspect ratio, bit rate, frame rate, Audio codec, sample rate, audio channels.

Step 3: Edit video. (Optional)
Before loading your video into Davinci Resolve for professional video editing, you can complete some basic video editing task with the program's built-in video editing function. Check an item to active the "Video Editor" function, then click the pencil like icon on the top tool bar to open the "Video Editor" window, you can trim video length, crop video black bars, add watermark, apply sepcial rendering effect, remove/replace audio in video, etc.

Step 3. Start to convert video with Davinci unsupported codec
After all the settings are done, simply click the Convert button to start transcoding video with Davinci unsupported codec files to DNxHD mov for Davinci Resolve on Mac. When the conversion is done, click "Open Output Folder" button to pop out the folder with converted files, then you can add those files into DaVinci Resolve Media Pool without any issues.
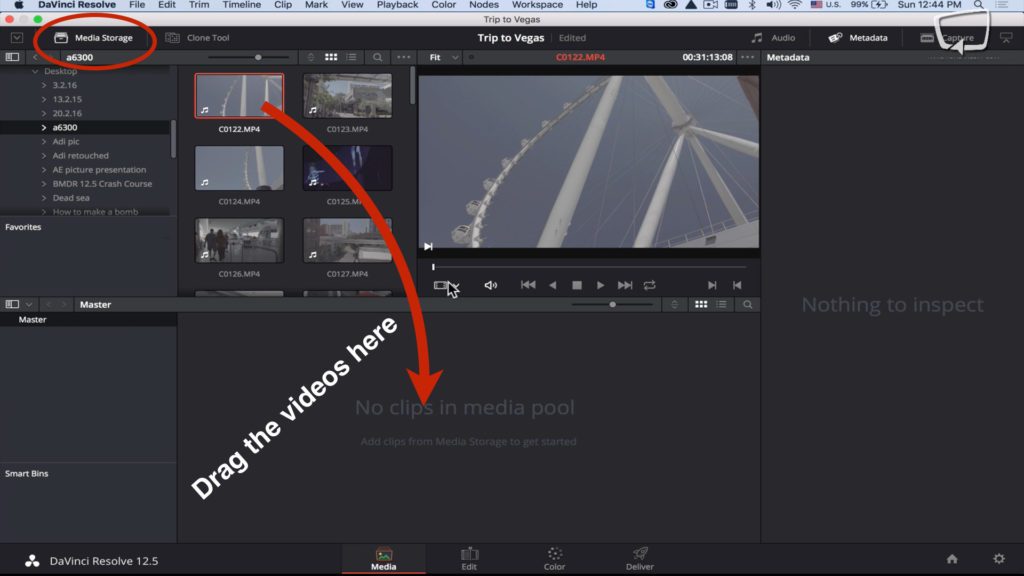
How to Import Video into DaVinci Resolve?
In order to import media from your media storage to the media pool, you have to select the media that you want to upload and then just drag it to the media pool.
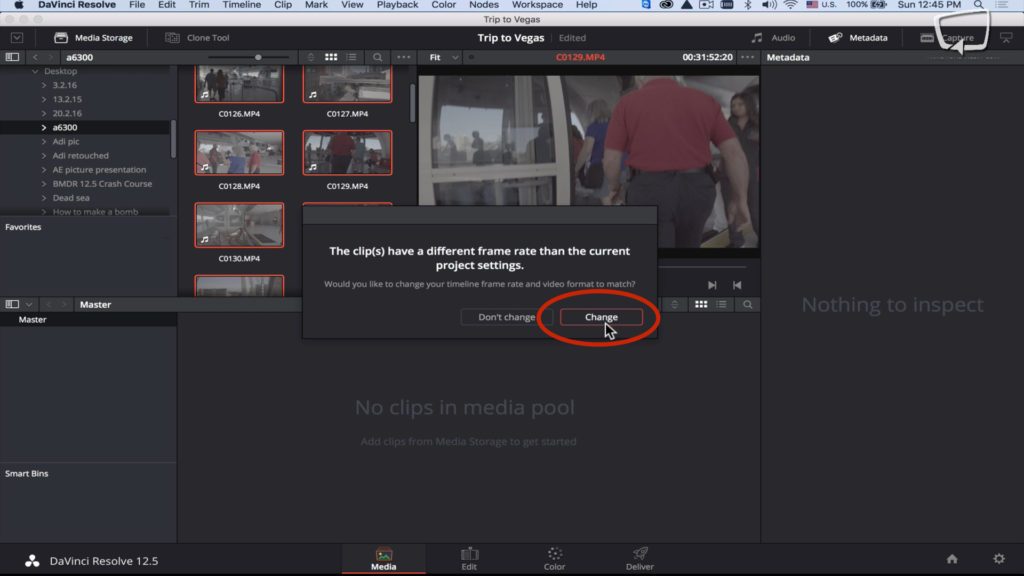
If you get a pop up message that asks you if you want to change the frame rate of the timeline to the frame rate of your media because they don’t match, you should click on “Change”.
By double clicking on a video in the media pool, and pressing the play button you can simply preview the shot.
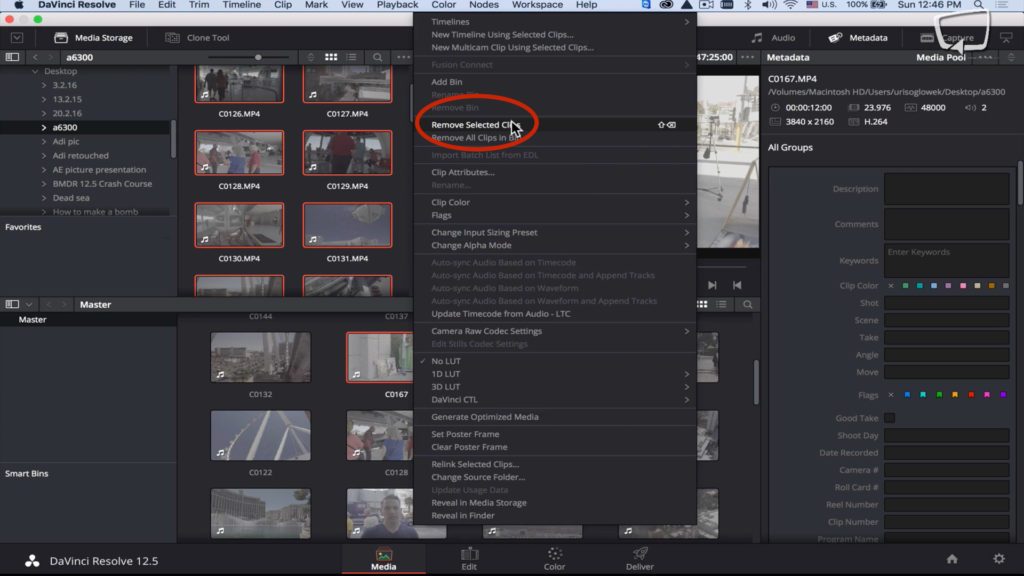
In order to delete a video from the media pool just right click it and press “Remove Selected Clips”
 Free Trial Video Converter for Mac

Useful Tips
- MOV to M4V: How to Convert MOV to M4V on Mac OS (macOS High Sierra Included)
- How to Play AVI Videos on MacBook(Air, Pro, iMac)?
- How to Import Android Videos to iMovie for Editing?
- How to Play a WMV File on Mac Computer
- Play H.265 Files with QuickTime Player on Mac
- Convert YouTube to MPG/MPEG with Easiest Way


