
 Home
HomeWindows Movie Maker is a free movie editing software on Windows people love to use to create photo slide shows and videos, edit videos and shate video on web. But if you are running a Windows 10, you won't be able to edit video with Windows Movie Maker in that Windows Movie Maker is currently part of Windows Live Essentials suite on Windows 10 and to install WMM on Windows 10, you have to download Windows Live Essentials suite, and select Windows Live Movie Maker. But, a news released from Microsoft said "Windows Essentials 2012 suite reached end of support on January 10, 2017".

This means that you won't be able to use Windows Movie Maker on Windows 10 until Microsoft offers you an available version. Right now, to edit video files on Windows 10, you can give a Windows Movie Maker alternative a try.
Best Windows Movie Maker Alternative Recommended
If you are looking for a similar tool of Windows Movie Maker to create your own video, you can try Pavtube Media Magician. It is a complete video editor based on timeline video editing function with some simple video conversion tool. Additionally, you can upload the output videos to your YouTube account and let your friends know about your new video production. Pavtube Media Magician comes with a well designed interface. Unlike some programs from the same category, Pavtube Media Magician looks professional but does easy to use to deliver high-quality results.
Pavtube Media Magician is also a perfect camcorder assistant manager software for Mac & Windows system that helps organize, backup and import camcorder videos. Easily convert & edit MTS/ M2TS/ MXF/ MOV/ MKV/ TiVo/ WMV/ AVI/ MPG videos, instantly join, trim, clips, create lossless MTS/M2TS videos and add 3D effects.
Top Reasons to Choose Pavtube Media Magician to Replace WMM
| As Video Editor | As Video Converter |
|
Sort/backup/convert camcorder footages Once you load camcorder footages to this Smart Camcorder Wizard, you can automatically detect the camcorder, sort, preview, backup and import videos with ease. Any camcorder recordings can be imported such as DJI Mavic Pro 4K footage, DJI Phantom 4, Canon XF305 MXF, Canon 60D MOV, Canon Powershot S95 MOV HD, etc. |
Convert camcorder recordings to different formats When edited video files on timeline, you can create multiple conversion tasks from the same source files placed on timeline. These tasks can be added, paused, and deleted any time you like. It outputs video formats like *.mpg (MPEG-2), *.mp4 (MPEG-4), *.avi, *.wmv, *.mov, *.mkv, *.m2ts and *.webm (for YouTube only). |
|
Instantly trim, join and cut video files You can accurately trim, cut, join, split, delete, rearrange your camcorder footages by frame. |
Output lossless MTS/M2TS or MKV Load your Sony PMW-F5/F55 XAVC, Nikon S800c, Nikon D7000, Sony PMW-350 XDCAM EX MP4, and othe camcorder videos and generate lossless videos with original format or MKV |
|
Timeline editing without rendering Timeline bas editing panel for full control & accuracy enables you to drag video files to timeline and edit it by frame. |
Directly upload camcorder videos to YouTube Easily Set YouTube account details in time line & direct upload to YouTube automatically. |
|
Add 3D effect to camcorder 2D videos Easily add 3D effects to 2D videos by highlighting a clip on timeline, and go to the 3D effect tab, you can enable 3D effect to the output video. You can choose Red Blue 3D effect and Red Green 3D effect. You also can adjust 3D depth to get better 3D experience. |
Convert videos to iOS/Win 8 RT/Android tablets & phones It supports import MTS/M2TS/MXF/MOV/MKV/TiVo/AVI and output MPEG-4 videos for better playback on iPad, iPhone, Apple TV, and Android tablets like Samsung Galaxy Note, Amazon Kindle Fire HD, and Microsoft Surface Windows RT/Pro. |
|
Add or adjust effects to contents After you drag files to timeline, you can move cursor to Effect tab where you can instantly adjust brightness, contract, saturation, as well as add special effects like Aged Film, Simple Gauss Blur, etc. |
Transcode Videos to NLE software Pavtube Media Magician turn loaded footage to Avid Studio, Sony Vegas, Adobe Premiere, Adobe After Effect, Cyberlink PowerDirector, Pinnacle Sutio optimized presets. |
|
Reduce or enlarge volume for clips Easily adjust volume in clips no matter input has abnormal. too small or too large volume. |
Save Media Library to mdat file extension for further editing Exporting Media Library file *.mdat, the video information of the imported videos will be saved. The next time when you launch the program, or import the Media Library file, the video list will be imported in seconds. |
Read Pavtube Media Magician review to learn more about it.
How to Use Pavtube Media Magician on Windows 10?
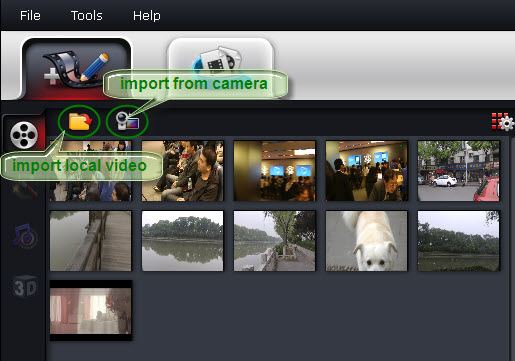
Step 1: Load video files
To import video files from hard drive to Media Magician, proceed as either way follows:
a. Drag and drop source files to source area directly
b. Click folder button to choose import media files, or import the whole folder.
Step 2: Edit Video files
Drag and drop the video files to Timeline, then you can manage it into movie. This function makes splitting movies, merging video clips, trim video clips at just the right moment easy. Now enhanced with frame accurate seeking, you can split/cut movies at a very precise point.
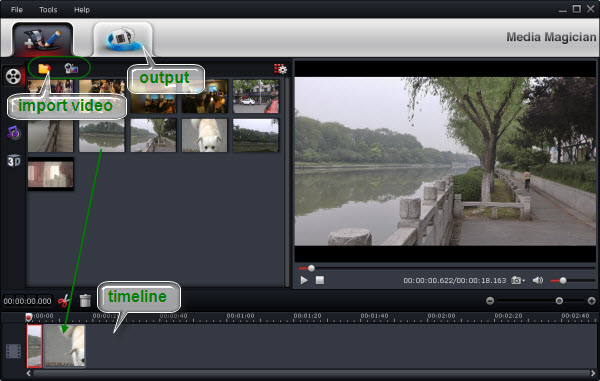
Split: Select a video clips from the Movie Track in Timeline, then move the Vernier to the time point or position you want to split and then Click ![]() , after that, one video clip will be divided into two.
, after that, one video clip will be divided into two.
Frame Accurate Splitting/Cutting: Just double click the video in Timeline and view it in Player, then use the Previous Frameor Next Frame Button to make sure you get the correct point. Then click split button to cut it.
Trim: Move your mouse to the left and right borders of the clip, you will find the mouse turns into a Square Bracket, now you can drag to change the starting time or ending time of the clip to finish Trim function.
Merge: When you drag and drop multiple video files from media library to Timeline, they will be merged into one file in output. It’s a way to create multimedia slideshow
Video Effects: Video Effects function can only be used for movie that exports for conversion. When such a movie is put in Timeline, you can click ![]() to adjusting brightness, contrast, saturation, flip and rotate video and add other special effects like Simple Gauss Blur, Aged Film, Gray, etc. The effect can be showed in the media player.
to adjusting brightness, contrast, saturation, flip and rotate video and add other special effects like Simple Gauss Blur, Aged Film, Gray, etc. The effect can be showed in the media player.
Volume adjustment: Volume adjust function can only be used for movie that export for conversion. When such a movie is put in Timeline, you can click ![]() to adjust the volume of the audio.
to adjust the volume of the audio.
3D effects: Currently Pavtube only support Red-blue and Red-Green effects. Check the 3D effect box, and choose red-blue button or red green button, then it will add 3D effect in output file.
Step 3: Choose format to output
Switch to Output window, you will find task area and profile area. Click to add a task before choose a profile. Media Magician comes up with massive output formats (AVI, WMV, MKV, MPG, H.264, TS, MOV, MP4, etc). Here we take MP4 as a instance, just follow “Common Format” and choose “MPEG-4”. There is also a lossless output. But this output only adapt to MTS, M2TS, TOD, MOD formats. And any video effect will be ignored when output lossless.
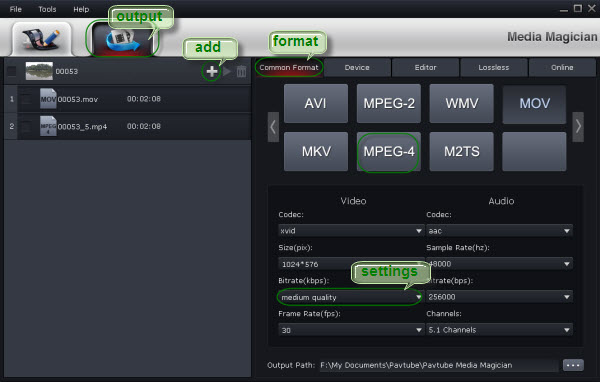
To limit the size of output file, you can set video bitrate down to desired value. Basically, the smaller bitrate you set, the smaller output file size it would be. But keep in mind there is noticeable quality degradation when you set any bitrate lower than 1500kbps.
Step 4: Start conversion
The software will specify a default folder to save converted videos. If you’d like to change the output location, please click ![]() to navigate to the folder you want to save videos to. After specifying all the settings, you can click
to navigate to the folder you want to save videos to. After specifying all the settings, you can click ![]() to start the conversion.
to start the conversion.

 Free Trial Media Magician


