
 Home
HomeAdobe Premiere Pro is a timeline-based video editing app. It is popular among many amateurish and professional video editor. Recently, many users have updated Adobe Premiere Pro for a new start. But it seems that not all new things are better than the old ones cause that when people import video clips, some come with audio but most don't. Premiere Pro has only video clips without any audio attached to them. When loading video to Premiere Pro, you might get an error stating "This File has no Audio".
See NO Audio Issues When Importing Video Clips to Premiere Pro
If you meet no audio issues when importing clips to Premiere Pro by coincidence, you might will be search the solution on Google. Then you will find that there are so many people that have the similar troubles with you.
"I tried importing my .mov video, which couldn't be done. I had to install Quicktime player in order to be able to import the video. But no audio track comes with it, just video. I recently had to re-install my Windows 10, maybe I am missing some codecs?"
"Why do some of the clips I imported in premiere pro cc has no audio even though it has audio when I play it in VLC?"
"I updated to Premiere Pro 2017 this morning. I went in to do some work on a project but when I imported some screen recorded footage that has audio and that appeared when imported into the last version."
"I used to edit my .mts files with Premiere Pro CC without any issues until yesterday.Now I import my .mts file (made with a Sony VG900) but Premiere doesn't recognize the audio tracks (that I can hear just fine with VLC)."
Solutions to Solve Premiere Pro No Audio Issues When Importing Videos
"No Audio" issue often mainly affects Premiere Pro CC 2015.3 (versions 10.3 and 10.4) and Premiere Pro CC 2017 (version 11.0). When you can't find audio after loaded video clips into Premiere Pro, you can try the following solutions.
Solution 1: Clean Media Cache files
Delete all the files from "Media Cache" and "Media Cache Files" folders. The location of these folders can be found under Preferences > Media.
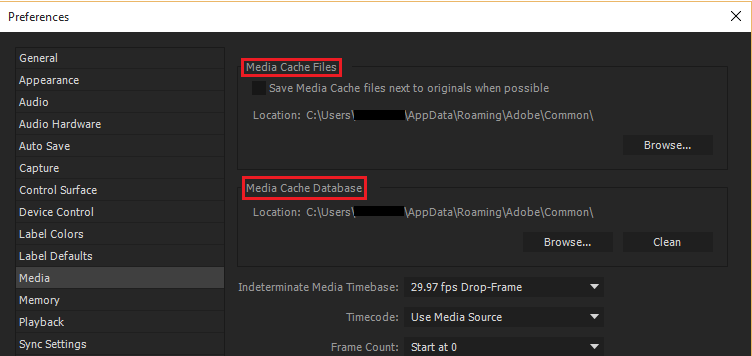
Note: By default, Media Cache Files and the Media Cache Database folders are stored in these locations:
Mac: /Users//Library/Application Support/Adobe/Common
Windows: \Users\\AppData\Roaming\Adobe\Common
Solution 2: Rename the Media Cache folder
Navigate to the Media Cache location and rename the folders to Media Cache Files_OLD and Media Cache_OLDrespectively.
Solution 3: Move Media Cache to a different location
Change the location of Media Cache folders to elsewhere on your machine.
Solution 4: Copy the same clip to a different folder (not 100% work)
The other fix, more stupid but worked most of the time. Was to copy the same exact clip to a different folder. Then import or replace the original clip with the copy from another folder. I don't know why it works other than it recreates the WaveForm and\or Peak file. These are the annoyances that really upset me.
Solution 5: Check for clips with incompatible codecs.
If you completed the steps above and you still don't hear sound, the problematic clips could have been encoded with an incompatible codec. Codecs are algorithms for compressing audio and video data. Many different codecs exist. Sometimes, Adobe Premiere Pro can't decode files that were encoded with a poorly designed codec or a codec that is not installed on your computer.
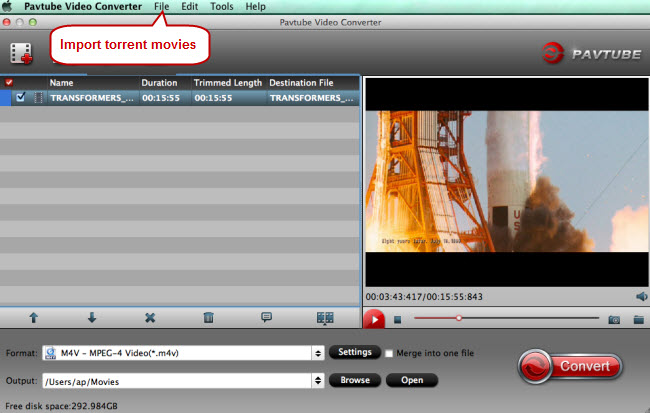
You can download Pavtube Video Converter for Windows/Mac which you just run it through that and it fixes the audio so Adobe Premiere Pro recognizes it. Then you can replace the clip with the new output from Pavtue Video Converter. This video tool can re-encode video and audio with Premiere Pro supported format, codec, bitrate, etc to make any video in right codec and format for PrPro. In addition, Pavtube Video Converter also can convert some Premiere Pro unsupported video such as Tivo, MXF, HEVC, 4K, TS, etc to Premiere Pro (CC, CS6, CS5, CS4) accepted ones.
Just drag and drop your video clips to the interface of Pavtube Video Converter. The software can detect the file and list them as below (Below is the Mac version screenshot.)
Then choose ProRes video for Premiere Pro. Both FCP and Premiere Pro can handle ProRes well. Select "Format" > "Final Cut Pro" > "Apple Prores 422(*.mov)" or "Apple Prores 422(HQ)(*.mov)". The output video will be encoded with Premiere Pro compatible video and audio codec. You can click "Settings" to adjust the video and audio parameters, including the Bitrate of Video & Audio, Video Size, Sample Rate, Frame Rate, Audio Channel for getting the best quality for Premiere Pro.

Click the big “Convert” button in the main UI to begin the video clips or ProRes conversion. You can see your converted videos by clicking “Open” button. Then try to load the output video clips to Premiere Pro.
Solution 6: Check for disabled audio tracks (Premiere Pro CS6)
If sound is missing only from certain clips or only from clips in a certain project, then do the following tasks in order:
1. Check for disabled audio tracks (Premiere Pro CS6).
In the Timeline panel, look at the box at the far left or far upper left of each audio track's header. If no speaker icon appears in this box, then the track is disabled. To enable a disabled audio track, click in the box. A speaker icon appears.
In the illustrated example below, the speaker icon (circled) indicates that the Audio 1 track is enabled. On the right side, the empty box indicates that the Audio 1 track is disabled:
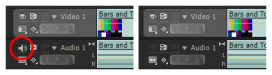 Audio track enabled (left), disabled (right)
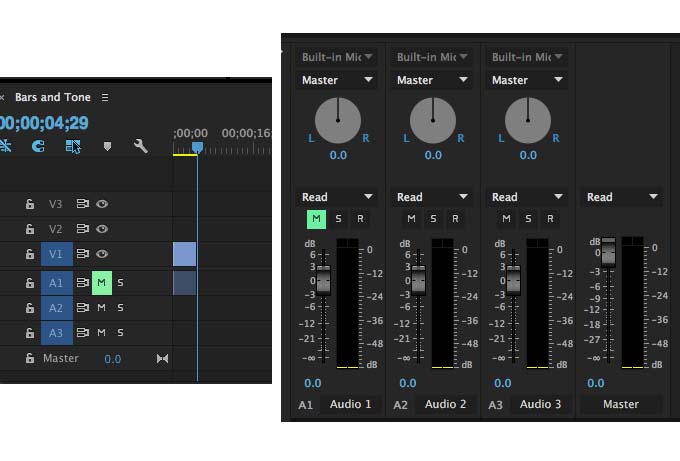
2. Check for muted or low track volume.
Use the Audio Mixer or Timeline panel to determine if an audio track is muted or has low volume, and to increase the volume if necessary.
Premiere Pro CC: Do one of the following:
Open the Audio Mixer, choose Window > Audio Clip Mixer > [Sequence Name] or Window > Audio Track Mixer > [Sequence Name].
In the Timeline panel, look at the box at the left.
If the M next to any of the tracks is highlighted, the audio is muted. Click M to turn sound on.
Premiere Pro CS6: To open the Audio Mixer, choose Window > Audio Mixer > [Sequence Name]. Check for muted or low-volume tracks.
Normally, the former 3 ways can help you solve "No Audio" issues in Premiere Pro. If your codec is wrong, you can choose solution 5 better. Hope the solutions offered here can assist you fix the issue.
 Free Trial Video Converter for Mac

Useful Tips
- MOV to M4V: How to Convert MOV to M4V on Mac OS (macOS High Sierra Included)
- How to Play AVI Videos on MacBook(Air, Pro, iMac)?
- How to Import Android Videos to iMovie for Editing?
- How to Play a WMV File on Mac Computer
- Play H.265 Files with QuickTime Player on Mac
- Convert YouTube to MPG/MPEG with Easiest Way


