Home
HomeHow to use Pavtube DVD Creator?
If you’re new to the user-friendly DVD burning software Pavtube DVD Creator, which lets you make your pictures, music and videos into DVDs that play in standard DVD player, here’s a guide for you to getting started with.
---------------------------------------------------------------------
Part 1. Knowing about DVD Creator Interface
The Pavtube DVD Creator icon appears on your computer's desktop after installation. Double-click on the icon to launch the software.
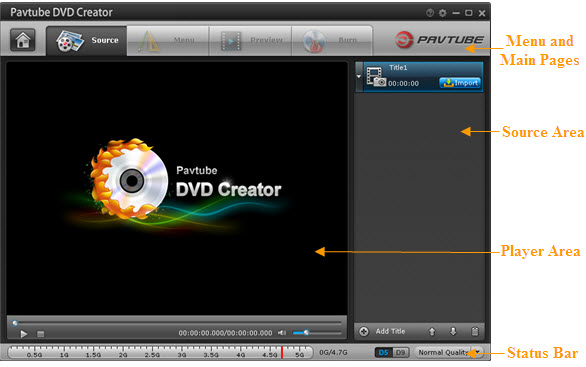
Source Screen
The Source screen of Pavtube DVD Creator is the starting point for all actions. It consists of title bar, menu and main pages area, source area, player area and status bar. Here you import source videos and pictures and arrange them in the order that they are expected to be played. [Learn More]
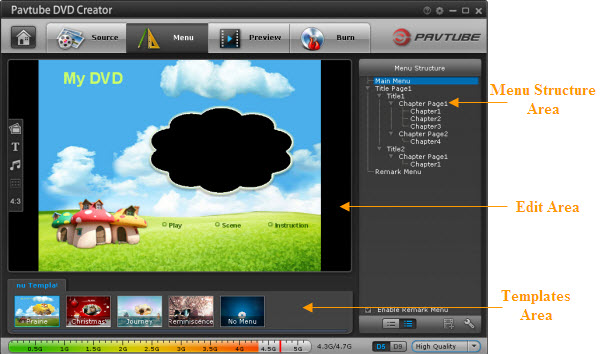
Menu Screen
In Menu screen your can customize your DVD menu to make the disc your own and give it the look you want. It consists of edit area, templates area and menu structure area. If you skip this page, the software will use a default menu template instead.
[Learn More]
Preview Screen
Once the menu has been decided, you can preview how it will look in Preview screen. Your DVD video will be played just like on a DVD player, and the control buttons are corresponded with the keys on remote control. [Learn More]
Burn Screen
The Burn screen lets you burn created DVD-video into ISO image or onto a writable DVD that will plays on standard DVD player after burning. [Learn More]
------------------------------------------------------------------------------------
Part 2. Creating Playable DVD with the DVD Creator
The typical uses of the Pavtube DVD Creator are authoring Video DVD and making Slideshow DVD from all kinds of video and image (see what file types are supported), but you may use it to fast copy DVD ISO and DVD-Video folder to a blank disc for backup purpose. Refer to the below 4 ways for creating DVD from different sources.
Create Video DVD from HD and SD Video files
Step 1. Import Video Files to DVD Creator. The app supports various popular video formats, such as AVI, MKV, WMV, MOV, MTS, M2TS, TiVo, MOD, TOD, etc.
Step 2. Arrange Titles and Chapters.
Step 3. Edit Video Clip (Trim, Crop, Watermark, etc) if necessary.
Step 3. Customize DVD Menu. This includes changing the DVD menu template/style, menu text, display aspect ratio and background for the DVD menu. You can also set chapter mark, and playback mode.
Step 4. Preview Created DVD-Video.
Step 5. Burn Video DVD
Create Slide show DVD from Pictures and Music
Step 1. Import Photos (JPEG, PNG, GIF, BMP, TIFF) to DVD Creator
Step 2. Arrange Titles. This includes changing the DVD menu template/style, menu text, display aspect ratio and background for the DVD menu.
Step 3. Edit Photo Slideshow. The slide show editor lets you edit slideshow by setting transition effect, adding background music and caption text. You may also rearrange order of the pictures and rotate a picture by 90 degree clockwise (or counter-clockwise).
Step 4. Customize DVD Menu. You can either use a preset menu for your slideshow DVD or custom the menu in your way, like changing background picture, music, etc.
Step 5. Preview Created DVD-Video.
Step 6. Burn Slideshow DVD.
Create DVD from DVD ISO Image
If you have standard DVD ISO image, you can use Quick Burn feature to burn ISO Image to DVD.
Create DVD from DVD-Video File Structure
Backed up DVD-Video file structure- i.e. movie directory with a VIDEO_TS and an AUDIO_TS folder inside, can also be recognized by DVD Creator, learn how to burn DVD folder to disc.
 Free Trial DVD Creator