
 Home
HomePavtube DVD Ripper for Mac enables you to make fuller use of the 3.5-inch widescreen display of your iPhone 3GS. After ripping your DVD collections, from disc and ISO file, into most popular video and audio formats, you can enjoy the DVD movie freely on iPhone 3GS. With its simple but powerful editing features, you may crop, trim, set effect, volume up the movie episodes freely. By employing customized formats for iPhone, the ripping process cost you but several clicks and a few minutes. What’s more, the alterable settings make ripping flexible and personalized--- perfect image or smaller file size, all up to you. The following guide shows you how to set output format when ripping DVD for playback on iPhone:
Step I. Download Pavtube DVD Ripper for Mac to your MacBook, and double-click to install the program. Insert the DVD you wish to rip. Now run Pavtube DVD Ripper, when the main interface pops up, click “DVD Folder” to load DVD from optical drive. If your source content is a DVD ISO/IFO file, please click “IFO File” and browse to the directory that contains DVD files. The movie is listed chapter by chapter, and you could preview them and uncheck the chapters you do not want to rip. If you would like to rip the whole movie, select all the chapters and check the box “Merge into one”.

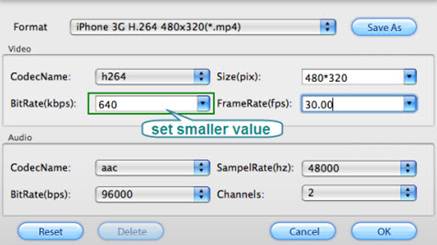
Step II. Click on the Format bar, and choose an appropriate format in iPhone group. The video formats supported by iPhone 3GS can be H. 264 and MPEG-4 video, up to 640*480p. To attain best image, you could choose iPhone 3G MPEG-4 640*480p (*.mp4). If you do not have much room on hard drive and prefer a small file size, iPhone 3G H.264 480*320p(*.mp4) is a better choice for you. To further compress the output file, you could click on “Settings” and set Bitrate to a smaller value (eg. 640kbps).
Step III. Simply click the “Convert” button at bottom right to start ripping DVD. A popup view log will you detailed information of the task. After conversion, you can find the ripping files via clicking “Open” button.
Tip 1: You could specify the output folder to where you like. Either type save path in Output bar or click the small folder icon and browse to a suitable destination folder.
Tip 2: In case that interlacing lines comes up, try “Edit->Effect->Deinterlacing” and the lines will be eliminated.
Tip 3: The ripper allows you to determine where to start ripping and where to end. To try it out, please follow “Edit->Trim”.
Try Pavtube DVD to iPhone Converter for Mac
Try Pavtube DVD to iPhone Converter for Windows
If you wanna share your videos or have perfect movie-watching experiences at home, you can make use of Apple AirPlay to watch movies on your wide screen TV via Apple TV 2.
 Free Trial DVD Ripper for Mac

Useful Tips
- Convert AVCHD (MTS/M2TS) Videos for Playing on iPhone
- How to Record HD videos with the iPhone 5?
- View movies in format of WMV, MKV, AVI, TiVo and MTS on the new iPhone 5
- How to Sync Music, Photo, Video files from Mac to iPhone 5s?
- Watch Blu-ray ISO movies on Apple's new iPhone 5C
- Easy Way to Convert DVD ISO/IFO to iPhone 5S/5C on Mac


