
 Home
Home"My iPhone 4S was stolen yesterday when I was shopping in a crowed supermarket; I reported to the police as soon as I found my iPhone4S was stolen, but I was told that it would be very difficult to retrieve my stolen iPhone. I was so anxious that there were a large number of important customer data in it, I must get the lost data back, I need help! Any one knows how to restore iPhone data while iPhone was stolen.”
iOS Device was stolen lead to important data lost? Don’t panic! Pavtube iOS Data Recovery comes to help you recover the lost data on iPhone/iPad/iPod as long as you have synced your iPhone/iPad/iPod with iTunes. This top Data Recovery for iOS device can scan all your iTunes backup files on your Mac automatically, then you can see all the files on iPhone/iPad/iPod including contacts, messages, photos, videos, notes, voice memos, reminders, etc. The most important is you are allowed to recover the data selectively (iTunes doesn’t allow you restore data selectively). Before recovering, you can preview the content of the contacts, message, notes and more in iTunes backup, so that you can recover the data what you want from the backup files.
Pavtube iOS Data Recovery supports iPhone5S/5C/5/4S,iPad air/mini/3/2,iPod touch4/5.
Only need two steps, you can quickly and easily retrieve the data from backup even if you have no iOS Device
Firstly download and install Pavtube iOS Data Recovery ,here we would like to take the windows version as an example. If you are running a Mac, you can get the iOS Data Recovery for Mac and doing the same operations as below on your Mac
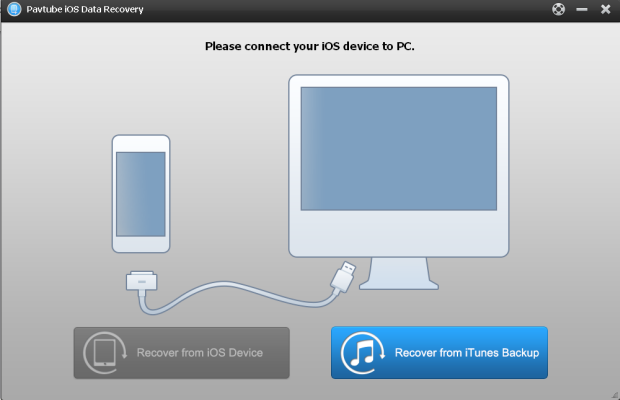
Step 1: Run iOS Data Recovery on your computer; choose “recover from iTunes backup” in the main interface.
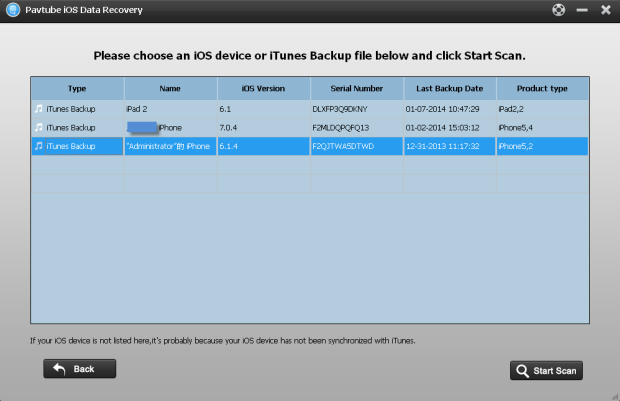
All the iTunes backup files of your iOS Device which has ever synced with iTunes on this computer will be automatically found and listed here. Just choose the right one to retrieve; click “Start to Scan”. The scan time depends on the number of files on the backup.
Step 2: After the scan, all the contents are extracted and displayed in details. You can preview the contents, and selectively mark those you want and click “Recover” to save them on your computer.

 Free Trial iFonebox
Useful Tips
- Get back lost/deleted voice memos from iPhone
- How to recover lost contacts from iPhone4s/5/5s/5c?
- Selectively recover deleted messages from iPhone backup
- How to get back iPhone deleted SMS message?
- Extract iPhone Contacts from iTunes to browse them on computer
- Quickly get back deleted notes on iPhone


