
 Home
Home"I have just acquired a Nikon D7000, and have tried importing some raw video footage shot with it into FCP 7 but to no avail..."
If you're experience the same issues, here's an useful advice for you-converting Nikon D7000 MOV files to Apple ProRes codec before loading the footage to FCP. The Nikon D7000 cam encodes footage with H.264 codec and save the files in MOV container format. The MOV format is FCP friendly but H.264 codec is not natively supported by Final Cut Pro because H.264 encoded contents are highly compressed and are for delivery only. In other words, FCP cannot support others like AVCHD MTS or MXF files, etc.

By transcoding/converting Nikon D7000 H.264 MOV to Apple ProRes 422 encoded MOV file, the possible best quality will be retained in post-production workflow and you can then edit the resulting media files just as you would edit in QuickTime Movie format without rendering.In order to tackle and make Nikon D7000 H.264 MOV to ProRes 422 MOV for natively loading, Pavtube HD Video Converter for Mac is a necessary tool to own. For the preset build in the format profile, it will make the output progress much easier and don't need to waste too much time on choosing which format is best for editing in FCP.


Make Nikon D7000 MOV to ProRes for FCP
Step 1. Load H.264 MOV footage to Nikon D7000 MOV Converter.
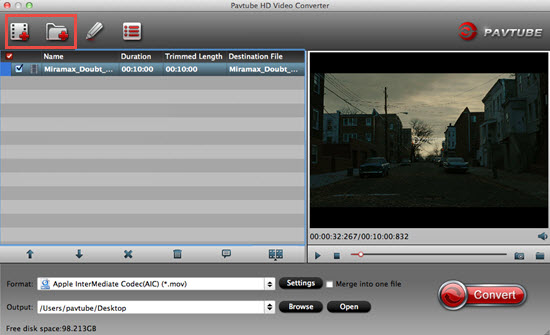
Transfer H.264 encoded MOV files from Nikon D7000 camcorder to your Mac HDD via USB cable. Run Pavtube HD Video Converter for Mac as a H.264 MOV converter for FCP, and click the "Add" button to load MOV footage.
Tips:
More than loading H.264 MOV footage shot by Nikon D7000, Pavtube HD Video Converter for Mac also features strong abilities to encode Canon G12 MOV to ProRes,transcode Canon 5D Mark III MOV for FCP X, convert Nikon D3200 MOV for FCP X and edit EOS 550D H.264 MOV within FCP.
Step 2. Set a FCP friendly codec (e.g. Apple ProRes 422) as export format.
Click on "Format" bar and set a FCP friendly codec in dropdown-list. You are advised to follow "Final Cut Pro" template and choose "Apple ProRes 422 (*.mov)" as export format. H.264 codec has a much higher compression ratio than Apple ProRes, so the ingested files are significantly larger than the original files.

Tips:
If you prefer smaller file size, choose "Apple ProRes 422 (LT) (*.mov)" instead. The "Apple ProRes 422 (Proxy) (*.mov)" format offers file size at SD levels and is recommended for 480i/p and 576i/p shootings. The Apple Intermediate Codec (*.mov) under "QuickTime Movie Format" template is recommended as an optional format for converting Nikon D7000 MOV files to Final Cut Pro. (Differences among Apple ProRes codec)
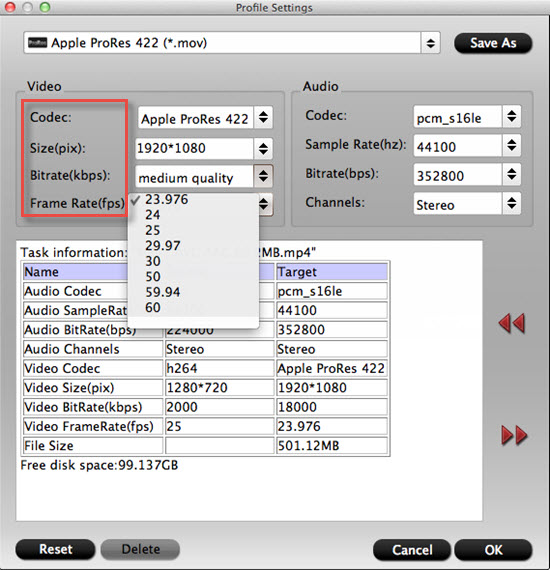
Step 3. Set possible best quality for FCP editing.
Click the "Settings" button and customize proper video/ audio parameters if necessary. Video size, bitrate and frame rate are flexible and can be adjusted as you like. E.g. Set video size to 1920*1080 when you feel like to keep 1080p as the source file features. Or set "original" in video bitrate drop-down list to keep best quality. You may skip this step as well as default format works well with FCP too.
Step 4. Convert Nikon D7000 MOV files for FCP workflow.
Click "Convert"button to convert Nikon D7000 MOV files to FCP friendly files. Once the conversion is finished, you can click "Open"button to get the output files effortlessly. Now you have got it right, feel free to import and edit converted D7000 MOV footage in Final Cut Pro.
Additional editing features of this Nikon MOV to FCP Video Converter:
1. Combine files together - check the files to be merged in file list and check "Merge into one"box beside "Settings"button.
2. Deinterlace - click "Editor", switch to "Effect"tab, find "Deinterlacing"box, and check it to eliminate interlacing lines.
3. Thumbnail - click "Snapshoot"button when previewing the video. Click "Option"to set the image format of screenshots.
4. Trim a section of the movie - click "Editor", switch to "Trim"tab, and input time point in start and end box.
 Free Trial HD Video Converter for Mac

Useful Tips
- Best Workflow of Canon 5D Mark IV 4K MOV with FCP X
- Convert 1080p MTS Videos to Windows Movie Maker
- Convert Panasonic MXF Footages to FCP as ProRes for Editing
- How to Edit Sony CX106 AVCHD Videos on Pinnacle Studio 15 without Rendering?
- How to Play AVCHD Video on Dune HD Player?
- Convert Sony AVCHD MTS/M2TS to AIC MOV for iMovie


