
 Home
HomeDavinci Resolve is one of the few applications that can combine professional multi track nonlinear video editing with the world's most excellent color corrector. It has all of the creative tools you need to edit everything from indie films to the largest Hollywood blockbusters. Well, with the popularity of iPhone7 and iPhone7 Plus, more users intend to utilize Davinci Resolve to correct color and edit iPhone videos, then how to import and edit iPhone video in Davinci Resolve?
Before edit iPhone video in Davinci Resolve, the first thing we should take into account is whether Davinci Resolve has the capability to handle iPhone videos. The fact is that it is hard for you to import every piece of iPhone video into Davinci Resolve directly. The iPhone (including iPhone 7, iPhone 7 Plus, iPhone 6s, iPhone 6s Plus, etc.) records in MPEG-4 and outputs its files as .MOV files (the container) which is compressed with the H.264 codec. However, H.264 codec is incompatible with most multi track nonlinear video editors including Davinci Resolve. Here let's take a look at the Davinci Resolve supported file formats.
Davinci Resolve supported file formats
Video codec: QuickTime, Prores, DNxHD, MXF, DPX, CIN, EXR
Image format: TIFF, JPEG, MOV, TGA, BMP
Camera raw format: Blackmagic CinemaDNG RAW, ARRI Alexa RAW and Amira. RED One, EPIC , Scarlet and Dragon R3D files including +5K, monochrome and HDRx images, Cineform , Cineform 3D, Phantom Raw, GoPro, Nikon, Canon C300, C500 and 1D, 5D, 7D, Sony F65/F55/F5 RAW, Sony XAVC variants
So the video files you get out of iPhone are hardly compatible with Davinci Resolve, and you will definitely encounter video importing issues. To solve this problem, you need to transcode iPhone video to a more editing-friendly format of Davinci Resolve, such as DNxHD codec. Here a simple-to-use video conversion tool called Pavtube Video Converter for Mac is highly recommended to you, which can do you a great favor to convert virtually any iPhone video formats to Davinci Resolve acceptable editing codecs listed above on your Mac computer.
Pavtube video converter for Mac not only assists you to convert iPhone videos to Davinci Resolve supported file formats, such as QuickTime, Prores and DNxHD for smooth editing task in Davinci Resolve, but also includes a basic editor with which you can merge separate video clips into single one, trim video length, crop video black bars, add watermark, apply special rendering effect, remove/ replace audio, or adjust iPhone video brightness, contrast, saturation, etc. What's more, the iPhone is capable of recording 4K high-definition video which is not accepted by Davinci Resolve. Supposing you intend to import and edit 4K clips with Davinci Resolve, Pavtube video converter for Mac can help you compress 4K to UHD or compress 4K to 1080p for smooth editing workflow with Davinci Resolve. As an extremely versatile software, it is hard for users to find many faults with it.
If you are running on Windows, please turn to the Pavtube Video Converter. Now just download Pavtube video converter for Mac and follow the steps to convert your iPhone videos to Davinci Resolve for smooth editing.
Guide on How to make iPhone video supported by Davinci Resolve on Mac
Step 1: Load iPhone videos into Pavtube video converter for Mac
Install and launch Pavtube video converter for Mac on your Mac computer, click the "File"> " Add Video/ Audio" or " Add from Folder" to load iPhone video into this program. If you'd like to combine multiple iPhone video files to be a single video file, you can tick the checkbox "Merge into one file". You can preview your videos and take snapshots of your favorite movie scenes on the right window.

Step 2: Select output format and folder
Click the "Format" bar to select output format. Choose "Avid Media Composer > Avid DNxHD(*.mov)" as output format for smooth importing and editing iPhone video in Davinci Resolve. You can choose other formats according to your own preference. Then click "Browse" button to choose the folder you'd like to save your output video in.

Tips: If necessary, you can click "Settings" button and go to "Profiles Settings" panel to modify video and audio settings like video encoder, resolution, video bit rate, frame rate, aspect ratio, audio encoder, sample rate, audio bit rate, and audio channels.
Before converting your iPhone video into Davinci Resolve supported formats for professional video editing, click the "Edit" icon on the top of interface to open "Video Editor" window, you can trim video length, crop video black bars, add watermark, apply special rendering effect, remove/ replace audio, add subtitles to your videos here.

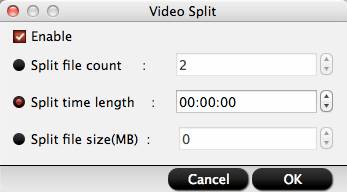
By clicking the "Split" button  on file list, you can launch the "Video Split" window. Checking "Enable", and then you can split the file by file count, time length, or file size.
Step 3: Start converting iPhone video to Davinci Resolve
Click the red "Convert button", it will start encoding iPhone video for importing to Davinci Resolve immediately. Soon after the conversion, just click "Open" button to get the generated vidoe files. Then you will have no problem to import and edit any iPhone videos in Davinci Resolve on both Mac and Windows.
How to import video into Davinci Resolve?
1. In order to import media from your media storage to the media pool, you have to select the media that you want to upload and then just drag it to the media pool.

2. If you get a pop up message that asks you if you want to change the frame rate of the timeline to the frame rate of your media because they don’t match, you should click on “Change”.

3. By double clicking on a video in the media pool, and pressing the play button you can simply preview the shot.
4. In order to delete a video from the media pool just right click it and press “Remove Selected Clips”

 Free Trial Video Converter for Mac

Useful Tips
- MOV to M4V: How to Convert MOV to M4V on Mac OS (macOS High Sierra Included)
- How to Play AVI Videos on MacBook(Air, Pro, iMac)?
- How to Import Android Videos to iMovie for Editing?
- How to Play a WMV File on Mac Computer
- Play H.265 Files with QuickTime Player on Mac
- Convert YouTube to MPG/MPEG with Easiest Way


