
 Home
HomeMP4 is a digital multimedia container format used to store video and audio and is commonly used for sharing video files on the Web. Have a lot of videos or movies in MP4 file format and wish to reduce MP4 file size for the following reasons:
- Free up some storage space on your computer hard drive
- Upload to video sharing sites which limit the video size of MP4 video you upload
- Send to others via email which refuse to accept email attachments over 10MB in size
- Just for playing on iPhone iPad or other portable devices smoothly
As a matter of fact, it won't be difficult for you to find a MP4 video compressor to reduce the MP4 file size. What really matters here is how to keep the original high quality of MP4 files during the video compression process, in other words, how to reduce MP4 file size with less quality loss. To answer this question, we should be clear of what important factors will influence the video file size of a MP4 video and how to make a good balance of video size and quality.
Factors that effect the final video file size
There are many factors that will impact the final video file size, such as video codec, container, resolution, bit rate, frame rate. For video size, codec and bit rate of the video are the most crucial factors or reference indexes. In broad terms, the video size is determined by bit rate. Under the same definition, the higher bit rate the video possesses, the bigger the video size is. And remember, the resolution has no influence on video size if we don't change bit rates.
Related article: Compress Movies to File Under 2GB | Compress MOV | Compress Video for Email YouTube
How to Compress MP4 files with less quality loss?
Based on above listed standards, we can compress a MP4 files by changing codec or lowering bit rate.
What is the best codec to compress MP4 files?
The MP4 files can be encoded with various different compression codec, among them, H.264 is a standard codec that balances high visual quality with efficient file size. It ensures you'll get the most out of your upload quota while minimizing upload and conversion times. Be sure to choose the "High Profile" H.264 setting instead of "Main Profile." Please note that the H.264 video codec only supports resolutions up to 4K.
How to lower MP4 video bit rate?
Lowering the video bit rate will bring about the decrease of the video file size, but always keep in mind that the image quality will be bad in case you make the bit rate too low.
How to tweak other factors such as frame rate, resolution, container, etc?
Frame rate
It's best to maintain the video's native frame rate when compressing a video. You can also choose to lower the video frame rate to a range between 24-30 frames per second (FPS), but doing that can affect the smoothness of the video, and especially make movement seem jerky or unnatural.
Resolution
As what we have mentioned above, resolution affects the size the video greatly but the quality may not be greatly affected.
Container file formats
If you wish to compress MP4 for email sending or hard drive space saving, you can choose the WMV file format, which create relatively small video files and preserve the quality better than many other highly compressed video formats. For popular online sites such as YouTube, Vimeo, Facebook, etc video sharing, FLV can be the best choice.
Best tool to compress MP4 file size with no quality loss
If you are looking for a powerful yet simple to use application to efficiently compress MP4 files on both Windows and Mac with no less quality loss, we highly recommend Pavtube Video Converter Ultimate to you. Compare with other MP4 Video compression programs on the market, it has the following great advantages:
- Full support for all 4K/2K/HD/SD MP4 files encoded with various different compression codec such as H.264, H.265, MPEG-4, MPEG-1, MPEG-2, WMV/VC1, MVC, etc
- Flexibly change output video codec, bit rate, frame rate, resolution, container, etc of MP4 to make a good balance between file size and quality
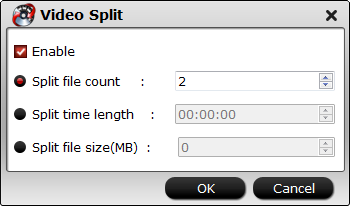
- Compress MP4 files with no quality loss with the trimming function to shorten the video length, crop the video to remove black edges or unwanted size area or split large video into small parts or segments by file size, count or length.
For Mac users, you can easily perform the same MP4 video compression process on macOS High Sierra, macOS Sierra, Mac OS X El Capitan, Mac OS X Yosemite, Mac OS X Mavericks, etc with Pavtube iMedia Converter for Mac.
Step by Step to Compress MP4 Files with Less Quality Loss
Step 1: Add MP4 video files that you desire to compress with.
Download and install the best MP4 video Compressor. Click "File" menu and select "Add Video/Audio" or click the "Add Video" button on the top tool bar to import source MP4 video files into the program.

Step 2: Choose output file format.
From "Format" bar drop-down menu, we choose the most efficient and device compatible compression codec "H.264 HD Video (*.mp4)" under "HD Video" main category to compress HD MP4 video. If you wish to compress 4K MP4 video, then it would be much ideal for you to select "H.264 High Profile Video(*.mp4)" under "Common Video" main category.
Best codec to compress HD MP4 video

Best codec to compress 4K MP4 video

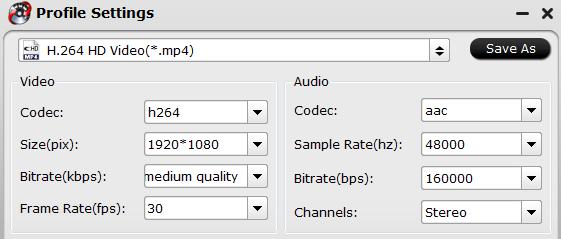
Step 3: Flexibly adjust output profile parameters.
Click "Settings" on the main interface to open "Profile Settings" window, here, you can lower the output video bit rate, frame rate, resolution with the principles we listed above to produce a smaller MP4 file size with no quality loss.
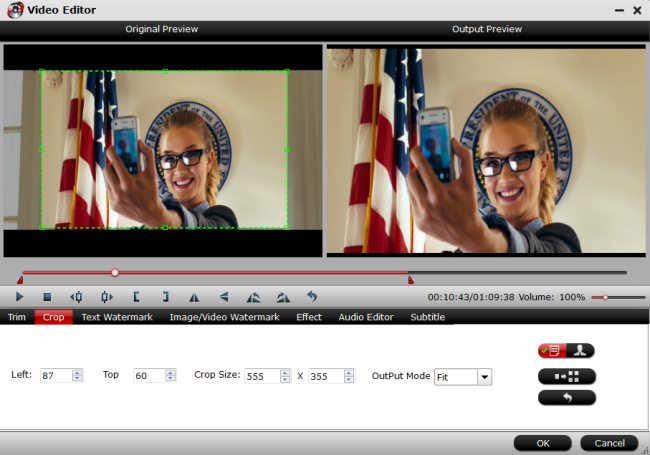
Step 4: Trim/crop/split MP4 file size.
Select one item on the file list to active the pencil like "Editor" icon on the top tool bar, hit the "Edit" icon to open video editor window.
Trim: Click "Trim" button, you can drag the slider bars to include the segment you want to remain, click the left square bracket to set start point, and click the right square bracket to set end point when previewing the video or directly input specific values to "Start" and "End" box.

Crop: Hit the "Crop" tab, drag the green dash line around the video to remove the black edges in the video frame.
Split: Click the split button on the file list to launch the Video Split window. Ticking "Enable" option, you can split the file by file count, time length, or file size.
Step 5: Start MP4 file compression process.
Define an output folder on your computer to store the compress MP4 files. Then hit right-bottom "Convert" button to start to MP4 video file size compression process on your computer.
When the conversion is completed, you can then get a smaller MP4 file for better online sharing, emailing, space saving and smooth playback.
 Free Trial Video Converter Ultimate


