
 Home
HomeCanon's Rebel DSLR line is doing so well that the company's adding a second model at the top. This T6s/760D has played a well role in the Canon DSLR family. For this brand new camera, let's take a close look at it. This is one can say is very similar with T6i/750D , which just has a little difference between.

What's new:
Updated sensor, autofocus and image processing systems. Canon's new 24.2-megapixel sensor is based on an updated version of the company's Hybrid CMOS, which incorporates both phase-detection and contrast autofocus on the sensor to provide better autofocus during movie capture when used with one of the company's STM (stepper motor) lenses. Plus, it has more phase-detection points, 19 up from nine, similar to the AF system that's in the original 7D.
New metering sensor. Canon brings the RGB+IR metering technology from the 7D Mark II down to the new Rebels, albeit with fewer zones. Generally, in addition to metering these sensors provide information to improve face or object detection and sometimes to boost autofocus tracking speed.
Smaller viewfinder. The small, dim viewfinder of the T5i loses even more magnification, dropping from an effective 0.53x to 0.51x.
Now you may notice that the shooting format is MP4 which most users may consider it as the common format to handle, but the truth is some unknown problems just happen without any expectation. How to make this T6s/760D MP4 compatible to load into different NLEs like FCP, Adobe Premiere Pro, iMovie etc or playback them on various platformats?
You need one powerful converter which can not only convert MP4 to the proper format to do the following jobs, but also maintain the most quality of the original files that you can even tell the difference. Pavtube Video Converter for Mac is just this one can do the job. With the inner decoder and encoder , you don't have to download any extra codec package to help you do the decode thing. Just some simple steps and you can all leave this to Pavtube.


Turn T6s/760D MP4 to ProRes to edit in FCP
Step 1. Download T6s/760D to FCP Converter on your Mac
This converter can run on Yosemite flawlessly. And the only difference between the full version and trail version is the watermark "Pavtube" in the middle of the converted files.

Tips:
If you can't install your Pavtube ,which pop up this message" unidentified developer", then please follow these steps and everything will just be fine:
1. Launch System Preferences from the Apple menu
2. Choose "Security & Privacy" and then click the "General" tab, followed by clicking the lock icon in the corner to unlock the settings
3. Look for "Allow applications downloaded from" and choose "Mac App Store and identified developers"
4. Accept the security warning and allow
5. You can now launch any app from any location or developer
Step 2. Choose ProRes 422 MOV for FCP
After successfully install this app, then go to this "Format" to choose the preset "Final Cut Pro">"Apple ProRes 422 (*.MOV)" as the output format. This is the best suitable format to go for FCP, even if you don't do this by yourself, FCP will do this conversion behind the backstage.

Tips:
If you don't know the differences among all those Apple ProRes codecs, you can go to this article for more.
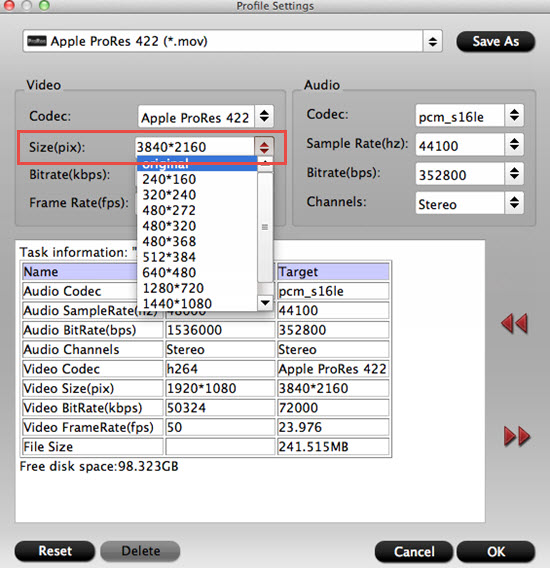
Step 3. Adjust your parameters if you need
Click "Settings" to do the adjustment if you need. Here you can adjust Bit rate and Frame and know the detailed information of your generated file in the below tablet.
If your files are 4K , and you can't find this parameter, then don't worry , just type this 3840*2160 in the following Size (pix) box, and you will get what you want.
Step 4. Start to convert T6s/760D MP4 to ProRes for FCP
After setting the file location, you can back to the main UI and then click "Convert" to start your conversion. You can do batch conversion if you have lots of files to convert. But the maximum number is four , you can load all your files into this app and the leave this app to run.
After the conversion, click "Open" to check your converted files. If you happen to forget to set the file location, no need to worry, click "Open output folder" to check your converted files in the default location.
For newbie, how to transfer files into FCP can be learned here. And the presets in the format list will help you to choose format and ease your conversion.
 Free Trial Video Converter for Mac


