
 Home
HomeThis tutorial is written for Pavtube DVD to iPhone Converter for Mac users, aiming to help them learn the basic operations and tricks of using Pavtube DVD to iPhone Converter on Mac. The DVD to iPhone Converter is a specific DVD trans-coding tool for converting DVDs to optimized video and audio formats for iPhone 4, iPhone 3G and iPhone 1st generation. DVD source could be disc or IFO file. The converter outputs videos of H.264 and MPEG-4 encoded video from 320*240 to 1280*720 for iPhone, iPhone 3G and iPhone 4.
You may download a trial version of DVD to iPhone Converter for Mac and give it a shoot. There is not any time or function limitation, only a Pavtube logo watermark will be put on the screen of converted videos.
A quick search is listed out below for your reference:
1. Load DVD to Pavtube DVD to iPhone Converter for Mac
2. Decide which chapters to convert.
3. Set audio track and subtitles for selected chapters.
4. Determine output format for your iPhone 4, iPhone 3G, iPhone.
5. Specify an output location.
6. Wanna do some editing work?
8. Tricks of using Pavtube DVD to iPhone Covnerter for Mac.
Now let’s focus on the detailed working flow of converting DVD to iPhone. By DVD I mean both disc and image file. Here I take a standard DVD disc for example:
1. Load DVD to Pavtube DVD to iPhone Converter for Mac
Insert your DVD to Mac/MacBook/ iMac, run the DVD to iPhone Converter. When it starts up, a dialogue box pops to ask whether you’d like to select Order or Trial. Click on “Trial” instead of close it.
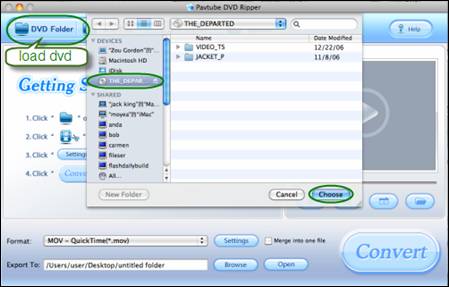
To load DVD movie, you can click “DVD Folder” and browse to the DVD movie you’d like to convert, and then click “Choose” to confirm.
2. Decide which chapters to convert.
The DVD movie is displayed in a directory. Click the triangle arrow to expand the directory for checking movie chapters. Basically the main movie is included in the first Title, so you can right-click, select “Uncheck All” and then check the first title only.

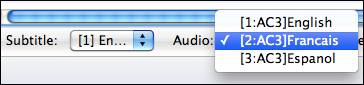
3. Set audio track and subtitles for selected chapters.
Now you got to select audio track and subtitle (if necessary). Click on the Audio box and select an audio track with desired language. Set subtitles in the same way. Always note that you got to check the chapter before setting audio and subtitle. And you have to select subtitle and audio for each Title. By default there will be no subtitle at all.
When setting audio and sub, you can view the movie clips from the Preview window. Simply select an item and click the “Play” button. When the video is playing, you are allowed to take snapshoot. Just click the “Snapshoot” button when it plays to your favorable frame. If you’d like to have one file instead of individual chapters (multiple video files), please check the box “Merge into one file”.

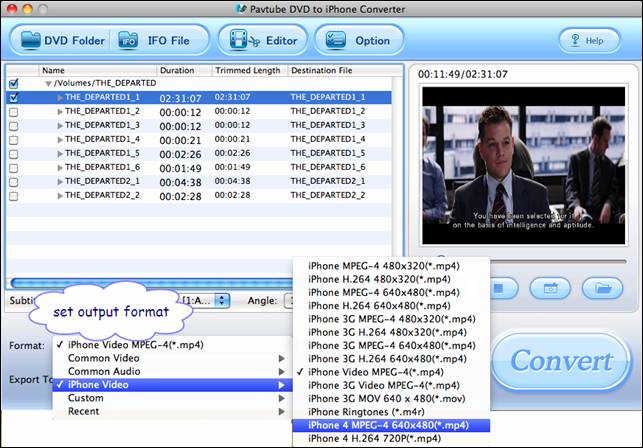
4. Determine output format for your iPhone 4, iPhone 3G, or iPhone 1st generation.
The Pavtube DVD to iPhone Converter is capable of converting DVDs. It is capable of converting DVD to iPhone 4, iPhone 3G, iPhone 1st generation and some other video and audio formats like WMV, MOV, VC-1, M4V, AVI, Divx, MKV etc. Since we are converting DVD to iPhone 4, you can click on the “Format” bar, find iPhone tab and select desired output format from the profile list. There are H.264 and MPEG-4 encoded MP4 and MOV formats up to HD 720p for your iPhone 4. Customized video formats for iPhone 3G and iPhone first generation are available too.
You may customize video and audio parameters in Settings panel as well. Simply click “Settings” button to and set the bitrate, frame rate, channels, sampling rate as desired values.
5. Specify an output location.
Click “Browse” button and specify an output folder to save converted files. Click “Choose” to confirm.
![]()
6. Wanna do some editing?
The DVD to iPhone Converter features some editing functions for you to organize the videos. You may crop, trim, watermark selected movie clip at your disposal in Editor panel. To enter the Editor interface, simply click the “Edit” menu.
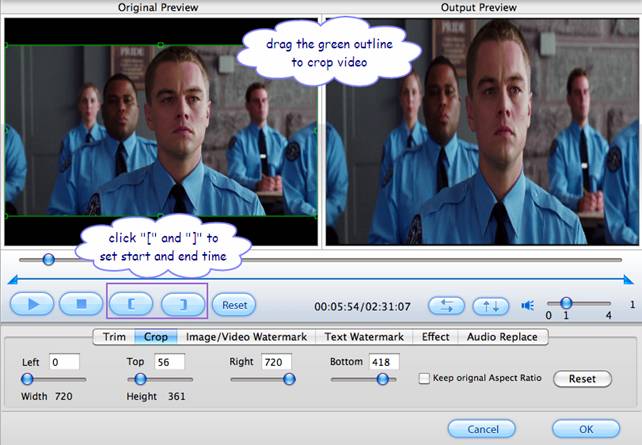
Crop and Trim video
In order to crop video, please click “Edit” menu, switch to “Crop” tab, and drag the green outline to circle the area you’d like to cover, to trim video, please switch to “Trim” tab, and set starting and ending time to include the part you want to keep only.
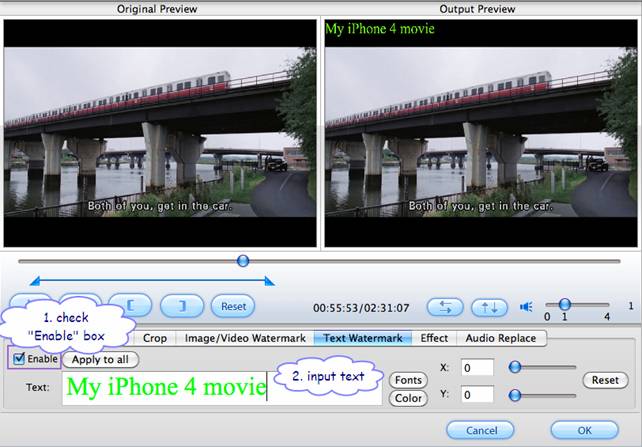
Add Text watermark/image watermark/video watermark
Click “Editor” menu, switch to “Text Watermark” tab, check “Enable” box, and input desired text.
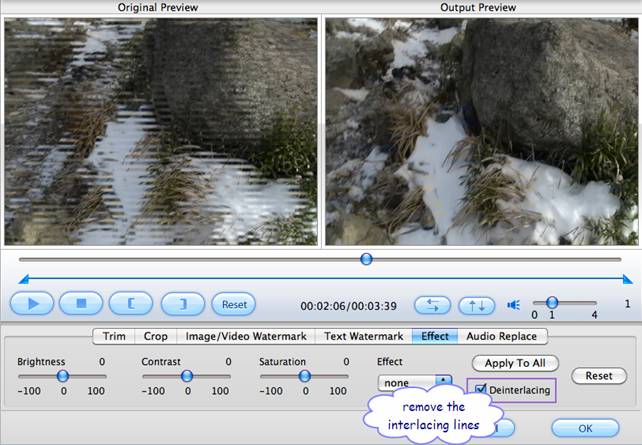
Remove the interlacing lines
Click “Editor” menu, switch to “Effect” and check the box of “Deinterlacing” when you feel like eliminating the interlacing lines.
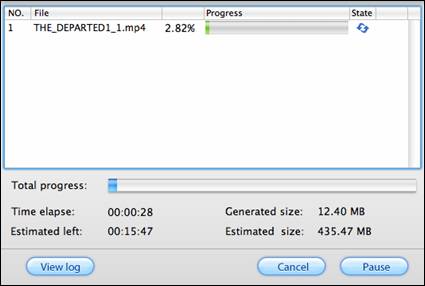
7. Start conversion… Done!
Click “Convert” to start converting DVD to iPhone 4 compatible format when everything’s done. The Mac DVD to iPhone 4 Converter supports auto shutdown so you may set auto shut down before conversion starts by entering “Option” window and check the box of “Shut down the computer after conversion”. When the conversion completes you may click “Open” button to find generated MP4/ MOV files and sync DVD movie to iPhone 4 with iTunes so as to enjoy the movies whenever and wherever you like.
8. Tricks of using Pavtube DVD to iPhone Covnerter for Mac.
A. Let your Mac shut down automatically. Converting M2TS files is usually time-consuming. You do not need to be there waiting all the time till it completes. To set auto shutdown, just click “Option” menu and check “Shut down the computer after conversion” before conversion starts.
B. Cut down the file size (shorten converting time). By setting a smaller video bitrate can you reduce the output file size. Another way is to set video codec as “h.264” instead of “xvid”, since h.264 encodes video with higher compress ratio with relative high quality.
C. Joint and split video clips. As mentioned above, you can combine files together by checking “Merge into one file”. To split video and trim off unwanted segments, you may click “Edit” menu, switch to “Trim” tab, and set starting and ending time to include the part you want to keep only, and then leave it to the DVD to iPhone Converter for Mac .
D. Convert DVD with AC3 5.1 sound. Click “Settings” and set Audio Codec Name to “ac3” and Channels to “6” instead of “1” or “2”.
 Free Trial DVD Ripper for Mac

Useful Tips
- Convert AVCHD (MTS/M2TS) Videos for Playing on iPhone
- How to Record HD videos with the iPhone 5?
- View movies in format of WMV, MKV, AVI, TiVo and MTS on the new iPhone 5
- How to Sync Music, Photo, Video files from Mac to iPhone 5s?
- Watch Blu-ray ISO movies on Apple's new iPhone 5C
- Easy Way to Convert DVD ISO/IFO to iPhone 5S/5C on Mac


