
 Home
HomeAt a very affordable price, the explosion of digital SLRs with video capability has turned many traditional videographers and photographers toward Canon DSLR cameras such as the EOS-1D Mark IV, EOS 5D Mark II, EOS 7D, EOS 60D, EOS600D, EOS 550D and the newly-introduced EOS 5D Mark III to create stunning high definition footage up to 1080p.
Full HD "MOV" movie files created by Canon EOS DSLRs use the H.264 codec for the video. This is an ideal file type for video capture in an SLR camera, delivering relatively compact file sizes with image quality noticeably superior to alternate video compression (Motion JPEG). However, H.264 codec is not intended for post video production. While Final Cut Pro does work with .movs, these H.264 versions are clunky to edit requiring much rendering when in a FCP timeline.
In order to process Canon DSLR footage fast and seamless in Final Cut Pro, it requires that the H.264 .mov videos to be transcoded into a format better suited to editing, and this would usually be Apple ProRes, which is the best intermediate codec developed specifically for seamless Final Cut workflow.
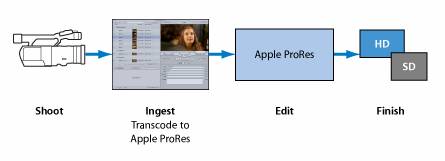
The Log and Transfer window in Final Cut Pro 7 makes ProRes files from your EOS camera’s memory card. Beginners may follow the steps below to import H.264 footage from Canon DSLR camera to Final Cut Pro 7.
1. Connect Canon DSLR camera to Mac computer.
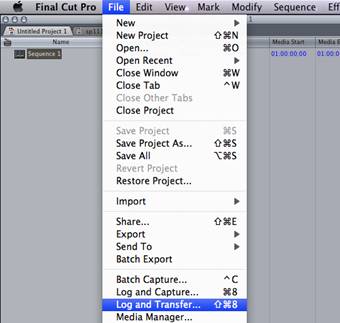
2. Open up Final Cut Pro 7, and select File>>Log and Transfer.
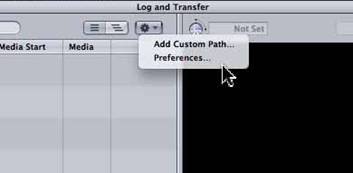
3. The L&T window pops up. Click on the Preference button (upper-middle) to open Import Preference window.
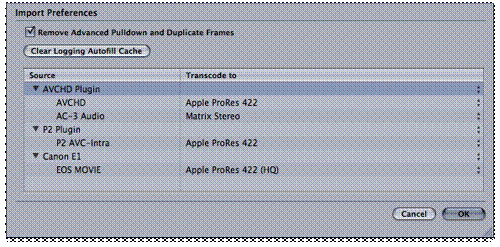
4. In the dialog that appears, set Apple ProRes 422 codec for the AVCHD plug-in (or Canon DSLR plug-in if there is) from the pop-up menu in the “Transcode to” column, and then click OK.
5. Back to L&T window, press the Browse button, and then browse to the Canon camera.

6. The browse area now should have provided an overview of all mounted video within your DSLR memory card. Drag and drop the footage that you’d like to edit to transfer area (bottom-left). The FCP 7 will then transcode selected H.264/AVC encoded EOS footage to Apple ProRes 422, and add them to current project for post-production. You can then edit them freely and smoothly.
Things happen from time to time that Log and Transfer can not detect connected EOS camera, or FCP gives error message like ""xxx" contains unsupported media or has an invalid directory structure. Please choose a folder whose directory structure matches supported media" when ingesting AVCHD structure.

In case that Log and Transfer does not work/can not recognize the Canon camera, refer to the following solutions for help:
1. Download and install Canon EOS Plugin, which enables the Log and Transfer function to recognize and import videos from Canon EOS 7D, EOS 60D, EOS-1D Mark IV, and EOS 5D Mark II.
2. Use a card reader to read the memory card. Backup everything in the EOS memory card to Mac hard drive, and mount the directory as a volume in the L&T window. Do not delete any file. FCP needs the entire card structure to import EOS footage.
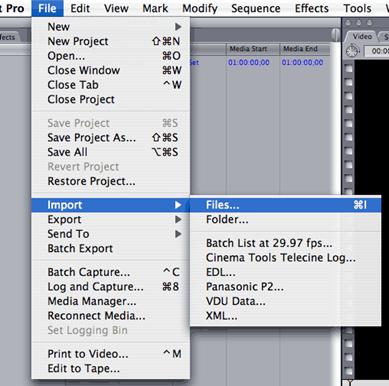
3. Use Pavtube Video Converter to convert H.264 footage into Apple Prores codec. From there you can load Canon DSLR footage via “File>>Import>>Files…” instantly without long-time rendering.
The app supports more variety of DSLR cameras than FCP does – including Canon EOS 5D Mark III, EOS-1D Mark IV, EOS 5D Mark II, EOS 7D, EOS 60D, Rebel T3i, Rebel T2i and Nikon DSLR cams. Different from Final Cut Pro, Pavtube Video Converter reads standalone .mov files from Canon memory card. You don’t need the full card structure, just pick up what you want to keep. Refer to a detailed guide of converting Canon EOS video to Apple ProRes.
 Free Trial HD Video Converter for Mac

Useful Tips
- Import footages/videos/projects into Final Cut Pro X without rendering
- Convert Panasonic MXF Footages to FCP as ProRes for Editing
- Workflow for Importing HX-WA20 MP4 to FCP (X) on Mac
- Edit MediaPortal TS Files in FCP X/Avid/iMovie and Burn to DVD on Mac
- Convert Panasonic TM900 MTS Videos to ProRes 422 for Editing on FCP
- MKV to FCP---Convert MKV to Apple ProRes 422 MOV for Final Cut Pro


