
 Home
HomeWith more and more high-end cameras shooting RAW, a powerful video editing software is necessary, like Premiere Pro CC which has the ability to read those RAW files natively, as of late ProRes has been dwindling within user's work flow. However most user of Premiere Pro CC can't find anywhere Prores settings or when user shot a project with a short turnaround time, you can't go wrong with ProRes. Export ProRes from Premiere Pro CC is a little difficult, following will show you how to export ProRes from Premiere Pro CC and introduce you the best way to get ProRes and edit ProRes in Premiere Pro CC.
How to Export ProRes from Premiere Pro CC project?
From the constant test and verify, I have found the way to Export ProRes from Premiere Pro CC which is a little complicated, there are many details you need to pay attention to.
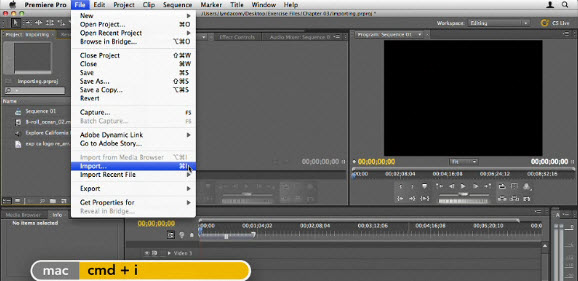
Step 1. Import the Video to Premiere Pro CC
Start the Premiere Pro CC, then choose File > Import. If you prefer to use keyboard shortcuts, press Command+I to open the standard Import dialog.
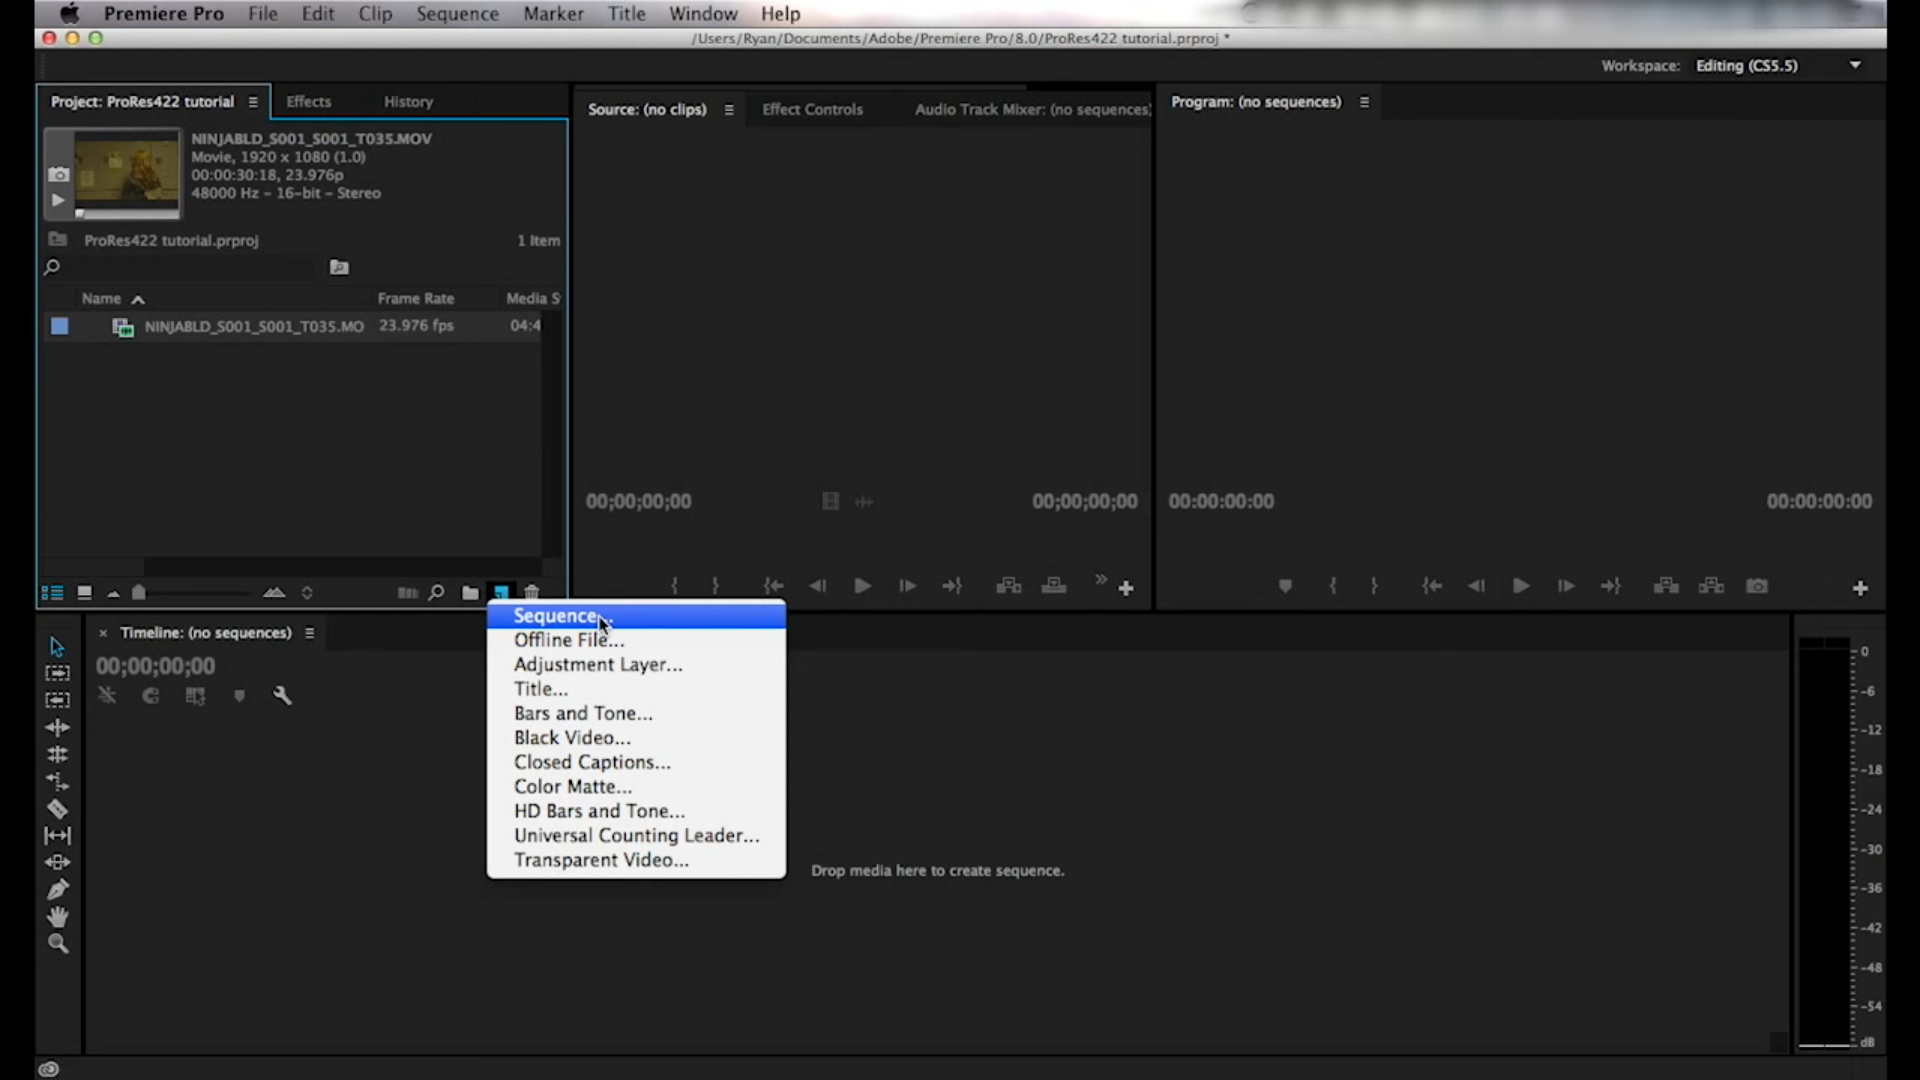
Step 2. Set A New Sequence Project
There are 2 ways to set a Sequence Project, you can click "File" to choose "New", the choose the "Sequence", or you can click the red mark, which is the direct sequence icon,click it and enter the sequence window.
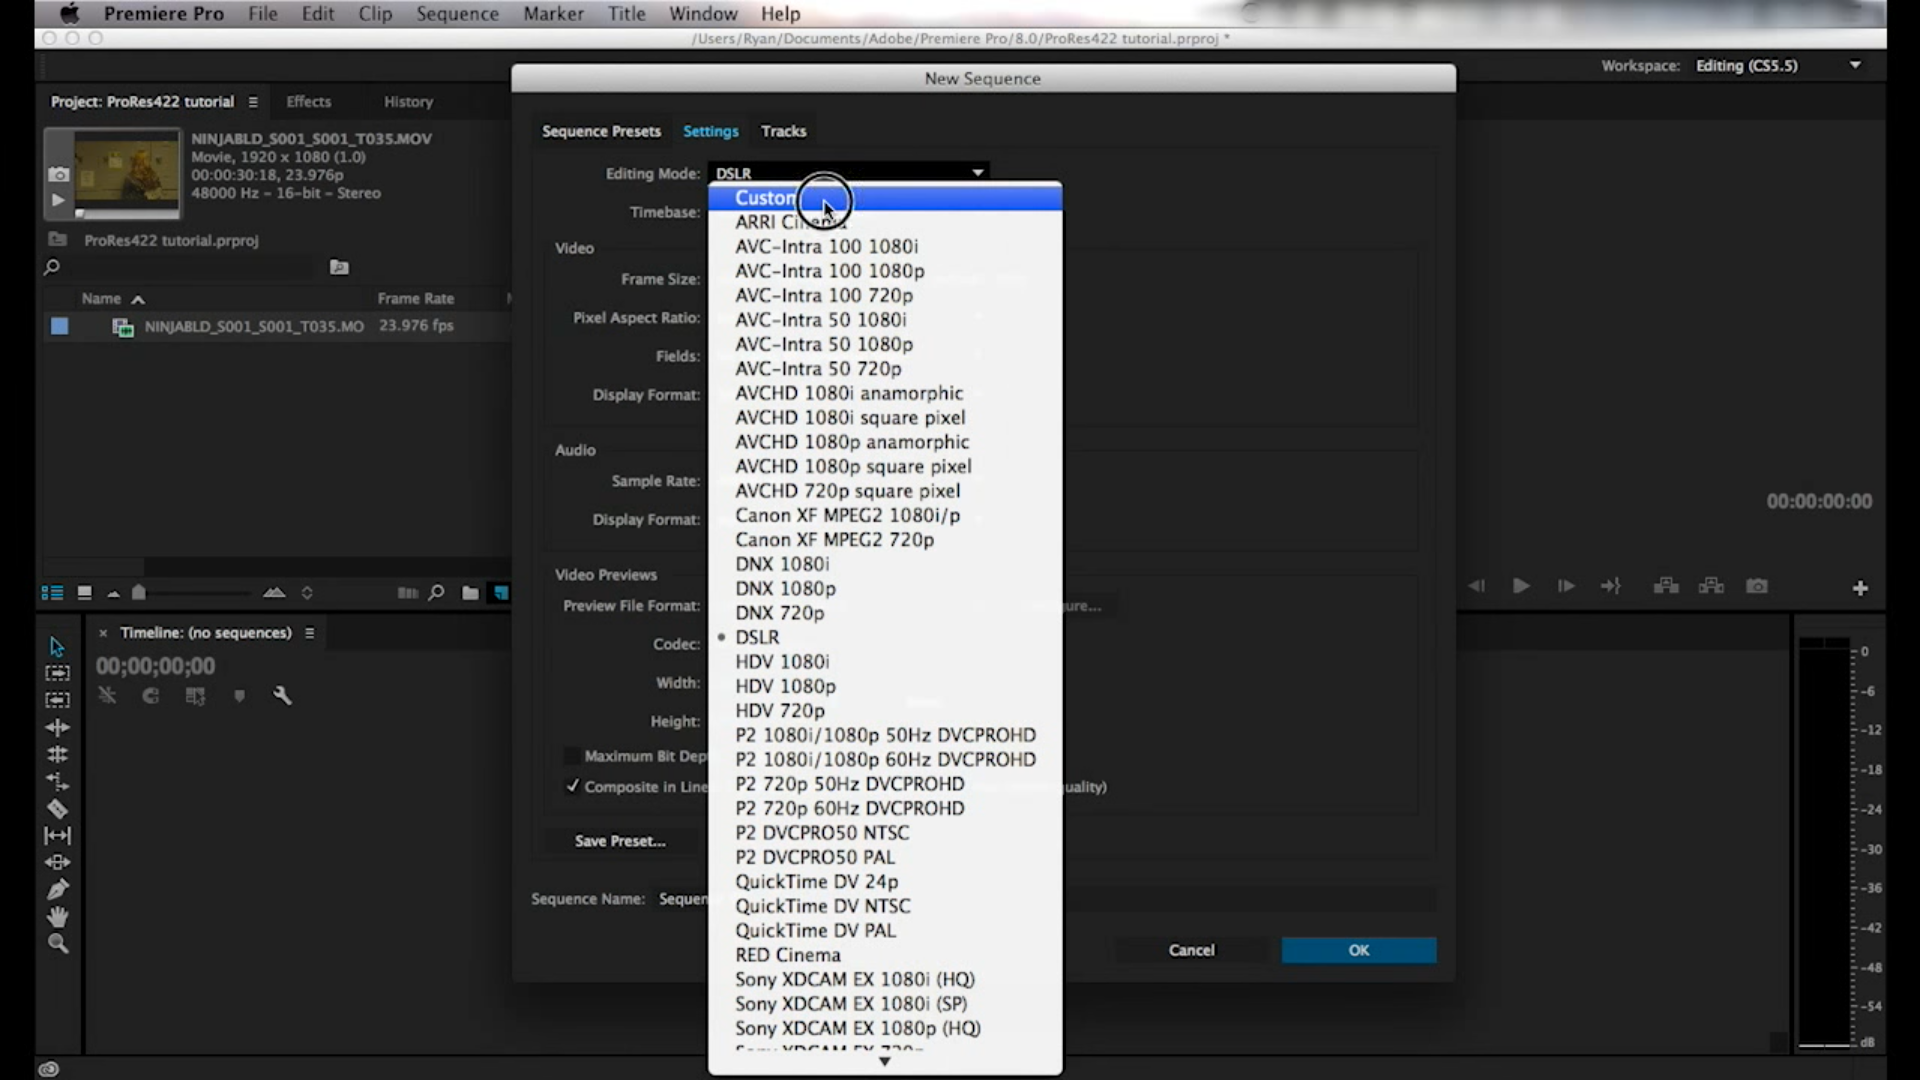
Step 3. Set the Editing Mode
When you open the New Sequence, the go to the"Setting" and choose the "Editing Mode", at the list, choose the"Custom" which you can set other parameters by yourself.
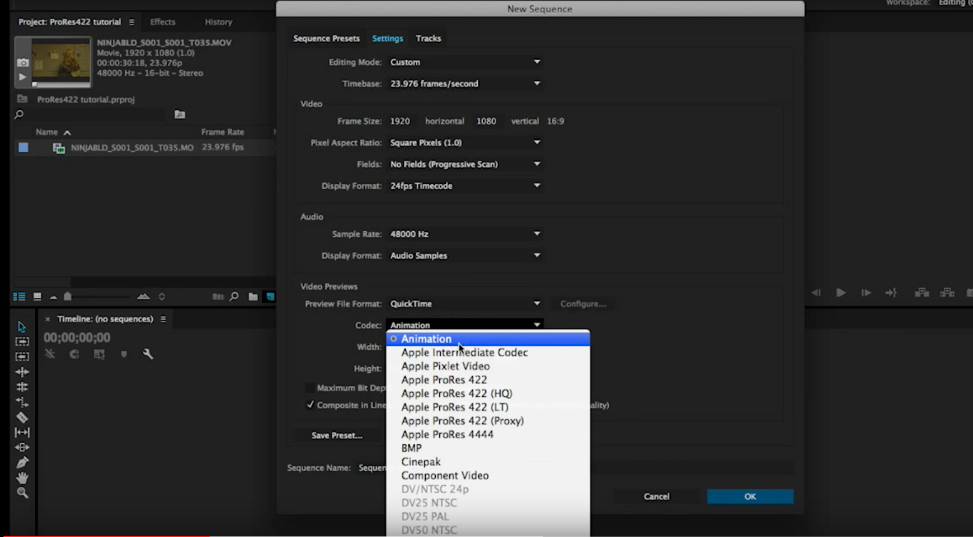
Step 4. Set The Preview File Format
After the Editing Mode is done, choose the "Preview File Format", at the drop-down list, choose the"Quick Time"

Step 5. Set ProRes Codec
Under the Preview File Format, it's the Codec choice, click it and you can see many options of ProRes, such as: Apple ProRes 422, Apple ProRes 422(HQ), Apple ProRes 422(LT), Apple ProRes 422(Proxy), etc. Choose one you want.
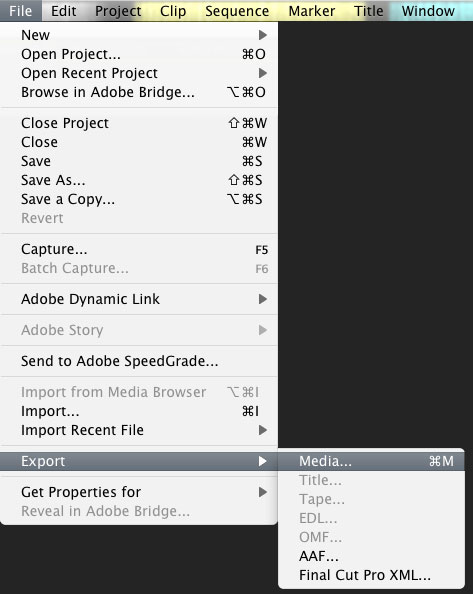
Step 6. Export ProRes from Premiere Pro CC
Go to File>Export>Media. You could also press the shortcut key "control M" on PC or "command M" on Mac.
Best Way to Export ProRes from Premiere Pro CC project?
Have you mastered all the steps that export ProRes from Premiere Pro CC? To a beginner, these steps are so difficult. Also you need to choose every factor by yourself, there are many choices, which one is the best? Based on these conditions, I recommend you the best way to export ProRes from Premiere Pro CC with a third ProRes video converter: Pavtube Video Converter for Mac which is easy to export ProRes from Premiere Pro CC in 3 clicks, you don't set these video parameters by yourself.
This ProRes Converter can support all the ProRes codec, like: Apple ProRes 422, Apple ProRes 422(HQ), Apple ProRes 422(LT), Apple ProRes 422(Proxy), etc. In addition, all the video parameters are preinstalled, you just need to choose the right codec, other work is finished by this best ProRes Converter. As is known to all that user can't export export ProRes from Premiere Pro CC at Windows operating syatem, here, you cna realize this goal, the ProRes Converter also support Windows version.
Export Prores from Premiere Pro CC as the output files, you may find the file size of the Prores is too large, how to get more smaller size? Convert Prores to another different file format such as MPEG-2 for broadcasting or more friendly playback formats like H.264, MPEG-4 is the best choices, this ProRes Converter not only can support multiple video input, also can output different video formats, like: H.264. H.265. MP4. AVI, etc. Best of all, when user choose the video with H.264 or H.265 codec, you can get the 30x conversion speed which is faster than any other ProRes Converter. Why it's so fast? This ProRes Converter.takes full use of NVIDIA CUDA technology and AMD Accelerated Parallel Processing (APP).
Even though this ProRes Converter can't have the powerful video editing functions like Premiere Pro, the basic video editing you can realize. Click the pen at the top of the window, you will find the following contents: Trim: the feature allows users to decide where to start and where to end when converting the selected clip. Crop: which enables users to get rid of the black edges and unwanted area of the image. Image/Video Watermark: Check Enable, you can add images or videos as watermark onto selected video file which can make you special video. Advanced Mode: There are four value fields: Left, Top, Width and Height, etc.
This ProRes Converter is very friendly, even you don't set the video files and output the ProRes directly, if you are stick to setting these files, this ProRes Converter also can satisfy you, you can enter the setting menu, and set the video and audio related parameters. You can down the trial version and explore these magic functions by yourself. This article will tell you more information about this excellent ProRes Converter.


How to Use the Best ProRes Converter?
Step 1. Run ProRes Converter for Mac.
Every video files issue in Premiere Pro CC, you can use this ProRes Converter to help you, just open the video converter by double click, the at the top of the software, you can click the "Format" to input video to ProRes Converter. At the right window, you can preview the video smoothly.

Step 2. Set a friendly ProRes to Premiere Pro CC
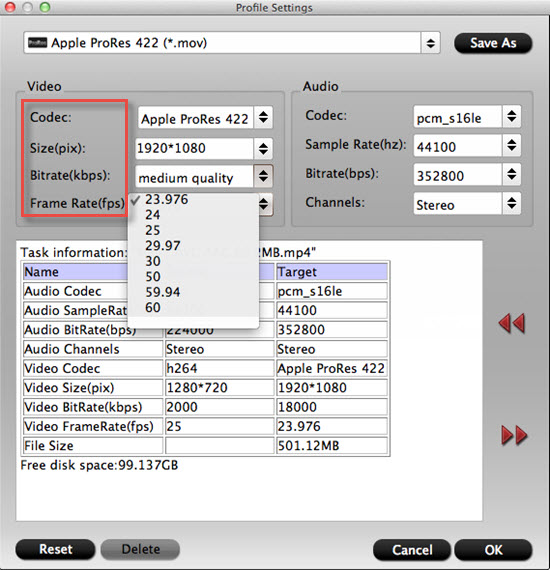
Click the "Format", at the drop down list, choose the "Follow Final Cut Pro", you can find many ProRes formats, such as: "Apple ProRes 422 (*.mov)" format. If you prefer smaller file size, choose"Apple ProRes 422 (LT) (*.mov)" instead. The"Apple ProRes 422 (Proxy) (*.mov)" format offers file size at SD levels and is recommended for 480i/p and 576i/p shootings. More information about the ProRes, you can refer to final TIP table.

Step 3. Set the ProRes to Premiere Pro CC Best formats
Video size, bitrate and fame rate are flexible and can be adjusted as you like. Just click "Setting" menu and enter the setting window, for example: Set video size to 1920*1080 when you feel like to keep 1080p as the source file features. Or set smaller bitrate to further cut down export file size. You can skip this step if you don't need to set these factors
Step 4. Start ProRes to Premiere Pro CC Conversion Process
The conversion process may take long time due to huge file size but trust me-- this ProRes Converter for Mac is faster than most other software. After conversion just click the "Open output folder" button to find the output ProRes files quickly.
Export ProRes from Premiere Pro CC VS Export ProRes from ProRes Converter, which one is the best? No doubt, the later way is more popular among people, you can also import the ProRes to Premiere Pro CC for editing, the you can export ProRes from Premiere Pro CC directly. So easy. By the way, if you are also like to collect DVD and Blu-ray, this ProRes Converter also can support input and related operation. Hope this ProRes Converter can be your best assistant.
TIP: There are a total of six ProRes formats. These formats range from extreme compression to minimal compression rates, such as SD, HD, 2K, 4K & 5K. following will provide each codec and the data rate specs for each frame size.
| Frame Dimensions | Frame Rate | ProRes 4444 | ProRes 422 (HQ) | ProRes 422 | ProRes 422 (LT) | ProRes 422 (Proxy) |
| 720 x 486 | 23.98 fps | 75 Mbps | 50 Mbps | 34 Mbps | 23 Mbps | 10 Mbps |
| 720 x 486 | 25 fps | 79 Mbps | 52 Mbps | 35 Mbps | 24 Mbps | 10 Mbps |
| 720 x 486 | 29.97 fps | 94 Mbps | 63 Mbps | 42 Mbps | 28 Mbps | 12 Mbps |
| 720 x 576 | 23.98 fps | 99 Mbps | 59 Mbps | 39 Mbps | 27 Mbps | 12 Mbps |
| 720 x 576 | 25 fps | 92Mbps | 61 Mbps | 49 Mbps | 34 Mbps | 15 Mbps |
| 720 x 576 | 29.97 fps | 110 Mbps | 73Mbps | 50Mbps | 35Mbps | 15Mbps |
| 960 x 720 | 23.98 fps | 113 Mbps | 75 Mbps | 52 Mbps | 36 Mbps | 16 Mbps |
| 960 x 720 | 25 fps | 118Mbps | 79 Mbps | 63 Mbps | 44Mbps | 19 Mbps |
| 960 x 720 | 29.97 fps | 141Mbps | 94 Mbps | 59 Mbps | 41 Mbps | 18 Mbps |
| 1280 x 720 | 23.98 fps | 132Mbps | 88 Mbps | 61 Mbps | 42 Mbps | 19 Mbps |
| 1280 x 720 | 25 fps | 138Mbps | 92 Mbps | 73Mbps | 51Mbps | 23 Mbps |
| 1280 x 720 | 29.97 fps | 165Mbps | 110 Mbps | 101 Mbps | 70 Mbps | 31Mbps |
| 1440 x 1080 | 23.98 fps | 226 Mbps | 151 Mbps | 105 Mbps | 73 Mbps | 32 Mbps |
| 1440 x 1080 | 25 fps | 236Mbps | 157 Mbps | 126 Mbps | 87 Mbps | 38 Mbps |
| 1440 x 1080 | 29.97 fps | 283 Mbps | 189 Mbps | 117 Mbps | 82 Mbps | 36 Mbps |
| 1920 x 1080 | 23.98 fps | 264Mbps | 176 Mbps | 122 Mbps | 85 Mbps | 38 Mbps |
| 1920 x 1080 | 25 fps | 275Mbps | 184 Mbps | 147 Mbps | 102 Mbps | 45 Mbps |
| 1920 x 1080 | 29.97 fps | 330 Mbps | 220 Mbps | 134 Mbps | 93Mbps | 41 Mbps |
| 2048 x 1152 | 23.98 fps | 302Mbps | 201Mbps | 140 Mbps | 97 Mbps | 43 Mbps |
| 2048 x 1152 | 25 fps | 315Mbps | 210Mbps | 168 Mbps | 116 Mbps | 52 Mbps |
| 2048 x 1152 | 29.97 fps | 377Mbps | 251Mbps | 377Mbps | 377Mbps | 377Mbps |
 Free Trial Video Converter for Mac

Useful Tips
- MOV to M4V: How to Convert MOV to M4V on Mac OS (macOS High Sierra Included)
- How to Play AVI Videos on MacBook(Air, Pro, iMac)?
- How to Import Android Videos to iMovie for Editing?
- How to Play a WMV File on Mac Computer
- Play H.265 Files with QuickTime Player on Mac
- Convert YouTube to MPG/MPEG with Easiest Way


