
 Home
Home“I’m dealing some AVCHD shootings with Mocha AE. Mocha wants me to import a video file when creating a new project and I can't import a .mts file… I did once import the cut clips from Premiere Pro CS5 into mocha, do my thing, then re-export, and the quality of the footage is reduced too much for my taste to add effects after an export then re-export again. Is there a way I can import .mts to mocha AE without losing quality?”
Mocha-AE offers high-end motion-tracking tools to Adobe Premiere Pro CS5 and After Effects CS5 users. But there is a problem when it comes to AVCHD footage, for AVCHD files (.mts and .m2t) are not supported directly by mocha AE. Since Mocha supports most standard movie clip and image sequence formats, you can solve the incompatibility issue by converting the source AVCHD footage into one of mocha supported formats:
AVI files (.avi)
DV Stream files (.dv)
MP4 files (.mp4)
MPG files (.mpg)
QuickTime Movie files (.mov and .qt)
RED files (.r3d)
I've never used .mts files in mocha, the first thing I'd try is to convert the .mts into a lossless .mov. Then I can use the shootings in mocha naturally. I want to export the SOURCE footage (in QT player, MPEG Streamclip, or Adobe Media Encoder) and use that, rather than exporting your edit, where resizing or other things can degrade the quality of the original. This makes things a lot easier and you will not lose quality. Here’s what I do.
Losslessly remux AVCHD .mts to .mov for mocha AE workflow
What you need:
Pavtube Video Converter for Mac (or if you work on Windows platform, get Video Converter for Windows)
Step 1. Add AVCHD video to Pavtube Video Converter for Mac.
Run the Video Converter app, press “Add” to import individual .mts file(s). To import AVCHD folder, press “Add folder” button. The software supports batch conversion and video merging.
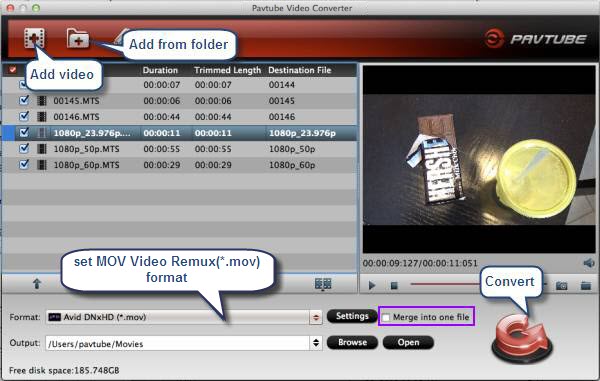
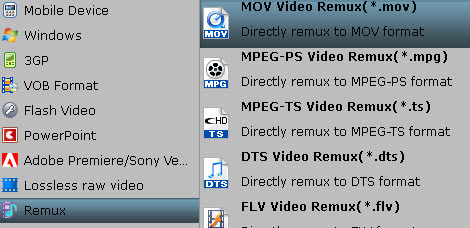
Step 2. Set a lossless format for exporting .mov.
Press on the “Format” bar, and choose “Remux >> MOV Video Remux(*.mov). If you follow this format of using lossless intermediates, you will not lose quality. And also you export the MTS into a format that mocha likes.
Also, you may choose “Common Video>> MOV – QuickTime(*.mov) and click “Settings” to set output video bitrate, frame rate, etc as original. If you continually re-export using the original settings, however, you are actually re-compressing the material in each step of your workflow, throwing away information and introducing artifacts. As you noted, with some codecs, the difference is noticeable after only a generation or two.
Step 3. Export the MTS into .mov format that mocha likes.
Press on the big “Convert” button to export lossless MOV video. This does but re-packs AVCHD contents into MOV wrapper, so it will not take a long time as you do with encoding.
Step 4. Import converted AVCHD contents into mocha AE.
When the conversion completes, click “Open” to find generated MOV video. Now you can import the AVCHD video to mocha AE. Note that in order to use clips you must have QuickTime installed.
 Free Trial Video Converter for Mac


