-
How to add video watermark for enjoyment?
Have you ever wanted to add a video watermark on your current video for enjoyment? Woo, it is easy and useful, as well as a great fun. Just image that you shoot a video for yourself as a presentation, maybe you also need anther video on the corner of the video presentation for deeper explanation. How to realize that goal? Yes, you may guess out, add a video watermark.
If you like, you can do further editing and convert the video with such watermark to your iPod, iPhone or any other mobile devices for playback anywhere, or even convert them to FLV for online sharing with more people. The whole making process is easy, a simple converter will help you finished the masterpiece.
Here, we will introduce you a Mac video converter ($35)-Pavtube Video Converter for Mac, which can be said the best one on the market. It supports a wider range of file formats, besides the ordinary video format like AVI, MPEG, WAV , MP3, it also supports Flash Video (*.flv, *.f4v), HD Video (*.tod, *.m2t, *.m2ts, *.ts, *.tp, *.evo, *.mkv, *.dv ) and images formats including JPG, ICO, BMP, PNG, GIF, TIFF. What will impress you most is that the program’s customization functionalities. With them, you can replace audio, adjust audio volume, trim, crop and merge videos, add special video effects like simple gauss blur, simple laplacian sharpen, gray, flip color, invert, aged film and deinterlacing and more. At the same time, the program adopts advanced audio and video sync technology, built-in codec, which guarantee you a high quality video conversion experience without audio and video sync issue and unexpected codec problem. To sum up, you will find it worth the money at once after you tried it.
Ok, now, we will tell you how to add video watermark with this converter.
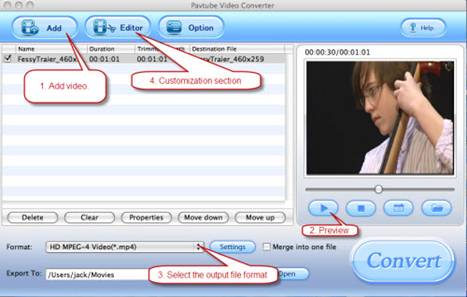
Download and run the program. The streamlined interface will soon attract your eyes. Add the video you want to edit and choose the output file format after the preview.
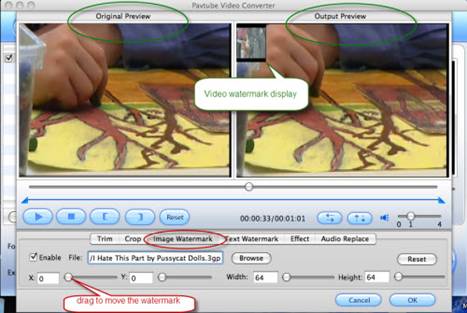
Then, click the Editor button to start the customization. On the edit section, the program display original video and output video for compare. Under the Image Watermark, you can insert the video you prepared first as the watermark, just like the below picture shows. At the same time, do not forget to drag the line under X, Y, Width, Height to change the watermark’s position and size.
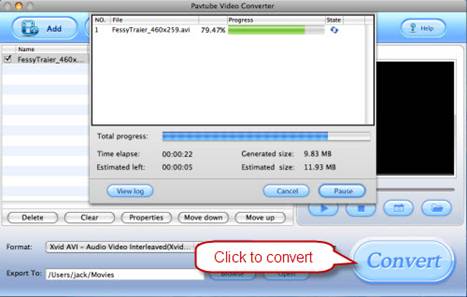
When everything is prepared, you can click the Convert button to start the conversion. From the below screenshot, you can find that a file with 9.83 MB was successful converted in 27 seconds. You will be satisfied with its faster speed :)
Free Trial
Video Converter for Mac(9.0 MB)Buy Now
Video Converter for Mac(Only $35)
Products List
- DVD Ripper Mac
- Blu-Ray Ripper
- DVD to iPod Converter Mac
- DVD to iPhone Converter Mac
- DVD to Apple TV Converter Mac
- DVD to Blackberry Converter Mac
- DVD to MP4 Converter Mac
- DVD to 3GP Converter Mac
- DVD to PSP Converter Mac
- DVD to Gphone Converter Mac
- DVD to Mobile Phone Converter Mac
- DVD to AVI Converter Mac
- DVD Audio Ripper Mac