Beginner’s Guide to Changing iPod Graphics
Since the release of the original iPod in 2001, iPod fans have been looking for ways to customize their iPods beyond the limited options that Apple has given them. This used to be extremely difficult. But recently, some tools have been developed to make major software changes to the iPod - ones that Apple doesn’t recommend or document.
The first such tool is iPodWizard, a utility that allows Windows iPod users to change graphics, menu text, and fonts on any iPod (save the iPod shuffle, of course). iPodWizard harkens back to the early years of the Macintosh, when tinkering users would create their own simple icons to change the ones that shipped with their computers. This article focuses only on changing the iPod’s graphics, a process which isn’t simple, and requires that you read the disclaimer below.
Note: The procedures found below are in no way sanctioned by Apple, and may invalidate your warranty and/or leave your iPod permanently inoperable. Proceed at your own risk! iLounge is not responsible for any harm to your iPod as a result of using this tutorial, or the iPodWizard software.
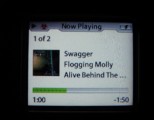
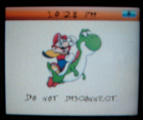
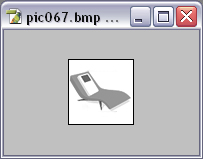
Before we get started, here are a few exciting teasers of what can be done with iPodWizard (photos from the iPodWizard forums):

Changing Graphics on your iPod
To begin using iPodWizard to change the graphics and text on your iPod, you’ll first need to download and install several items:
• iPodWizard: Download and extract the entire contents of the zip file to C:/Program Files/iPodWizard/
• iHack: Download and extract the zip file to C:/Program Files/iHack/
• Apple’s iPod Software Updater: Download and run iPodSetup.exe and complete the installation to C:/Program Files/iPod/.

Once the three items above have been completed, you’re ready to start customizing:
Regardless of your specific iPod model, the process for using iPodWizard is nearly identical. You begin by launching iPodWizard.exe, which you extracted into the C:/Program Files/iPodWizard/ directory.
Next, note the “Open Updater” button in the top left corner of the window. Click it, and browse to C:/Program Files/iPod/Software Updater XXXX-XX-XX/, and select the file “iPod Updater XXXX-XX-XX.exe.” Click OK.
You’ll note that the pulldown list at the top of the screen has now been filled with entries. What do all these entries mean? Puzzled already? You probably should be. Each iPod Software Updater download comes with firmware updates for all iPod models. The entries in this pull-down menu represent the names of these specific firmware images. Here’s a quick table of which cryptic names correspond to which iPod models, adapted from a post by user Tintintin of the iPodWizard.net Forums:
• 1G iPod: 1.1.5
• 2G iPod: 1.1.5
• 3G iPod: 2.2.3
• 4G/HP/U2 iPod: 4.3.1 or 10.3.1
• iPod Photo / 4G & U2 Color: 5.4.2 or 11.4.2
• 1G iPod mini: 3.2.6 or 6.2.6
• 2G iPod mini: 7.2.6
Note that several models have multiple versions listed. Try them until you find one that works, as you may not get the correct selection the first time. Note also that as the iPod Software Updater evolves after iPod Software Updater 2005-06-26, the numbers above will change. It should not, however, be hard to guess the correct values, as they’ll be fairly close to these.
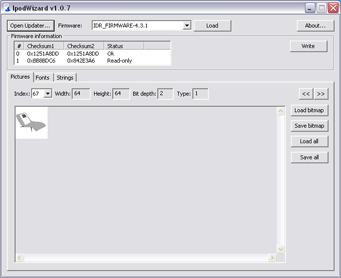
Select the firmware version appropriate to your iPod model, and click “Load Firmware.” You’ll now see more data entered into iPodWizard’s fields.
Pull down the list entitled “Index.” This will allow you browse through the various graphics files used in your iPod’s interface. You can change your Do-Not-Disconnect logo, your battery icon,and many many more. You will likely recognize many of the graphics, but some may not be what you expect. Trial and error is key with iPodWizard modifications (though lists explaining each image are available in the iPodWizard forums).
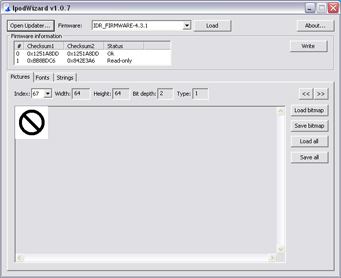
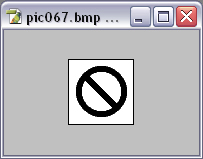
How do you replace an image? Select an image you’d like to replace from the pull-down menu, and click “Save Image” to the right. This will save a copy of the image in BMP format to your local hard disk. Open the image in your favorite image editor (Paint, Photoshop, Irfanview (free), or Microsoft Photo Editor will work fine), and edit the image to your liking. It’s important that you not change the image’s dimensions.
If you have a color-screen iPod, try to save your images in color (default settings are usually sufficient). If you have a greyscale iPod, be aware that the images may not appear the same on the iPod as they do in your image editor, as the 4 shades of grey available on the iPod are different than the defaults for most image editors. That is, they use different “palettes.” Additional help in fixing this problem is available on the iPodWizard forums, but for now, let’s keep it simple - iPodWizard will make the image compatible, if not pretty, upon “Loading” the image.
When you’re finished, simply save the file and use the iPodWizard “Load Image” button to replace the existing photo in the firmware image. Repeat as desired.
Don’t have time to custom tailor your look graphic-by-graphic? Download one of several pre-made themes (Zip archives of picXX.bmp files) from the iPodWizard forums, easily imported using iPodWizard’s “Load All” button.
How do I send these modifications to the iPod?
First, you need to patch Apple’s updater with the new firmware. To do so, click the “Write” button in iPodWizard. This will simply replace Apple’s firmware with your own. Remember… to restore to an official firmware, you’ll need to re-download and reinstall the iPod Software Updater from Apple’s website.
Next, simply plug in the iPod and use the “Restore” feature in Apple’s iPod Software Updater utility to rewrite the firmware with the modified version. Simple!
However, if you don’t want to “Restore” (losing all your data!), and would rather “Update,” you may find you aren’t able to. The update button only works if the iPod’s firmware version is older than the current version. If your iPod is already up to date, then this will be the case when you go to load your patched firmware. This is the reason for downloading and unzipping the mini-application called “iHack.”
iHack will set the iPod’s firmware version a small amount below its current level before you run the iPod Software Updater, re-enabling its “Update” button. Open iHack (at C:/Program Files/iHack/), and click the “Patch...” button while your iPod is connected to your PC and its disk mode feature is enabled. Select your iPod’s drive letter, and iHack will work its magic. Now run the “Update” utility!
If everything went well, you should have an iPod with modified graphics. If not, try a different firmware from the list above - perhaps you’ve operated on the wrong version.
If anything goes seriously wrong, you may be able to restore from an unmodified, freshly-downloaded iPod Software Updater, but if that doesn’t work, seek help on the iPodWizard forums - you may be out of luck.
Have fun customizing your iPod’s look and feel, but be careful!
Jerrod Hofferth is a Forum Administrator and Contributing Editor to iLounge. An Aerospace Engineering Student at Arizona State University, Jerrod enjoys spending his free time both with his girlfriend of 6 years and 15” Aluminum Powerbook.
The first such tool is iPodWizard, a utility that allows Windows iPod users to change graphics, menu text, and fonts on any iPod (save the iPod shuffle, of course). iPodWizard harkens back to the early years of the Macintosh, when tinkering users would create their own simple icons to change the ones that shipped with their computers. This article focuses only on changing the iPod’s graphics, a process which isn’t simple, and requires that you read the disclaimer below.
Note: The procedures found below are in no way sanctioned by Apple, and may invalidate your warranty and/or leave your iPod permanently inoperable. Proceed at your own risk! iLounge is not responsible for any harm to your iPod as a result of using this tutorial, or the iPodWizard software.
Before we get started, here are a few exciting teasers of what can be done with iPodWizard (photos from the iPodWizard forums):
Changing Graphics on your iPod
To begin using iPodWizard to change the graphics and text on your iPod, you’ll first need to download and install several items:
• iPodWizard: Download and extract the entire contents of the zip file to C:/Program Files/iPodWizard/
• iHack: Download and extract the zip file to C:/Program Files/iHack/
• Apple’s iPod Software Updater: Download and run iPodSetup.exe and complete the installation to C:/Program Files/iPod/.
A professional tool that can convert all popular video/audio formats such as AVI, XviD, Divx, WMV, MPEG, MPG, DAT, RM, RMVB, MOV, ASF to iPod Video formats including MP4, H.264, MP3, M4A, AAC and WAV, which can be perfectly played on your iPod classic, iPod nano, iPod shuffle, iPod touch, iPod mini, iPod U2, etc
Once the three items above have been completed, you’re ready to start customizing:
Regardless of your specific iPod model, the process for using iPodWizard is nearly identical. You begin by launching iPodWizard.exe, which you extracted into the C:/Program Files/iPodWizard/ directory.
Next, note the “Open Updater” button in the top left corner of the window. Click it, and browse to C:/Program Files/iPod/Software Updater XXXX-XX-XX/, and select the file “iPod Updater XXXX-XX-XX.exe.” Click OK.
You’ll note that the pulldown list at the top of the screen has now been filled with entries. What do all these entries mean? Puzzled already? You probably should be. Each iPod Software Updater download comes with firmware updates for all iPod models. The entries in this pull-down menu represent the names of these specific firmware images. Here’s a quick table of which cryptic names correspond to which iPod models, adapted from a post by user Tintintin of the iPodWizard.net Forums:
• 1G iPod: 1.1.5
• 2G iPod: 1.1.5
• 3G iPod: 2.2.3
• 4G/HP/U2 iPod: 4.3.1 or 10.3.1
• iPod Photo / 4G & U2 Color: 5.4.2 or 11.4.2
• 1G iPod mini: 3.2.6 or 6.2.6
• 2G iPod mini: 7.2.6
Note that several models have multiple versions listed. Try them until you find one that works, as you may not get the correct selection the first time. Note also that as the iPod Software Updater evolves after iPod Software Updater 2005-06-26, the numbers above will change. It should not, however, be hard to guess the correct values, as they’ll be fairly close to these.
Select the firmware version appropriate to your iPod model, and click “Load Firmware.” You’ll now see more data entered into iPodWizard’s fields.
Pull down the list entitled “Index.” This will allow you browse through the various graphics files used in your iPod’s interface. You can change your Do-Not-Disconnect logo, your battery icon,and many many more. You will likely recognize many of the graphics, but some may not be what you expect. Trial and error is key with iPodWizard modifications (though lists explaining each image are available in the iPodWizard forums).
How do you replace an image? Select an image you’d like to replace from the pull-down menu, and click “Save Image” to the right. This will save a copy of the image in BMP format to your local hard disk. Open the image in your favorite image editor (Paint, Photoshop, Irfanview (free), or Microsoft Photo Editor will work fine), and edit the image to your liking. It’s important that you not change the image’s dimensions.
If you have a color-screen iPod, try to save your images in color (default settings are usually sufficient). If you have a greyscale iPod, be aware that the images may not appear the same on the iPod as they do in your image editor, as the 4 shades of grey available on the iPod are different than the defaults for most image editors. That is, they use different “palettes.” Additional help in fixing this problem is available on the iPodWizard forums, but for now, let’s keep it simple - iPodWizard will make the image compatible, if not pretty, upon “Loading” the image.
When you’re finished, simply save the file and use the iPodWizard “Load Image” button to replace the existing photo in the firmware image. Repeat as desired.
Don’t have time to custom tailor your look graphic-by-graphic? Download one of several pre-made themes (Zip archives of picXX.bmp files) from the iPodWizard forums, easily imported using iPodWizard’s “Load All” button.
How do I send these modifications to the iPod?
First, you need to patch Apple’s updater with the new firmware. To do so, click the “Write” button in iPodWizard. This will simply replace Apple’s firmware with your own. Remember… to restore to an official firmware, you’ll need to re-download and reinstall the iPod Software Updater from Apple’s website.
Next, simply plug in the iPod and use the “Restore” feature in Apple’s iPod Software Updater utility to rewrite the firmware with the modified version. Simple!
However, if you don’t want to “Restore” (losing all your data!), and would rather “Update,” you may find you aren’t able to. The update button only works if the iPod’s firmware version is older than the current version. If your iPod is already up to date, then this will be the case when you go to load your patched firmware. This is the reason for downloading and unzipping the mini-application called “iHack.”
iHack will set the iPod’s firmware version a small amount below its current level before you run the iPod Software Updater, re-enabling its “Update” button. Open iHack (at C:/Program Files/iHack/), and click the “Patch...” button while your iPod is connected to your PC and its disk mode feature is enabled. Select your iPod’s drive letter, and iHack will work its magic. Now run the “Update” utility!
If everything went well, you should have an iPod with modified graphics. If not, try a different firmware from the list above - perhaps you’ve operated on the wrong version.
If anything goes seriously wrong, you may be able to restore from an unmodified, freshly-downloaded iPod Software Updater, but if that doesn’t work, seek help on the iPodWizard forums - you may be out of luck.
Have fun customizing your iPod’s look and feel, but be careful!
Jerrod Hofferth is a Forum Administrator and Contributing Editor to iLounge. An Aerospace Engineering Student at Arizona State University, Jerrod enjoys spending his free time both with his girlfriend of 6 years and 15” Aluminum Powerbook.
From: http://www.ilounge.com/index.php/articles/comments/beginners-guide-to-changing-ipod-graphics/ By Jerrod H